Your
Set up your
ViewPoint toolbar >  Make Appointment or
  Grid Scheduler. (See additional ways to open the Grid Scheduler.)

When you first open your
Choose viewing mode - Click a viewing mode in the

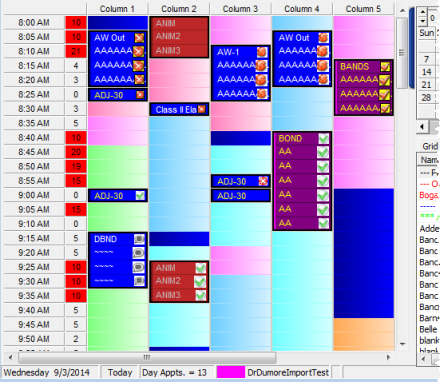
 Day view - Day-view mode shows you a single day's appointments. All appointment activities and events are available from this view.
 Week view - Week-view mode shows a 7-day schedule
 Month view - View your schedule in Month View mode to see a monthly calendar that includes template assignments and scheduling statistics. See "View Monthly Schedule" for details.

Show / Hide Calendar & Grid Bar - The example above does not show the calendar or Grid Bar that appear at the left of your grid screen. You can hide/display these items by clicking the blue bar that appears at the top right of the grid screen. When you click the blue bar, ViewPoint remembers the setting when you exit and return to the Grid Scheduler. In addition, the calendar on/off setting for your Day View screen is independent from your Week View screen. So, you might keep the calendar visible while you are in Day View, but have it turned off while you are in Week View mode so that you can see more of your schedule for that week without scrolling. See "Manage Grid Bar Clipboards, Lists & Notes" for details.
Select date(s) - The date you are viewing is noted near the top of the  Today from the Grid Scheduler toolbar to return to today's schedule.
Choose a date from the calendar.
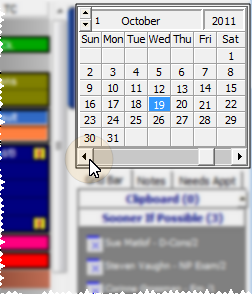
Go to today's schedule.

Navigate using keyboard shortcuts - You can also use several keyboard shortcuts to navigate within your Scheduler. See "Keyboard Shortcuts" for details.
Apply initial template - The first time you open a new date in your
Apply scheduled template - Select Auto to apply the template you have assigned for this day of the week. See "Set Up Schedule Rotation" for details.
Apply a different template - Choose a template, then click
Edit template - Once the date has been opened, you can edit that individual date's scheduling grid if needed.
Filter by doctor, office, assistant -

Select the filter(s) to use.
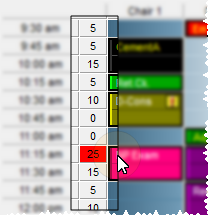
Doctor time - The number that appears between the appointment time and the first column of your schedule indicates the amount of doctor-time currently scheduled for that row. The length of doctor-time is defined for each procedure in your Procedure table. If the column is overbooked, the doctor-time is the sum of all affected appointments. If the doctor-time exceeds the amount of time defined for the appointment cell, the number appears in RED. (See "Set Up Procedure List" for details.)
Notes & appointments board - Use the Notes tab of your Grid Bar to record and review notes for the day, as well as optionally view Office and HR Manager calendar appointments. See "Manage Grid Bar Clipboards, Lists & Notes" for details.
Display kept appointments - (Optional.) Appointments that have been processed as Kept can appear dimmed on your schedule, or can be removed from your schedule entirely. If the appointments appear on the schedule, you can hover over them to view the details and open the patient folder, just as you can with currently scheduled appointments. In addition, the amount of doctor time assigned to that appointment remains visible on your Scheduler. In addition, you can right-click kept appointments to print a School/Work excuse stamped with the current time of day. (You can enable / disable this feature with your Grid Scheduler Properties.)
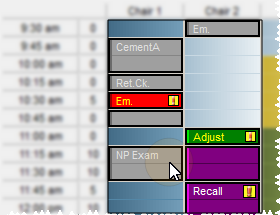
Notifications - Special icons appear on your patients' appointments to notify you of the Appointment Confirmation/Edge Reminders response, current Operatory Display status of the appointment, and optionally a Past Due Notice.
On-Deck Operatory status notifications
 - On-Deck Operatory status is Signed in.
 - On-Deck Operatory status is Seated.
 - On-Deck Operatory status is Exited. (Note this icon's yellow background, which distinguishes it from the Patient Canceled Appointment icon described below.)
Appointment confirmation / Edge Reminders - (Via either Edge Reminders or right-clicking to manually process the confirmation, described below.)
 - Patient confirmed appointment.
 - Patient canceled appointment. (Note this icon's white background, which distinguishes it from the On-Deck Exited icon described above.)
 - Phone reminder was answered by a person or answering machine, but no confirmation choice was made. (It is likely that your office left a message for the patient).
 - Phone reminder was not answered.
 - Patient left a voice message via Edge Reminders. Click the icon to hear the message. You can also hear the message directly from the Edge Reminders Report window. See "Edge Reminders Message History" for details.
 - Reminder attempt failed.
Past Due Notice
 - You can optionally include a past-due notification icon on your scheduler. Use your
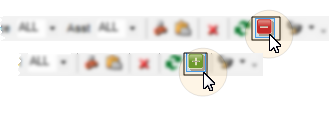
You can quickly toggle the display of Edge Reminders notifications by clicking  or
or  on the Grid Scheduler ribbon bar to toggle the reminders On and Off.
Overbooked cells -

Drag & drop appointments - You can quickly reschedule an appointment by dragging
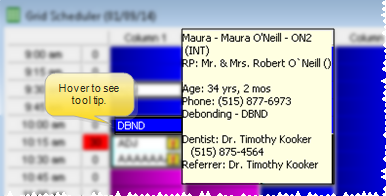
Hover for tooltip - Hover over a scheduled cell to see a tooltip that includes the details about that appointment, such as the patient name,
Activate / work with a patient - Right-click an appointment cell and select Activate. If you activate from a scheduled cell, that patient is now available for you to work with. If you activate from a non-scheduled cell, Fast Find opens for you to select the patient to work with. Once a patient is active, the name appears on the status bar at the bottom of the grid screen. With a patient active you may click a patient-related action on the ViewPoint toolbar. In addition, you can perform several actions for a patient by right-clicking the appointment. (If the cell is overbooked, the right-click menu will show you both patient names. Be sure you select the patient you want to work with.)
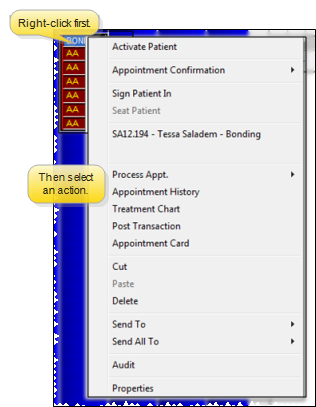
Manual appointment confirmation status - If you do not use Edge Reminders, you can right-click an appointment in your schedule and select Appointment Confirmation. Then choose whether the patient confirmed or cancelled the appointment when you attempted the reminder call. Note the notification icon that appears when appointment confirmation processing has occurred, described above.
Update On-Deck Operatory - You can manage On-Deck patient processing from the Operatory Display or by right-clicking the patient's appointment in the Grid Scheduler or your Light Bar. (See "Update On-Deck Operatory" for details.)
Process appointment - Right-click an appointment in your schedule and select Process Appointment. See "Process Appointments" for details.
Appointment history - View and update the patient's Appointment History. (See "Appointment History" for details.)
Treatment chart - Open the patient's Treatment Chart. (See "View Treatment Chart" for details.)
Post transaction - Open the post transaction window for the patient.
Appointment card - Run an Appointment Card form to generate detailed appointment reminder cards for your patients. The information available for printing
on the card, such as the most recent payment receipt, and a school/work excuse, depends on the style you select. You may also include your office name and address on the form as it prints,
or have your logo pre-printed on special form paper for a more professional appearance.
Cut, Paste, Delete appointment - Use these options to move
a scheduled appointment to another date/time or to a Grid Bar. You will have the opportunity to flag the change in the patient's Appointment History. (You can also simply click the  Delete button on the
Grid Scheduler toolbar to delete the selected appointment.)
Delete button on the
Grid Scheduler toolbar to delete the selected appointment.)
Send to / Send all to - Use these options to move this appointment, or all appointments on this scheduling grid, to a Grid Bar. When you send an individual appointment to a Grid Bar, you can choose to flag the appointment as Changed or Deleted. When you send all appointment from the grid to a Grid Bar, the appointments are flagged as Deleted in the patients' Appointment Histories. (If you have used filters to view the appointments for a certain orthodontist, office or assistant, only those appointments will be affected.)
Audit - Use this option to see who and when the original appointment was scheduled, as well as the operator, date, and time it was changed.
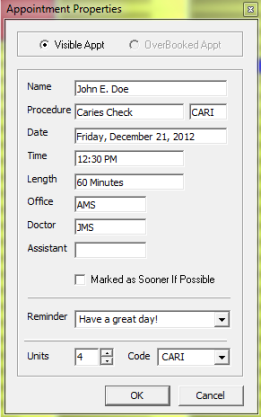
Properties - Use this option to review the appointment details, and to add or change the appointment reminder, procedure, and number of units. In addition, if this appointment is overbooked, you can select it as the visible appointment in the grid.
Schedule an appointment - In addition to using Drag & Drop (described above), you can use
 Refresh - If you leave the Scheduler open for any length of time, click Refresh on the

HR Manager Integration - The number of scheduled patient appointments appears at the top of your HR Manager office calendar for a quick overview of your day. See "View HR Manager Calendar" for details.
 │
│  │
│  │
│ 
Ortho2.com │1107 Buckeye Avenue │ Ames, Iowa 50010 │ Sales: (800) 678-4644 │ Support: (800) 346-4504 │ Contact Us
Chat with Software Support │Chat with Network Engineering │ Chat with New Customer Care
Remote Support │Email Support │ Online Help Ver. 12/18/2015


