Use your Light Bar widget to monitor the doctor's involvement with patient appointments once they have been processed as "seated" in your
ViewPoint Toolbar![]()
 Light Bar.
ViewPoint Shortcut Menu ![]() Add-In > Light Bar. (Or, press Alt+D on your keyboard to open the Add-In menu options.)
Add-In > Light Bar. (Or, press Alt+D on your keyboard to open the Add-In menu options.)
Edit Settings ![]() - Click the
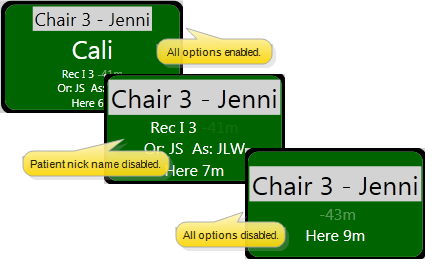
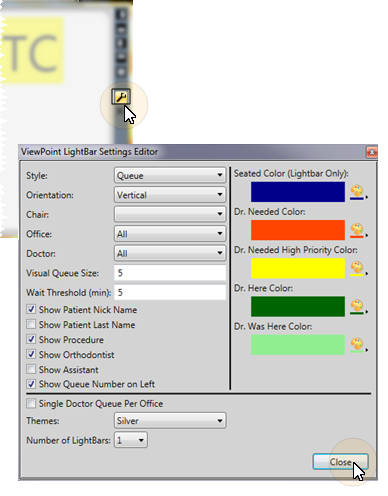
- Click the  Settings option on the light bar tool panel to select which orthodontist / office to view, and to set up how the light bar appears on your screen.
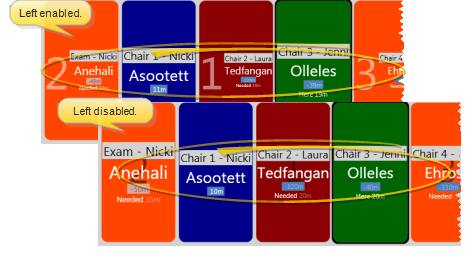
Light Bar Position![]() - Use the positioning buttons on the light bar settings panel to select where the widget appears on your screen; You can dock the light bar at the bottom, top, right, or left of your ViewPoint screen, or float the light bar in its own window that you can drag to any location.
- Use the positioning buttons on the light bar settings panel to select where the widget appears on your screen; You can dock the light bar at the bottom, top, right, or left of your ViewPoint screen, or float the light bar in its own window that you can drag to any location.
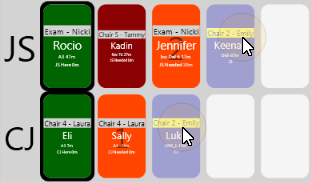
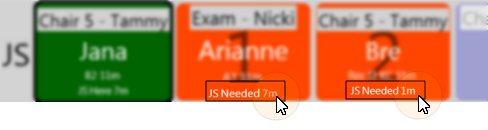
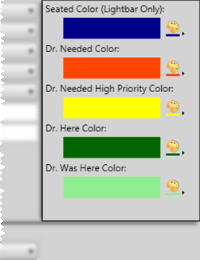
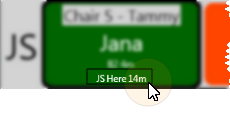
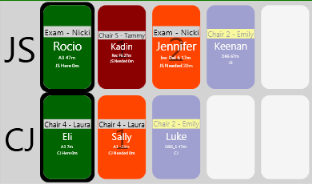
Interpret Light Bar Display![]() - Your light bar widget uses colors, numbers, labels, and flashing to indicate the current status of a patient's appointment activity, and to direct the doctor to the next patient. In addition, when viewing the light bar in queue format, the priority of the appointment determines its place in the list.
- Your light bar widget uses colors, numbers, labels, and flashing to indicate the current status of a patient's appointment activity, and to direct the doctor to the next patient. In addition, when viewing the light bar in queue format, the priority of the appointment determines its place in the list.
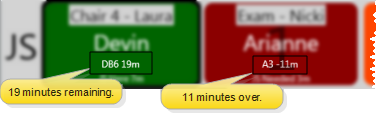
Update Appointment Activity![]() - Right-click an appointment in your light bar, and select an activity to change the color and position of the appointment, as well as accurately track the amount of time patients have spent in each status. (You can also use the keyboard shortcuts to update the appointment activity for the chair you have selected to monitor in your settings window.)
- Right-click an appointment in your light bar, and select an activity to change the color and position of the appointment, as well as accurately track the amount of time patients have spent in each status. (You can also use the keyboard shortcuts to update the appointment activity for the chair you have selected to monitor in your settings window.)
Update Seating Status - Right-click the appointment, then select to Unseat or Checkout the patient. This action results in removing the appointment from your light bar as well as updating your On-Deck Operatory.
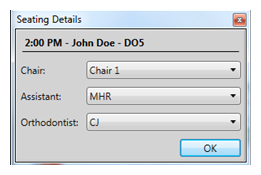
Change Seating Details![]() - Right-click an appointment in the light bar and select Change Seating Details to change the chair, assistant, and/or orthodontist assigned to the appointment.
- Right-click an appointment in the light bar and select Change Seating Details to change the chair, assistant, and/or orthodontist assigned to the appointment.
Exit![]() - Click X in the light bar settings panel to close the light bar.
- Click X in the light bar settings panel to close the light bar.
 │
│  │
│  │
│ 
Ortho2.com │1107 Buckeye Avenue │ Ames, Iowa 50010 │ Sales: (800) 678-4644 │ Support: (800) 346-4504 │ Contact Us
Chat with Software Support │Chat with Network Engineering │ Chat with New Customer Care
Remote Support │Email Support │ Online Help Ver. 12/18/2015


 Single Doctor Queue Per Office option,