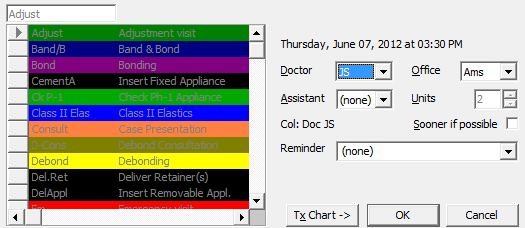
After you select an appointment slot for a patient, you use the Confirm Appointment window to review your appointment choices, make changes to certain parameters, and complete the scheduling process.
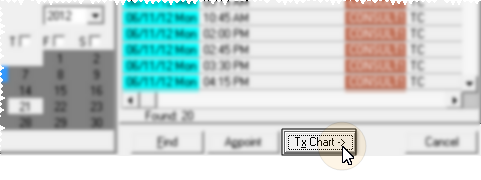
Use Explore or Manual Scheduling to select an appointment slot for a patient.
Procedure, date, & column - The selected appointment date and time, the selected procedure code, and the grid column being scheduled appear for your review. If you are scheduling manually, you can select a different procedure; if you are using Explore, you have already selected a procedure and cannot change it. You cannot change the appointment date, the appointment time, or the column you are scheduling to.
You can change the procedure of a scheduled appointment by right-clicking the appointment in the grid and selecting Properties.
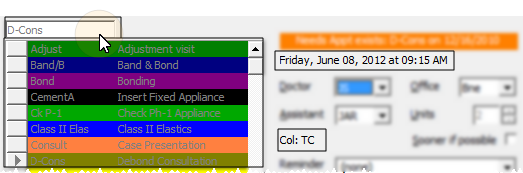
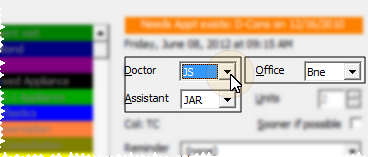
Appointment Alert - An appointment alert will appear if the patient already has an appointment for the procedure being scheduled, or if the patient is on your Needs Appointment grid bar. In this case, when you schedule this appointment, you will have the option of removing the patient from the grid bar.

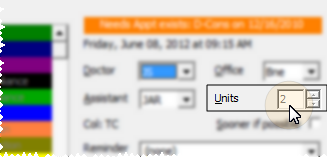
Doctor / office / assistant - These fields indicate the doctor, office, and assistant that will be scheduled for this appointment, If the selected appointment slot has been assigned to a specific doctor, office, or assistant, you cannot change the field. Otherwise, the field defaults to the value in the patient folder, but may be changed if needed.
Units - This field indicates the number of appointment cells that will be scheduled. If you are scheduling manually, you can change this field; if you are using Explore, you have already selected the number of units, and cannot change it.
You can change the number of units of a scheduled appointment by right-clicking the appointment in the grid and selecting Properties.
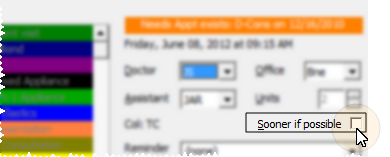
 Sooner if possible - Enable this field to place the patient on your Sooner if Possible grid bar board, where you can easily re-schedule the appointment if an earlier time becomes available. See "Manage Grid Bar Clipboards, Lists & Notes" for details about working with patient on the Sooner if Possible list.
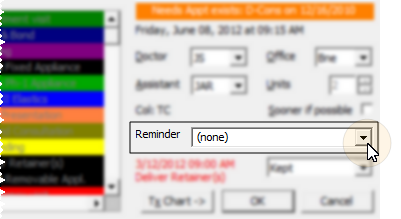
Reminder - To add a reminder to the appointment you may: 1) Select a standard reminder from your Appointment Reminders Table; 2) Type a unique reminder in the Reminder text box, or; 3) Use a combination of both methods by selecting a standard reminder, then editing the text as needed. Reminders appear in the appointment detail, appointment cards and the patient Appointment History. (See "Set Up Appointment Reminders List" for details.)
You can also apply a reminder to a scheduled appointment by right-clicking the appointment in the grid, and selecting Properties.
Process other appointment - As you schedule a new appointment for a patient, you can process previously scheduled appointments directly from the appointment confirmation window.
View Treatment Chart - Click Tx Chart at the bottom of the appointment details screen to toggle viewing the patient's treatment chart information.
Finish - Click Ok to schedule the appointment.
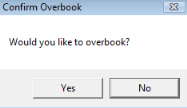
Overbook warning - If this appointment will be scheduled to one or more grid cells that already have an appointment scheduled, you are warned that you are about to overbook. Depending on your Grid Properties setting, you are either prompted to confirm that you want to overbook, or you are prevented from overbooking any cells. See "Set Up Grid Scheduler Properties" for details.
Confirm scheduling conflicts - If this appointment is being scheduled to a grid cell with a different class or column assignment, or if the doctor, office, or assistant do not match those in the patient folder, you must confirm you action before continuing.
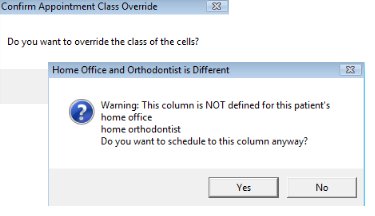
Column / class / personnel warnings - If this appointment is being scheduled to a grid cell with a different class / column assignment, or if the doctor, office, or assistant do not match those in the patient folder, you must confirm you action before continuing.
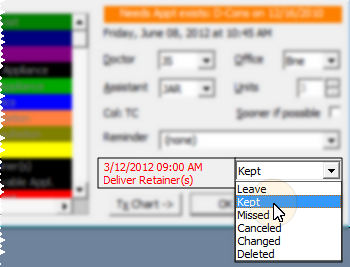
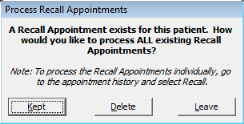
Recall appointment processing - If the patient has one or more recall appointments assigned, you are asked how you would like to process ALL recall appointments assigned to the patient. (If you would prefer to process multiple recall appointments individually, select to Leave the recall appointments as you schedule this appointment. Then go to the Appointment History to process the Recall appointments as needed. See "Appointment History" for details.)
Auto-events - Respond to Auto-Events triggered by to the appointment event, including whether or not to post charges, print letters, define treatment dates, and change the patient's status. See "Set Up Procedure List" for details about setting up Auto-Events.
Respond to milestone reminders -
Alert Stop - If the patient has an alert stop flag for this feature, the alerts box will appear when you initiate this feature for the patient. Review the alert information, then click the box to continue. (See "Patient Alerts" for details.)
Patient reward points - (Optional.) Use the Points for scheduling next appointment while in office field of the patient reward triggers options to enter the number of points to award patients that schedule their next appointment before leaving. These points are awarded when a new appointment is scheduled for a patient that is currently signed into your office. See "Set Up Patient Reward Triggers" for details.
 │
│  │
│  │
│ 
Ortho2.com │1107 Buckeye Avenue │ Ames, Iowa 50010 │ Sales: (800) 678-4644 │ Support: (800) 346-4504 │ Contact Us
Chat with Software Support │Chat with Network Engineering │ Chat with New Customer Care
Remote Support │Email Support │ Online Help Ver. 12/18/2015