Explore to search for openings
and schedule patient appointments.
Explore to search for openings
and schedule patient appointments.Use Explore to search for openings
and schedule patient appointments.
Watch video tutorial. (Windows Media Player, an active Internet connection, and a valid Ortho2 customer login are required to run video tutorials, webinars, and training programs.)
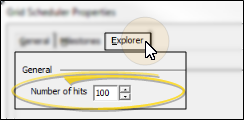
Number of Hits![]() - Use the Explorer tab of your Grid Scheduler properties to specify the maximum number of available appointment slots to list when searching for an appointment with Explore. Keep in mind that the larger the number of hits you allow, the slower your search will become.
- Use the Explorer tab of your Grid Scheduler properties to specify the maximum number of available appointment slots to list when searching for an appointment with Explore. Keep in mind that the larger the number of hits you allow, the slower your search will become.
ViewPoint toolbar >  Make Appointment or
  Grid > Explore. (Click here for additional ways to open the Grid Scheduler.)
Open the Grid Scheduler:

Then initiate Explore:

You can also open Explore by double-clicking a patient name on the Needs Appointment List. (See "Manage Needs Appointment List" for details.)
In addition, you can use the Save & Appoint feature when creating new patient folders to open Explore as soon as the folder is saved so that you can schedule an appointment for the new patient.
Enter your search parameters - Define the type of appointment slot you are looking for.
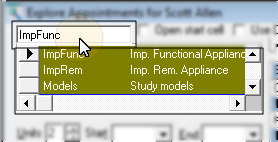
Procedure - Select the procedure you want to schedule for this patient.
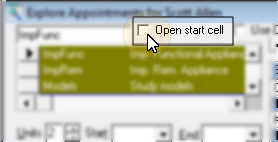
 Open start cell - The Open start cell
option indicates whether you want Explore to search only for openings
that begin with a cell classified
as an Open Start cell. The default
Open start cell setting for this procedure
is maintained in your Procedure Table, but you may enable / disable the field as
needed for individual appointments.
Open start cell - The Open start cell
option indicates whether you want Explore to search only for openings
that begin with a cell classified
as an Open Start cell. The default
Open start cell setting for this procedure
is maintained in your Procedure Table, but you may enable / disable the field as
needed for individual appointments.
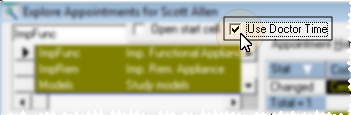
Use doctor time - Enable this option to limit the search to appointment openings with ample doctor time available for the selected procedure. To determine whether sufficient doctor time is available, Explore considers: 1)
Doctor time already scheduled in columns assigned to the doctor specified
for this appointment, AND 2) Doctor time already scheduled in columns not assigned
to any doctor. (You assign your scheduling columns to specific doctors
in your Grid Template editor, and you assign the amount of doctor time allotted for each procedure in your Procedure table.)
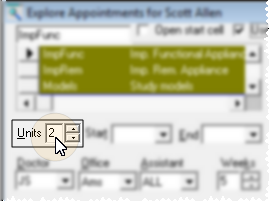
Units - Enter the number of appointment cells to schedule. The actual length of time depends on the time interval represented by each cell. The default units field for each procedure is maintained in your Procedure Table, but you may modify it for individual appointments as needed.
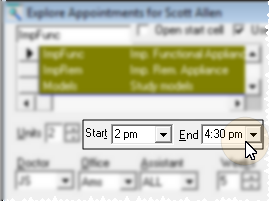
Start / end times - Enter the earliest time to start the appointment in the Start field, and the latest appointment ending time in the End field. To remove a time already entered, click the field, then press the Delete key on your keyboard.
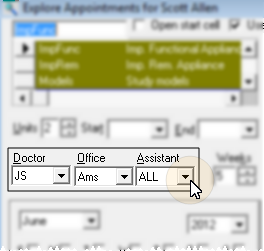
Doctor / office / assistant - Select to search for appointment openings assigned to a specific orthodontist, office, or assistant, or choose to search all open appointment times. Note that when you specify a doctor, office, or assistant, Explore also searches appointment openings that are not assigned to anyone.
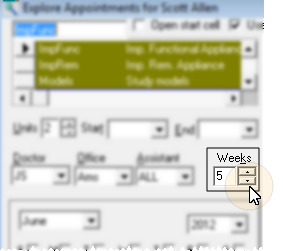
Weeks - Enter the number of weeks from today to begin the search for available openings. You set up the default Weeks to Jump in your Grid Scheduler properties. (See "Set Up Grid Scheduler Properties" for details.)
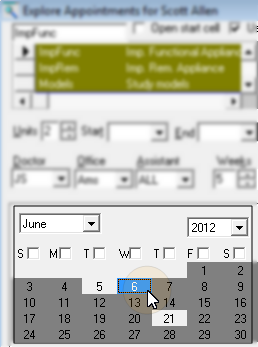
Date - You can optionally use the calendar on the Explore screen to select a specific date to begin searching. The currently selected date is blue. Dates that are colored light gray have grids created, and are ready for scheduling. Dates that are colored dark gray do not have grids created: If you select to schedule to one of these dates, Explore will create the grid for you, using the default template for that day. (See "Set Up Schedule Rotation" for details.)
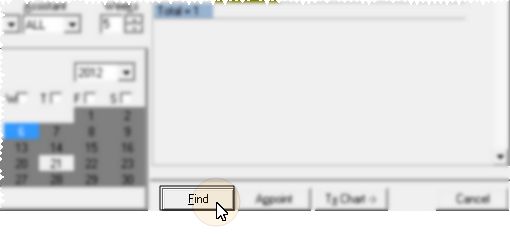
Begin your search - Click Find on the right side of the Explore window to begin searching for available appointment dates and times.
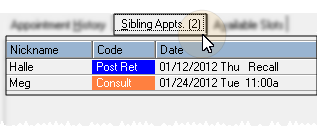
Review patient and family information - Review this patient's detailed appointment history, as well as any appointments that family members currently have scheduled at your office. Click a
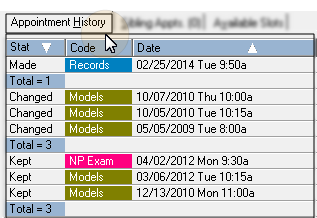
Appointment history - Review currently scheduled appointments, as well as the history of appointments this patient has kept, missed, and changed. You must use appointment processing for this data to be accurate.
![]()
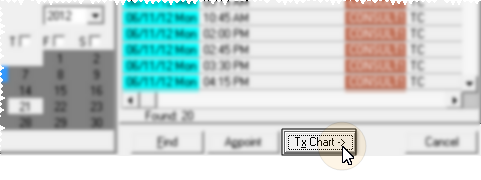
View Treatment Chart - Click Tx Chart at the bottom of the appointment details screen to toggle viewing the patient's treatment chart information.
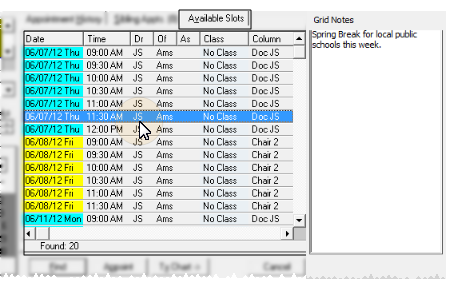
Select an appointment - Select an appointment from the Available Slots window, and click Appoint. Or, double-click the opening. Note that if grid notes exist for the selected date, they appear in the box to the right of the list of available time slots. (See "Manage Grid Bar Clipboards, Lists & Notes" for details about grid notes.)
Confirm appointment - Review the appointment details window, then click Ok to schedule the appointment. (See "Confirm Appointments" for details.)
Respond to milestone reminders -
 │
│  │
│  │
│ 
Ortho2.com │1107 Buckeye Avenue │ Ames, Iowa 50010 │ Sales: (800) 678-4644 │ Support: (800) 346-4504 │ Contact Us
Chat with Software Support │Chat with Network Engineering │ Chat with New Customer Care
Remote Support │Email Support │ Online Help Ver. 12/18/2015


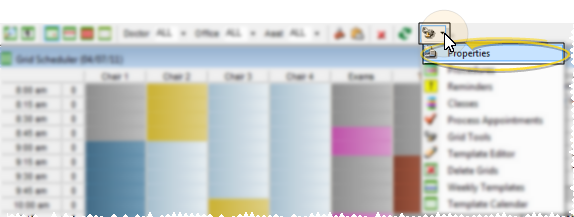
 Grid tools arrow >
  Properties > General. (