Use the Procedure
Watch "Auto Events" video tutorial. (Windows Media Player, an active Internet connection, and a valid Ortho2 customer login are required to run video tutorials, webinars, and training programs.)
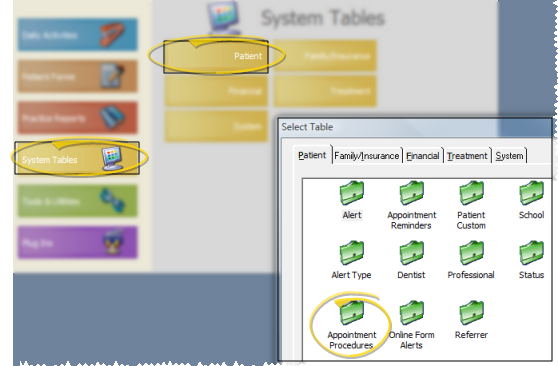
ViewPoint Main Menu - System Tables > Patient > Appointment Procedures.
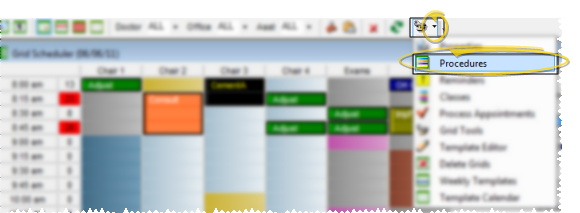
Grid Scheduler Toolbar -  Grid Tools arrow > Procedures.
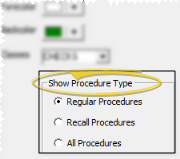
Type of procedure to work with -
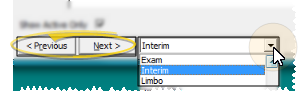
Choose Record to Work With - Use the Previous and Next buttons, or the dropdown button at the bottom of the table window to choose an existing record to work with.
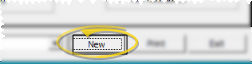
Create New Procedure - Be sure the appropriate procedure type is selected (described above) and click New. Then enter the description and other details, described below. (Note that once created, you cannot change whether the procedure is for Regular or Recall appointments.)
Procedure Details- Define how the selected procedure should be scheduled.

Text - Type the full in-office description for the appointment. This description appears in the scheduler appointment hover and in several areas of the patient folder.
Code - Review and edit the procedure code, if needed.
Units - Enter the number of units to schedule for this procedure. You will notice the Cell Contents fields, described below, are prepared for you according to the length you enter.
Foreground / background colors -Set up the colors that will be displayed when this procedure is scheduled. Before an appointment is scheduled, your grid template displays the colors of the class assigned to that cell (if any). After an appointment is scheduled, your grid template displays the colors of the procedure scheduled to that cell. Thus, you might want to coordinate your classification colors and associated procedure colors. (You set up class colors in your Classes
Start / end times -Enter the earliest and latest times you want to schedule this procedure. These times will be the default when you search for this procedure with
Inactive / active toggle - Once you create a record, you cannot delete it. You can, however, flag it  Inactive. Inactive records cannot be selected for your patients. You can, however, change them back to Active if needed.
Open start - Enable this option to require that the first cell of this procedure be scheduled to a cell flagged as Open Start. (You can flag cells as Open Start in your scheduler templates, and toggle this option as you search for appointments as needed.
Sign-in message - (Optional.) You can choose to display a procedure-specific message when a patient signs into your office.See "Use Patient Sign-In" for details.
Classes (scheduling cells) - Click the Classes field, then select a class of grid cells that this procedure should be scheduled to. If this procedure can be scheduled to multiple classes, you can flag additional classes as needed. If you do not select any classes, Explore will only return appointment cells that have no class assigned to them when you search for a time slot for this procedure. (Use the Class Editor to create your list of classes, and flag cells for certain classes with your Grid Scheduler Template Editor.)
Reminder and Appointment Card Details - Select the reminders to associate with the selected procedure, and define how you want the procedure to appear on your patients' appointment cards.

Appt. reminder - Type a reminder, or select one from your list to print on your appointment day sheet and other internal reference sources. This will be the default reminder for this procedure, but you can change it as you schedule an appointment if needed. (See "Set Up Appointment Reminders List" for details about creating your reminder list.)
Appt. card text - Type a description for the procedure in layman's terms so the patient understands what will be happening.
Appt. card length- Type the appointment length you want to print on the appointment card, which is not necessarily the number of minutes you schedule for the procedure.
Appt. card reminder - Type a reminder, or select one from your list to print on the appointment card.This will be the default reminder for this procedure, but you can change it as you schedule an appointment if needed. (See "Set Up Appointment Reminders List" for details about creating your reminder list.)
Doctor Time Details - Use the Continuation Cell Characters fields to identify when the doctor's presence is required during this procedure. These settings are used for calculating available doctor time in your scheduling grids.
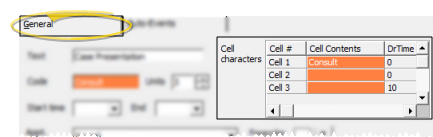
Cell contents - When a procedure requires multiple units of time, you can type the text you want to appear in all but the first cell of the appointment. (The first cell of an appointment always displays the First Cell Contentssetting in your Grid Scheduler Properties.) If you do not enter any text here, the default Continuation Cell Contents setting in your Grid Scheduler Properties will be used.
Dr Time - Enter the number of minutes the doctor is required during each unit of this procedure.
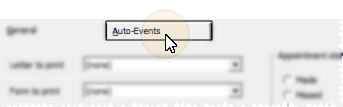
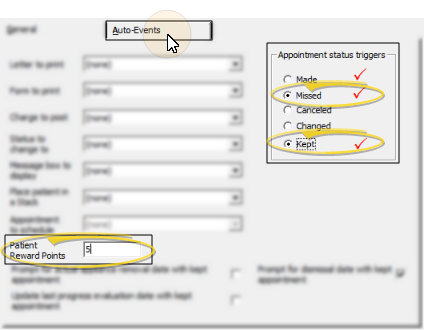
Open the Auto-Events tab for the selected procedure to set up the events, patient reward points, and milestone dates that should occur when you process an appointment for this procedure.
Assign Appointment Events - Select an appointment status trigger, then choose one or more events. You can trigger events when an appointment for this procedure is Made, Missed, Canceled, Changed, Kept or Deleted. Once you have assigned events, a red checkmark appears beside that status.
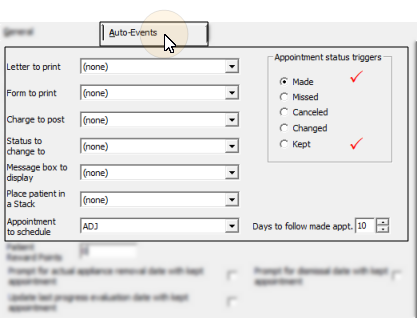
Letter to print - Select the appointment status to work with, then choose the document you want to trigger by that event. You can also select Choose from List to select the letter at the time the auto event is triggered.
Form to print - Select the appointment status to work with, then choose the patient form to trigger by that event.
Charge to post - Select the appointment status to work with, then choose the miscellaneous charge to trigger by that event.
Status to change to - Select the appointment status to work with, then choose the status description to assign to the patient when that event is triggered. You can also select Choose from List to select the status at the time the auto event is triggered.
Message box to display - Select the appointment status to work with, then select the message to trigger by that event. Use the Message Box table to compile standard messages that you can assign to auto events. Each message can contain up to 30 characters. See "Set Up Message Box Descriptions" for details.
Place patient in a stack - Select the appointment status to work with, then select the stack you want to place the patient into when the event is triggered.
Appointment to schedule - Select the appointment status of made, then select the next procedure that should be scheduled for the patient when this procedure is scheduled. You can also then identify the default number of days past the original appointment date to schedule the new appointment.
Assign Reward Points - Select the appointment status to work with (either kept or missed), then enter the number of reward points a patient earns or loses when the auto event is triggered. Enter positive numbers to apply points, and negative numbers to deduct points from the patient's reward point total. For example, you might award 5 points when a patient keeps an adjustment visit, and deduct 5 points when an adjustment visit is missed.
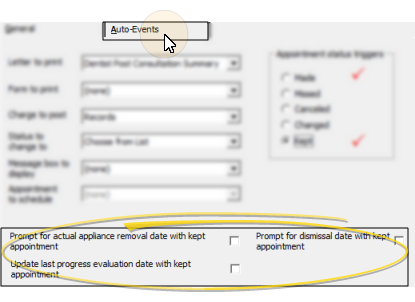
Update Milestone Dates- Enable one or more of the Kept Appointment date options to automatically set the corresponding date in the patient folder to the date you processed an appointment for this procedure as Kept. Note that keeping these dates updated is important for generating accurate results in several system reports.
Print -
Save Changes - Click Exit to the changes you have made and close the editing window.
Print a Procedure List Report - Run a
Assign Workflow Triggers - In addition to assigning workflows to specific procedures, you can use the Trigger editor to assign workflows to any procedure that is processed in a specific manner.
 │
│  │
│  │
│ 
Ortho2.com │1107 Buckeye Avenue │ Ames, Iowa 50010 │ Sales: (800) 678-4644 │ Support: (800) 346-4504 │ Contact Us
Chat with Software Support │Chat with Network Engineering │ Chat with New Customer Care
Remote Support │Email Support │ Online Help Ver. 12/18/2015


