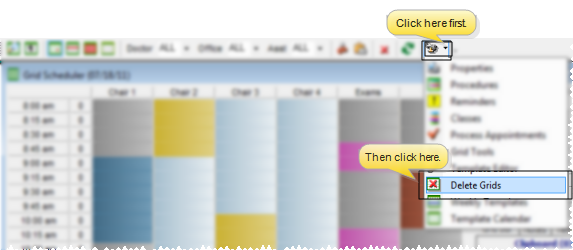
Grid Scheduler > Grid tools arrow >  Delete Grids.
Once a date is past, you no longer need the appointment grid for that date. If you are using the Grid Scheduler correctly, all old appointments are processed off your appointment grids at the end of the day. However, the grid remains as a file in your system, taking up disk space unnecessarily. Regularly deleting these old grids frees disk space and keeps your system tidy.
Grid Scheduler > Grid tools arrow > Delete Grids.
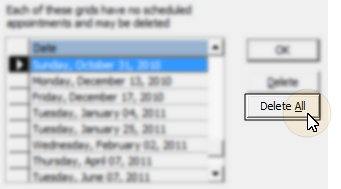
Delete all empty grid files - Select Delete All to remove all unneeded grid files.
Delete individual grid file - Click the bar at the left of the date you want to remove, then click Delete to remove an individual grid file.
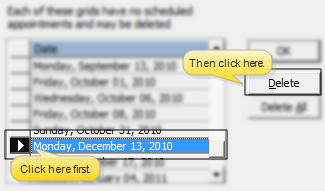
Delete multiple grid files - Click the dates you want to remove, then click Delete to remove all the dates you have selected. Note that in order to select multiple dates, rather than a single date, you must click the dates themselves, and not the bar at the left of the list.
Finish - When you have finished, click Ok to exit the Delete Grids function.
Grids with appointments not deleted - Old grid files with appointments still on them are not deleted. To be sure all old grid files are available for removal, first process appointments, then perform the delete grids function. See "Process Appointments" for details.
Delete grids vs. Delete patient - Do not confuse the Delete Grids function with the  Delete button on the Grid Scheduler toolbar, which provides a way to remove an appointment from your schedule. (See "View & Navigate Your Schedule" for details about deleting scheduled appointments.)
 │
│  │
│  │
│ 
Ortho2.com │1107 Buckeye Avenue │ Ames, Iowa 50010 │ Sales: (800) 678-4644 │ Support: (800) 346-4504 │ Contact Us
Chat with Software Support │Chat with Network Engineering │ Chat with New Customer Care
Remote Support │Email Support │ Online Help Ver. 12/18/2015