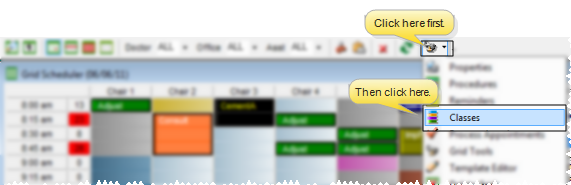
Grid Scheduler toolbar > Grid Tools arrow > Classes.
Use the Classes
Grid Scheduler toolbar > Grid Tools arrow > Classes.
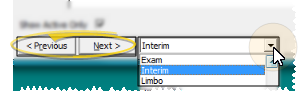
Choose Record to Work With - Use the Previous and Next buttons, or the dropdown button at the bottom of the table window to choose an existing record to work with.
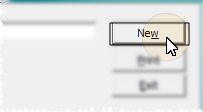
Create new class - Click New. Then enter the description and other details, described below.
Edit class record - Select a class to work with. If you just created a new record, it is selected automatically.
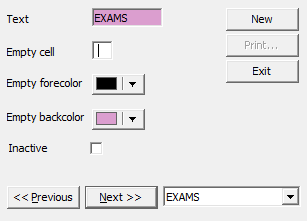
Foreground / background colors - Set up the colors that will be displayed in empty appointment slots. Before an appointment is scheduled, your grid template displays the colors of the class assigned to that cell (if any). After an appointment is scheduled, your grid template displays the colors of the procedure scheduled to that cell. Thus, you might want to coordinate your classification colors and associated procedure colors. (You set up procedure colors in your Procedure
Empty cell - This field contains the text character that displays in grid cells assigned to this class, before an appointment is scheduled (in other words, "empty" appointment time slots). Most offices leave the empty cell character blank, and use colors to differentiate classes.
Inactive / active toggle - Once you create a class, you cannot delete it. You can, however, flag it  Inactive. Inactive classes cannot be added to grid templates.
Procedures in class - This section of the window shows you the procedures that can be scheduled to appointment cells that are assigned to this class. See "Set Up Procedure List" for details about assigning procedures to classes.
Save your changes - Click
Print class list - See "Class List" for details. about printing your list of classes.
"Empty" cell changes - If you change the Empty Cell field, the character displayed in all appointment grids change, too.
 │
│  │
│  │
│ 
Ortho2.com │1107 Buckeye Avenue │ Ames, Iowa 50010 │ Sales: (800) 678-4644 │ Support: (800) 346-4504 │ Contact Us
Chat with Software Support │Chat with Network Engineering │ Chat with New Customer Care
Remote Support │Email Support │ Online Help Ver. 12/18/2015