 Make Appointment or
  Grid from your ViewPoint toolbar. (Or, click here for additional ways to open your Grid Scheduler.)
 Grid Bar Clipboards; Grid Notes; Needs Appointment List; Sooner if Possible List; Old Appointments List.; Office Calendar / HR Manager Appointments
The
Open Your Grid Scheduler![]() - Click Make Appointment or Grid from your ViewPoint toolbar. (Or, click here for additional ways to open your Grid Scheduler.)
- Click Make Appointment or Grid from your ViewPoint toolbar. (Or, click here for additional ways to open your Grid Scheduler.)

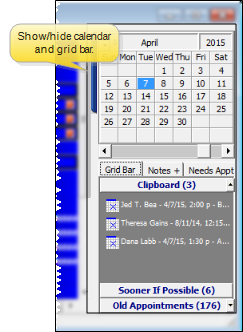
Show / Hide Grid Bar![]() - The grid bar appears on the right side of your Grid Scheduler window: If you don't see it, click the blue toggle bar to display it. You can use the toggle bar to show / hide the grid bar at any time. ViewPoint will remember your most recent setting when you exit and re-open the Grid Scheduler.
- The grid bar appears on the right side of your Grid Scheduler window: If you don't see it, click the blue toggle bar to display it. You can use the toggle bar to show / hide the grid bar at any time. ViewPoint will remember your most recent setting when you exit and re-open the Grid Scheduler.
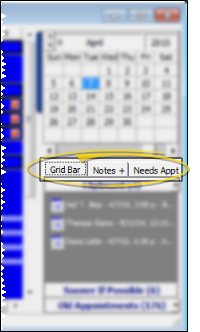
Choose Default Grid Bar Tab![]() - You can select whether you would like the grid bar Clipboard, Notes, or Needs Appointment section to open when you first enter the Grid Scheduler, and whenever you refresh your Grid Scheduler screen. See "Set Up Grid Scheduler Properties" for details.
- You can select whether you would like the grid bar Clipboard, Notes, or Needs Appointment section to open when you first enter the Grid Scheduler, and whenever you refresh your Grid Scheduler screen. See "Set Up Grid Scheduler Properties" for details.
Grid Bar Boards![]() - Click the Grid Bar tab to use your appointment Clipboard, Sooner if Possible list, Old Appointments list, and any user-created boards.
- Click the Grid Bar tab to use your appointment Clipboard, Sooner if Possible list, Old Appointments list, and any user-created boards.
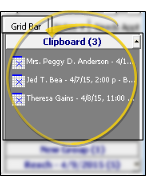
Clipboard![]() - Click the Clipboard grid bar heading to open your appointment clipboard. You can use the Clipboard to temporarily store appointments that you need to reschedule. You can add and reschedule patients from this board as needed, as well as activate patients, open patient folders, review appointment details, process appointments, print the list of patients and hide / show the Clipboard in your grid bar.
- Click the Clipboard grid bar heading to open your appointment clipboard. You can use the Clipboard to temporarily store appointments that you need to reschedule. You can add and reschedule patients from this board as needed, as well as activate patients, open patient folders, review appointment details, process appointments, print the list of patients and hide / show the Clipboard in your grid bar.
Add a Patient - Drag and drop a patient appointment from your Grid Scheduler onto the board, or right-click the patient appointment and select Send To > Clipboard. You have the option of recording the change in the patient's Appointment History.
You can also right-click a patient appointment and select Send All To > Clipboard to move all of the appointments for the selected day to your clipboard. This option does not provide a way to flag the appointment changes in the Appointment History.
Cut & Paste Patient Appointments - Right-click a patient appointment in your Grid Scheduler and select Cut to send the appointment to your Clipboard. You can then right-click a different appointment date / time and select Paste to move the appointment to that time slot.
Activate & Schedule a Patient - Click a patient name in the board to activate the patient in your Grid Scheduler. You can then manually schedule a new appointment, or use Explore to schedule a new appointment for the patient.
Drag & Drop to Schedule - You can drag and drop a patient from the board onto an appointment time slot in your schedule. Any related appointment messages, milestone reminders, and
Open a Patient Folder - Double-click patient name in the board to open that patient's folder.
Review Appointment Properties - Right-click a patient name in the board, and select Properties to display the appointment details, including the patient name, scheduled procedure, appointment date and length, assigned office, doctor, and assistant, and whether the appointment is flagged for the Sooner if Possible board. You can add or change the appointment reminder, if needed, but no other details can be changed from the properties window. When you have finished reviewing the details, click Ok to save any reminder changes and exit.
Process the Appointment - Right-click a patient name in the board, and select the appropriate appointment processing status (i.e. missed or kept). The patient will be removed from the board automatically.
Hide / Show the List - Right-click anywhere on your Clipboard, Sooner if Possible list, Old Appointments list, Rescheduled Appointments list, or a User-Created list and select Hide Group to remove it from your grid bar display. You can also right-click and select Show All Groups to be sure no group is currently hidden. Note that you can only hide one grid bar board at a time.
Print the List - Right-click anywhere on your Clipboard, Sooner if Possible list, Rescheduled Appointments list, or User-Created list and select Print. Then choose the grid bar board you want to print. Or, run a Grid Bar report from your ViewPoint Practice Reports. See "Grid Bar Report" for details.
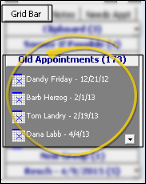
Old Appointments List![]() - Click the Old Appts grid bar heading to open your Old Appointments list. Patients are placed on the Old Appointments list automatically whenever they have an unprocessed appointment in the past. You can activate patients, open patient folders, review appointment details, process appointments, and hide / show the list in your grid bar.
- Click the Old Appts grid bar heading to open your Old Appointments list. Patients are placed on the Old Appointments list automatically whenever they have an unprocessed appointment in the past. You can activate patients, open patient folders, review appointment details, process appointments, and hide / show the list in your grid bar.
Add a Patient - You cannot manually add patients to the Old Appointments list: Patients with unprocessed appointments are added automatically.
Activate & Schedule a Patient - Click a patient name in the board to activate the patient in your Grid Scheduler. You can then manually schedule a new appointment, or use Explore to schedule a new appointment for the patient.
Drag & Drop to Schedule - You can drag and drop a patient from the board onto an appointment time slot in your schedule. Any related appointment messages, milestone reminders, and
Open a Patient Folder - Double-click patient name in the board to open that patient's folder.
Review Appointment Properties - Right-click a patient name in the board, and select Properties to display the appointment details, including the patient name, scheduled procedure, appointment date and length, assigned office, doctor, and assistant, and whether the appointment is flagged for the Sooner if Possible board. You can add or change the appointment reminder, if needed, but no other details can be changed from the properties window. When you have finished reviewing the details, click Ok to save any reminder changes and exit.
Process the Appointment - Right-click a patient name in the board, and select the appropriate appointment processing status (i.e. missed or kept). The patient will be removed from the board automatically.
Hide / Show the List - Right-click anywhere on your Clipboard, Sooner if Possible list, Old Appointments list, Rescheduled Appointments list, or a User-Created list and select Hide Group to remove it from your grid bar display. You can also right-click and select Show All Groups to be sure no group is currently hidden. Note that you can only hide one grid bar board at a time.
Print the List - Right-click on your Old Appointment board and select Print to initiate the ViewPoint Old Appointments report. See "Old Appointments Report" for details.
Sooner if Possible List![]() - Click the Sooner if Possible grid bar heading to open your Sooner if Possible list. As you schedule a patient appointment, you can enable the Sooner If Possible flag to place the patient on your Sooner if Possible list, making it easier for you to fill appointment slots that become open due to cancellations. You can activate patients, open patient folders, view appointment details, process appointments, remove patients from the Sooner if Possible list, and hide / show the list in your grid bar.
- Click the Sooner if Possible grid bar heading to open your Sooner if Possible list. As you schedule a patient appointment, you can enable the Sooner If Possible flag to place the patient on your Sooner if Possible list, making it easier for you to fill appointment slots that become open due to cancellations. You can activate patients, open patient folders, view appointment details, process appointments, remove patients from the Sooner if Possible list, and hide / show the list in your grid bar.
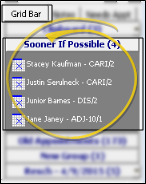
Add a Patient - You add patients to this board by enabling the Sooner if Possible flag as you schedule the patient appointment. You can also enable the Sooner if Possible option from the patient's Appointment History.
Remove a Patient - To remove a patient from the Sooner if Possible board without deleting the scheduled appointment, right-click the patient and choose Remove From Sooner if Possible. The patient is automatically removed from the board when you re-schedule or process the scheduled appointment.
Activate & Schedule a Patient - Click a patient name in the board to activate the patient in your Grid Scheduler. You can then manually schedule a new appointment, or use Explore to schedule a new appointment for the patient.
Drag & Drop to Schedule - You can drag and drop a patient from the board onto an appointment time slot in your schedule. Any related appointment messages, milestone reminders, and
Open a Patient Folder - Double-click patient name in the board to open that patient's folder.
Review Appointment Properties - Right-click a patient name in the board, and select Properties to display the appointment details, including the patient name, scheduled procedure, appointment date and length, assigned office, doctor, and assistant, and whether the appointment is flagged for the Sooner if Possible board. You can add or change the appointment reminder, if needed, but no other details can be changed from the properties window. When you have finished reviewing the details, click Ok to save any reminder changes and exit.
Process the Appointment - Right-click a patient name in the board, and select the appropriate appointment processing status (i.e. missed or kept). The patient will be removed from the board automatically.
Hide / Show the List - Right-click anywhere on your Clipboard, Sooner if Possible list, Old Appointments list, Rescheduled Appointments list, or a User-Created list and select Hide Group to remove it from your grid bar display. You can also right-click and select Show All Groups to be sure no group is currently hidden. Note that you can only hide one grid bar board at a time.
Print the List - Right-click anywhere on your Clipboard, Sooner if Possible list, Rescheduled Appointments list, or User-Created list and select Print. Then choose the grid bar board you want to print. Or, run a Grid Bar report from your ViewPoint Practice Reports. See "Grid Bar Report" for details.
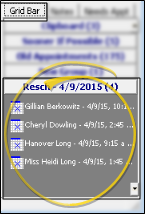
Rescheduled Appointments List![]() - When you assign a new template with the Template Calendar
and the Grid Scheduler is unable to re-schedule certain appointments onto the new template, those appointments are automatically placed on a Rescheduled Appointment board in the Grid Bar tab. The board heading includes the original appointment date. You can add and remove patients from this board as needed, as well as activate patients, open patient folders, review appointment details, process appointments, and hide / show the list in your grid bar.
- When you assign a new template with the Template Calendar
and the Grid Scheduler is unable to re-schedule certain appointments onto the new template, those appointments are automatically placed on a Rescheduled Appointment board in the Grid Bar tab. The board heading includes the original appointment date. You can add and remove patients from this board as needed, as well as activate patients, open patient folders, review appointment details, process appointments, and hide / show the list in your grid bar.
Add a Patient - Patients are added to this list automatically, but you can also drag and drop a patient appointment from your Grid Scheduler onto the board, or right-click the patient appointment and select Send To > Resched. You have the option of recording the change in the patient's Appointment History.
You can also right-click a patient appointment and select Send All To > Resched. to move all of the appointments for the selected day to this board. This option does not provide a way to flag the appointment changes in the Appointment History.
Activate & Schedule a Patient - Click a patient name in the board to activate the patient in your Grid Scheduler. You can then manually schedule a new appointment, or use Explore to schedule a new appointment for the patient.
Drag & Drop to Schedule - You can drag and drop a patient from the board onto an appointment time slot in your schedule. Any related appointment messages, milestone reminders, and
Open a Patient Folder - Double-click patient name in the board to open that patient's folder.
Review Appointment Properties - Right-click a patient name in the board, and select Properties to display the appointment details, including the patient name, scheduled procedure, appointment date and length, assigned office, doctor, and assistant, and whether the appointment is flagged for the Sooner if Possible board. You can add or change the appointment reminder, if needed, but no other details can be changed from the properties window. When you have finished reviewing the details, click Ok to save any reminder changes and exit.
Process the Appointment - Right-click a patient name in the board, and select the appropriate appointment processing status (i.e. missed or kept). The patient will be removed from the board automatically.
Hide / Show the List - Right-click anywhere on your Clipboard, Sooner if Possible list, Old Appointments list, Rescheduled Appointments list, or a User-Created list and select Hide Group to remove it from your grid bar display. You can also right-click and select Show All Groups to be sure no group is currently hidden. Note that you can only hide one grid bar board at a time.
Print the List - Right-click anywhere on your Clipboard, Sooner if Possible list, Rescheduled Appointments list, or User-Created list and select Print. Then choose the grid bar board you want to print. Or, run a Grid Bar report from your ViewPoint Practice Reports. See "Grid Bar Report" for details.
User-Created Boards![]() - In addition to using the Clipboard, you can create additional grid bar boards to temporarily store appointments. You can add and remove appointments from your board, as well as activate patients, review appointment details, and process appointments directly from the board. In addition, you can rename a user-created board at any time, and delete user-created boards, and hide / show the board in your grid bar.
- In addition to using the Clipboard, you can create additional grid bar boards to temporarily store appointments. You can add and remove appointments from your board, as well as activate patients, review appointment details, and process appointments directly from the board. In addition, you can rename a user-created board at any time, and delete user-created boards, and hide / show the board in your grid bar.
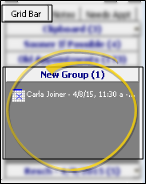
Add a User-Created Board - Right-click anywhere on your grid bar, and select Add New Group. You can optionally name your new board.
Rename a User-Created Board - First, click the board heading to select it. Then right-click anywhere in the board, and select Rename Group. Type a new name for your board and press Enter.
Delete a User-Created Board - You can only delete empty user-created grid bar boards. To do so, first click the board heading to select it. Then right-click anywhere in the board, and select Remove Group. Click Yes to confirm your action.
Add a Patient - You can drag and drop a patient appointment from your Grid Scheduler onto the board, or right-click the patient appointment and select Send To, then select your board name. You have the option of recording the change in the patient's Appointment History.
You can also right-click a patient appointment and select Send All To, then select your board name to move all of the appointments for the selected day to your clipboard. This option does not provide a way to flag the appointment changes in the Appointment History.
Activate & Schedule a Patient - Click a patient name in the board to activate the patient in your Grid Scheduler. You can then manually schedule a new appointment, or use Explore to schedule a new appointment for the patient.
Drag & Drop to Schedule - You can drag and drop a patient from the board onto an appointment time slot in your schedule. Any related appointment messages, milestone reminders, and
Open a Patient Folder - Double-click patient name in the board to open that patient's folder.
Review Appointment Properties - Right-click a patient name in the board, and select Properties to display the appointment details, including the patient name, scheduled procedure, appointment date and length, assigned office, doctor, and assistant, and whether the appointment is flagged for the Sooner if Possible board. You can add or change the appointment reminder, if needed, but no other details can be changed from the properties window. When you have finished reviewing the details, click Ok to save any reminder changes and exit.
Process the Appointment - Right-click a patient name in the board, and select the appropriate appointment processing status (i.e. missed or kept). The patient will be removed from the board automatically.
Hide / Show the List - Right-click anywhere on your Clipboard, Sooner if Possible list, Old Appointments list, Rescheduled Appointments list, or a User-Created list and select Hide Group to remove it from your grid bar display. You can also right-click and select Show All Groups to be sure no group is currently hidden. Note that you can only hide one grid bar board at a time.
Print the List - Right-click anywhere on your Clipboard, Sooner if Possible list, Rescheduled Appointments list, or User-Created list and select Print. Then choose the grid bar board you want to print. Or, run a Grid Bar report from your ViewPoint Practice Reports. See "Grid Bar Report" for details.
Needs Appointment List![]() - The Needs Appointment
- The Needs Appointment
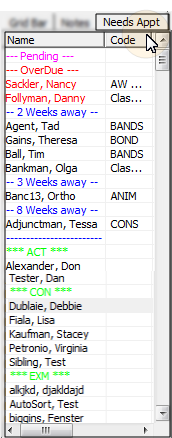
Print the List - You cannot print the Needs Appointment list from the Grid Bar: You must run this report from your ViewPoint Practice Reports. See "Needs Appointment Report" for details.
Notes / Calendar Appointments![]() - Click the Notes grid bar tab to add, edit, and review notes about your day, as well as review appointments scheduled on your Office and HR Manager calendars.
- Click the Notes grid bar tab to add, edit, and review notes about your day, as well as review appointments scheduled on your Office and HR Manager calendars.
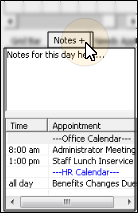
Review Notes - When notes or appointments exist for the current date, a plus symbol ( + ) appears along with the Notes heading. The notes also appear on the Day Sheet Addendum report, and in the list of available time slots when you use Explore to schedule patient appointments.
Add / Edit Notes - Simply type in the Notes box to add or edit your grid bar notes. The notes are specific to the currently selected date in your Grid Scheduler.
Review Calendar Appointments - Appointments scheduled on your Office Calendar, and optionally your HR Manager calendar, appear at the bottom of the Notes tab of your Grid Bar. Each appointment includes the start time, or "all day" notice, and the appointment description. If an appointment spans multiple dates (for example, noting an employee's vacation days), the appointment will appear on each date.
Note that employee time off requests are included in the HR Manager Calendar list once they have been approved; pending requests, and requests that have been denied are not included. (See "Set Up Grid Scheduler Properties" for details about including HR Manager events on your Notes tab.)
Open Office Calendar / HR Manager Module - You can double-click an appointment to open the Office Calendar to that date, or to log into your HR Manager module. In addition, double-clicking the calendar heading, even if no appointments exist, will open your Office Calendar or HR Manager.
 │
│  │
│  │
│ 
Ortho2.com │1107 Buckeye Avenue │ Ames, Iowa 50010 │ Sales: (800) 678-4644 │ Support: (800) 346-4504 │ Contact Us
Chat with Software Support │Chat with Network Engineering │ Chat with New Customer Care
Remote Support │Email Support │ Online Help Ver. 12/18/2015


