Your Grid Scheduler
Your
The way your
You can open your
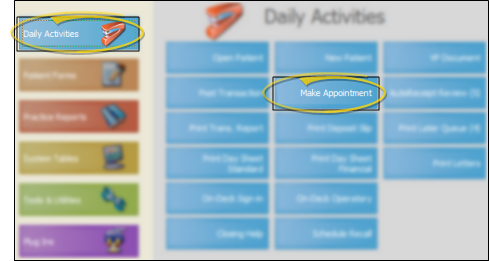

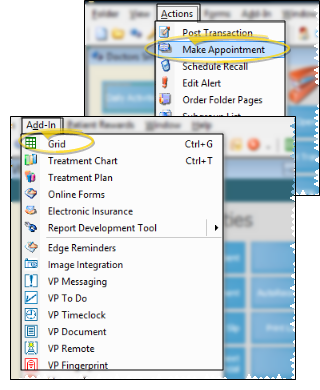
From the ViewPoint shortcut menu, either open the Actions menu (Alt+A) and choose Make Appointment, or open the Add-In menu (Alt+D) and choose Grid.
![]() Scheduling Template - The scheduling template determines the number of columns and rows (i.e. chairs and times) you see on your scheduling screen, and the classifications applied to those chairs and times. The first time you open a new date in your
Scheduling Template - The scheduling template determines the number of columns and rows (i.e. chairs and times) you see on your scheduling screen, and the classifications applied to those chairs and times. The first time you open a new date in your
Apply Scheduled Template - When you open a date for the first time, click Auto to apply the default template you have assigned for this day of the week. See "Set Up Weekly Scheduling Templates" for details about setting up your template defaults.
Apply a Different Template - When you open a date for the first time, you can alternately choose a template from the list, then click
Edit the Day's Template - Once a date has been opened, you can edit that individual date's scheduling grid if needed.
![]() Choose Viewing Mode (Day, Week, Month, List) - When you first open your
Choose Viewing Mode (Day, Week, Month, List) - When you first open your


 Detail
![]() Show / Hide Grid Bar - You can show / hide the Grid Bar and calendar sections of your
Show / Hide Grid Bar - You can show / hide the Grid Bar and calendar sections of your
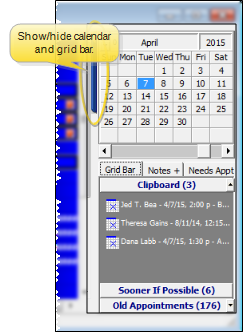
Notes & Calendars Board - Use the Notes tab of your Grid Bar to record and review notes for the day, as well as optionally view Office and HR Manager calendar appointments. See "Manage Grid Bar Clipboards, Lists & Notes" for details.
![]() Apply Filters -
Apply Filters -

![]() Doctor Time Indicator - The number that appears between the appointment time and the first column of your schedule
indicates the amount of doctor-time
currently scheduled for that row. The
length of doctor-time is defined for each procedure in your Procedure
table.
If the column is overbooked, the doctor-time is the sum of all affected
appointments. If the doctor-time exceeds the amount of time defined for
the appointment cell, the number appears in RED. (See "Appointment Procedure Table" for details.)
Doctor Time Indicator - The number that appears between the appointment time and the first column of your schedule
indicates the amount of doctor-time
currently scheduled for that row. The
length of doctor-time is defined for each procedure in your Procedure
table.
If the column is overbooked, the doctor-time is the sum of all affected
appointments. If the doctor-time exceeds the amount of time defined for
the appointment cell, the number appears in RED. (See "Appointment Procedure Table" for details.)
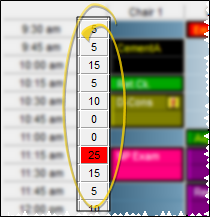
![]() Display Kept Appointments - (Optional.) Appointments that have been processed as Kept can appear dimmed on your schedule, or can be removed from your schedule entirely. If the appointments appear on the schedule, you can hover over them to view the details and open the patient folder, just as you can with currently scheduled appointments. In addition, the amount of doctor time assigned to that appointment remains visible on your
Display Kept Appointments - (Optional.) Appointments that have been processed as Kept can appear dimmed on your schedule, or can be removed from your schedule entirely. If the appointments appear on the schedule, you can hover over them to view the details and open the patient folder, just as you can with currently scheduled appointments. In addition, the amount of doctor time assigned to that appointment remains visible on your
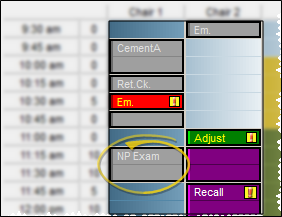
![]() Notifications - Special icons appear on your patients' appointments to notify you of certain situations and events. You can quickly toggle the Edge Reminders notification display whenever you want to.
Notifications - Special icons appear on your patients' appointments to notify you of certain situations and events. You can quickly toggle the Edge Reminders notification display whenever you want to.
![]() Past Due Finances Notification Icon - You can optionally include a notice of past due accounts on your schedule.
Past Due Finances Notification Icon - You can optionally include a notice of past due accounts on your schedule.
You can optionally include a Past Due notification icon on your scheduler. Use your System Settings to enable / disable this feature, and to set up the threshold for the number of days to be considered past due. The icon will only display on an appointment if the patient has a non-insurance contract that is more delinquent than your days past due threshold, AND you have enabled this feature.
![]()
 Patient is Signed in.
 Patient is Seated.
 Patient has been Exited. (Note this icon's yellow background, which distinguishes it from the Patient Canceled Appointment icon described below.)
![]() Appointment Confirmation / Edge Reminders Notification Icons - These icons indicate the confirmation status of the appointment. If you use Edge Reminders, the patients' responses to your reminder messages are entered automatically. Alternately, you can right-click to update the status if needed. (See "Edge Reminders" for details about Edge Reminders messages.) You can quickly toggle the Edge Reminders notification display whenever you want to.
Appointment Confirmation / Edge Reminders Notification Icons - These icons indicate the confirmation status of the appointment. If you use Edge Reminders, the patients' responses to your reminder messages are entered automatically. Alternately, you can right-click to update the status if needed. (See "Edge Reminders" for details about Edge Reminders messages.) You can quickly toggle the Edge Reminders notification display whenever you want to.
Toggle Edge Reminders Icons - Click the  or
or  icon from the
 Patient confirmed appointment.
 Patient canceled appointment. (Note this icon's white background, which distinguishes it from the
 Phone reminder was answered by a person or answering machine, but no confirmation choice was made. (It is likely that your office left a message for the patient).
 Phone reminder was not answered.
 Patient left a voice message via Edge Reminders. You can hear the message from the patient's Appointment History or the Edge Reminders Report window. See "Edge Reminder Message History" for details.
 Reminder attempt failed.
![]() Overbooked Cells -
Overbooked Cells -
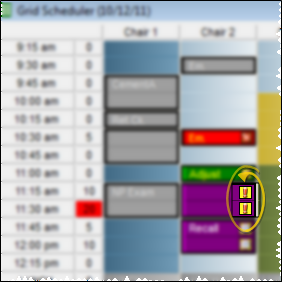
![]() Hover for More Information - Hover over a scheduled cell to see a tooltip that includes appointment details.
Hover for More Information - Hover over a scheduled cell to see a tooltip that includes appointment details.
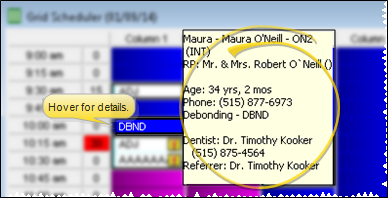
The first cell contents setting in your
Some of the details displayed in the tooltip include the patient name, age, ID number,
![]() Refresh - If you leave the
Refresh - If you leave the  Refresh on the

The date you are viewing is noted near the top of the  Today from the
Choose Date from Calendar - With the
Go to Today - Click the  Today icon in the
You can schedule patient appointments in several ways:
Explore Open Appointments - Use the Explore appointment scheduling tool to search for openings and schedule patient appointments. See "Schedule Appointments with Explore" for details.
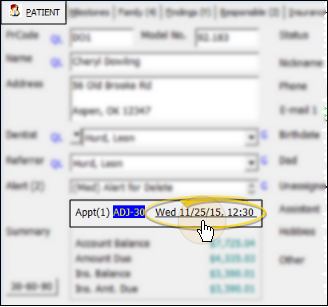
Manually Schedule Appointments - You can double-click an appointment time in your
Drag & Drop Appointments - You can quickly reschedule an appointment by dragging and dropping the appointment to a new time slot that has enough cells available to accommodate the procedure.See "Drag and Drop Appointments" for details.
Schedule Recall Appointments - You can schedule recall appointments for patients that do have not a specific upcoming appointment, such as patients due for annual retainer checks and pre-treatment exams, to help prevent them from falling through the cracks. See "Recall Appointments" for details.
![]() Work With Scheduled Appointments
Work With Scheduled Appointments
Right-click a scheduled appointment to access several actions for the patient, such as updating the
If a cell is overbooked, the right-click menu will show you both patient names. Be sure you select the patient you want to work with.
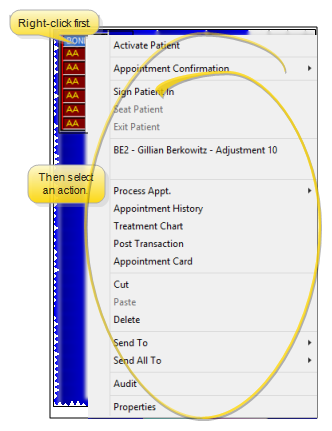
Activate Patient - Right-click an appointment cell and select Activate. If you activate from a scheduled cell, that patient is now available for you to work with. If you activate from a non-scheduled cell, Fast Find opens for you to select the patient to work with. Once a patient is active, the name appears on the status bar at the
bottom of the
Appointment Confirmation - Right-click an appointment in your schedule and select Appointment Confirmation. Then choose whether the patient confirmed or canceled the appointment, if you left a message, or if there was no answer when you attempted the reminder call. (If you use Edge Reminders, the patients' responses to your reminder messages are entered automatically, and you do not need to use this feature very often.)Note the notification icon that appears when appointment confirmation processing has occurred, described above.
Sign In, Seat, Exit Patient - Right-click an appointment, and choose Sign Patient In, Seat Patient, Change Seating Details, or Exit Patient to update the
Process Appointment - Right-click an appointment in your schedule and select Process Appointment. Then choose the appropriate appointment status (i.e. Kept, Missed, Changed.) See "Process Appointments" for details.
Appointment History - Right -click an appointment and choose this option to view and update the patient's Appointment History. (See "Appointment History" for details.)
Treatment Chart - Right-click an appointment and choose this option to open the patient's Treatment Chart. (See "Treatment Chart" for details.)
Post Transaction - Right-click an appointment and choose this option to Open the post transaction window for the patient.
Appointment Card - Right-click an appointment and select Appointment Card to generate an appointment card form for the patient. Run Appointment Card forms to generate detailed appointment reminder cards for your patients. The information available for printing on the card, such as the most recent payment receipt, or a school / work excuse, depends on the style you select. You may also include your office name and address on the form as it prints, or have your logo pre-printed on special form paper for a more professional appearance. In addition, you may choose to email appointment cards to patients and / or responsible parties, rather than printing them. See "Appointment Cards" for details.
Cut, Paste, Delete Appointment - Use these options to move a scheduled appointment to another date / time or to a Grid Bar. You will have the opportunity to flag the change in the patient's Appointment History. (You can also simply click the  Delete button on the
Audit Appointment - Right-click an appointment and select Audit to see who and when the original appointment was scheduled, as well as the operator, date, and time it was changed. You can audit both currently scheduled and kept appointments. (This action is not available from the
Send To - Right-click an appointment and select Send To, then select a grid bar board to move this appointment to. You can choose to flag the appointment as Changed or Deleted in a the patient's Appointment History.
Send All To - Right-click any cell of a scheduling grid and select Send All To, then select a grid bar board to move all of the appointments for the selected day to your board. This option flags the appointment as "Deleted" in each patient's Appointment History. (If you have applied
Audit - Use this option to see who and when the original appointment was scheduled, as well as the operator, date, and time it was changed.
Properties - Use this option to review the appointment details, and to add or change the appointment reminder, procedure, and number of units. In addition, if this appointment is overbooked, you can select it as the visible appointment in the grid.
ViewPoint Videos - Click the  Video button from the
Keyboard Shortcuts - You can also use several keyboard shortcuts to navigate within your
Use the Shortcut Keys link from the
HR Manager Integration - The number of scheduled patient appointments appears at the top of your HR Manager office calendar for a quick overview of your day. See "HR Manager Calendar" for details.


