On-Deck Operatory
Your On-Deck Operatory works in conjunction with your Sign-In module to show you the patients that have signed into your office, the current progress of each appointment procedure, and which patient should be attended next by each assistant and orthodontist. The Light Bar widget further details the patients in your On-Deck Operatory. showing you the doctor's activity within each patient appointment, and accumulating appointment time statistics.
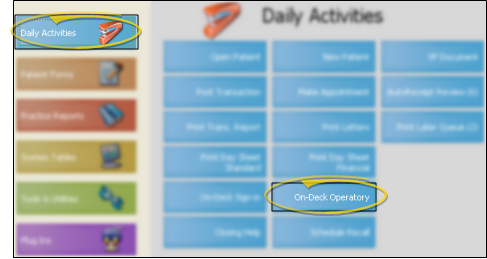
 Open On-Deck Operatory - ViewPoint main menu > Daily Activities > On-Deck Operatory.
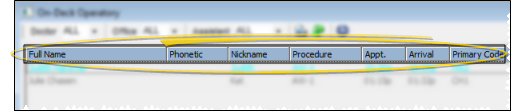
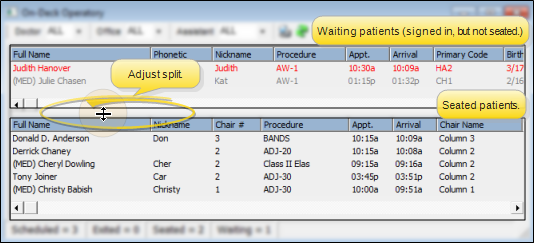
View Operatory Details - The Operatory lists the patients that have signed into On-Deck (described below). You can filter the patients to include, adjust the split between sections (if you are using split-screen mode), and adjust the location and width of the Operatory columns.
Choose Patients to View - Use the Doctor, Office, and Assistant drop down fields to choose to display only certain patients in your Operatory. Or, choose to display all patients that are signed into your office. The doctor / office / assistant used for the Operatory display are those
assigned to your patient appointments, not necessarily the doctor / office / assistant assigned to the Patient tab of the patient folder.
Review Appointment Details - The fields of information and color-coding that appear on
your Operatory display are determined by your On-Deck Properties. If not
all information fits on the screen, use the scroll bar at the bottom of
the window to see more fields. See "Set Up Operatory Display Fields" for details.
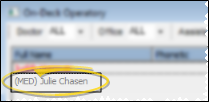
Medical Alerts - A (MED)
notice appears before the patient full name if the patient has a medical
alert. For the medical alert to appear, the patient full name must be selected as a field to view in your On-Deck Properties. (See "Patient Alerts" for details about assigning medical alerts to patients.)
Adjust Split-Screen - If you are viewing the Operatory display in split-screen mode, you can drag the center bar between the two portions of the screen to adjust the
amount of space allotted to each portion. See "Set Up Operatory Display" for details.
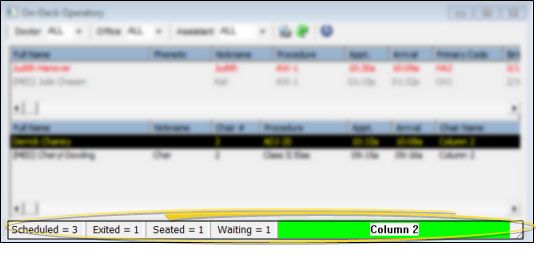
Status Bar -
The status bar at the bottom of your Operatory window summarizes the number of patients scheduled for today,
as well as the number of patients seated, exited and waiting (sign in, but not seated). The chair
number of the earliest appointment you have processed as Doctor
Needed blinks, indicating the patient that needs assistance next.
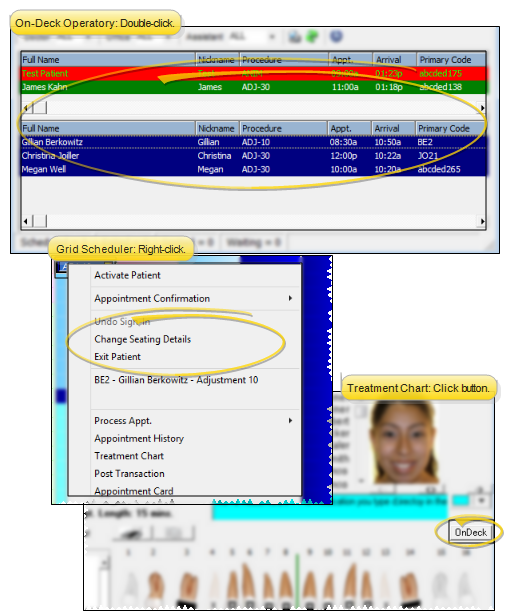
Sign Patients Into On-Deck - Click  Sign-in from the Operatory toolbar to open a window that lists all patients with an appointment scheduled for today. The list includes patients assigned to all doctors, offices, and assistants, regardless of any filters you have applied to your Operatory. Double-click a patient name, or click the name and select Ok to choose the patient that you want to sign into your office. Once you confirm the identity, that patient is added to the Operatory screen.(You can also sign patients into On-Deck from a designated Sign-In station or your Grid Scheduler right-click menu.)

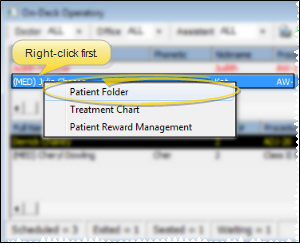
Open a Patient Folder - Select a patient in your Operatory, then right-click and choose Patient Folder to open the patient's record to the Patient tab (See "Patient Tab" for details.)
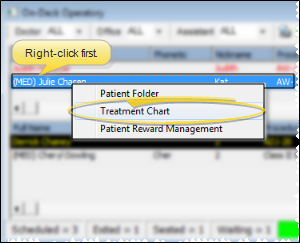
Open a Patient Treatment Chart - Select a patient in your Operatory, then right-click and choose Treatment Chart to open the patient's treatment chart. (See "Treatment Chart" for details.)
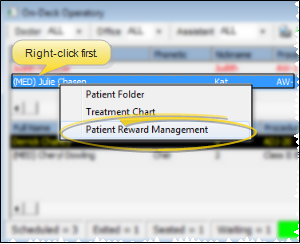
Open a Patient Rewards Window - Select a patient in your Operatory, then right-click and choose Patient Rewards Management to open the Patient Rewards Management window. (See "Manage Patient Rewards" for details.)
Rearrange Headings - Click and drag a column heading to a new location, or click a column heading,
then use the dropdown list to select a different heading name to rearrange your columns. The changes
affect your workstation only, and remain in effect until you manually
change them again. (To return to viewing default information, use Reset Grid from the Waiting, Seated or Classic tab of your On-Deck properties.)
Resize Columns -
Click the edge of a column, and drag to increase or decrease the width.
The column size remains in effect until you either manually change them
again, or use Reset Grid from the Waiting, Seated or Classic tab of your On-Deck properties.
Update On-Deck Status - You update the status of patient appointment progress in your On-Deck Operatory to keep track of the flow of patient appointments, and to accumulate statistics regarding the amount of time the doctor and assistant are with
the patient. In
some offices, patients are processed several times during a single appointment,
indicating orthodontist and assistant attendance. In
other offices, patients are processed only when they sign in, when they are seated, and when they exit your office.
Open On-Deck Operatory Status Window - You can open the On-Deck Operatory status window by double-clicking the patient name in the On-Deck Operatory, right-clicking the patient's appointment in the Grid Scheduler, right-clicking the patient in your Light Bar, or clicking On-Deck from the patient's Treatment Chart.
Update On-Deck Status - Use the tools in the status window to seat patients, request the doctor's attendance, and exit the patient from your office.status.
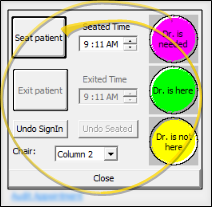
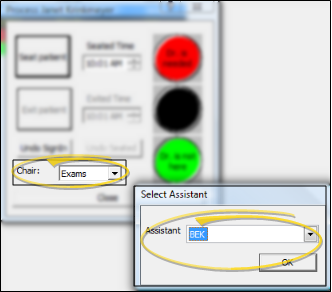
Seat Patient - Use this action when a patient has been escorted to the operatory. Adjust the seated time, if needed, than click the Seat Patient button to apply the status to the patient. You may optionally be able to assign the chair and / or assistant as you seat the patient.
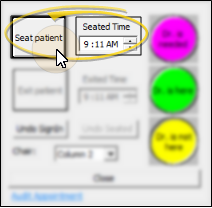
If your On-Deck properties have enabled the "Assign Assistant" and / or "Assign Chair" options, you can select the chair, and be prompted for the assistant at the time you seat the patient. These options are only available if they have been enabled in the General tab of your On-Deck properties. (See "General On-Deck Sign-In Options" for details.)
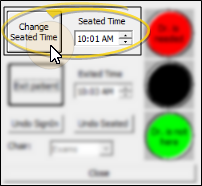
Change Seated Time - To change the seated time after a patient has been seated, first enter the correct time in the Seated Time field, then click the Change Seated Time button. (If you change the time in the Seated Time field, then exit the window without clicking the Change Seated Time button, your changes will not be saved.)
Change Chair / Assistant - You can optionally assign the chair and assistant when you first seat a patient, as described above, if your On-Deck properties are set up to do so. To change the details later, we recommend you use your Light Bar widget. To instead change the chair / assistant from the Operatory, you would first need to undo the patient's seated status (described below), then re-seat the patient with the correct chair / assistant.
Doctor Status Actions - Use the Doctor is Needed, Doctor is Here, and Doctor is Not Here actions to help direct the flow of appointments. (These actions can also be updated from your Light Bar widget.)
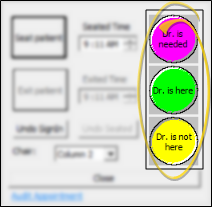
Dr. Is Needed - Use this action when the assistant is finished, and the patient is waiting for the doctor.
Dr. Is Here - Use this action when the doctor begins working with the patient. When you process a patient as Dr is Here, the orthodontist is automatically logged out of any previous appointment. This helps calculate the amount of time a doctor spends with each patient more accurately.
Dr. is Not Here - Use this action when the assistant is actively working with the patient.
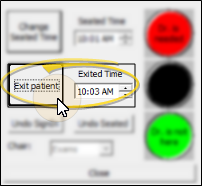
Exit Patient - Use this action when the patient is leaving your office. You can change the time that the patient's appointment was completed, if needed, before you click the Exit Patient button.
If your system is set up to award patient reward points when an appointment is scheduled while the patient is in your office, you will need to schedule that appointment before you process the patient as Exited from your On-Deck system. See "Patient Reward Trigger Editor" for details.
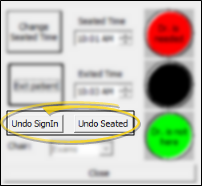
Undo Sign In / Undo Seated - Use these actions to reverse the previous process.
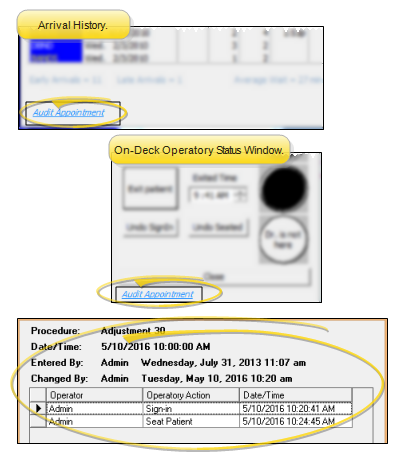
Audit Appointment - Click the Audit Appointment link at the bottom of the On-Deck Operatory Status window or the Arrival History window (or double-click an appointment in the Arrival History), to review the operator, dates, and times that the appointment was processed through your On-Deck system. Click Close when you have finished reviewing the information.
Refresh
Screen - Click  Refresh to update your screen to
the newest information. You can also set up the Operatory display to reload periodically,
according to the Polling settings on the Operatory tab of your On-Deck
properties.
Refresh to update your screen to
the newest information. You can also set up the Operatory display to reload periodically,
according to the Polling settings on the Operatory tab of your On-Deck
properties.

Appointment Timer in Treatment Chart - The Treatment Chart appointment timer keeps track of how long you have until a patient's scheduled appointment time, and how long the appointment has taken so far. If the patient does not have an appointment today, or if the appointment has been processed as Kept, the timer does not appear.) See "Treatment Chart" for details.
Operatory Status in Grid Scheduler - You can see a patient's Operatory appointment status at a glance directly from yourGrid Scheduler screen. See "Your Grid Scheduler" for details.
Operatory Text Hard to Read - If you cannot see the text in your Operatory very well, review the text and background colors of your processing milestones: You may have selected colors that blend together. Try setting the text to white and the background to black. If you can now see the display correctly, you can now adjust the colors to better suit you. See "Set Up Operatory Display" for details.
Only One Section Appears in Operatory - If you can see only part of the patients that have been signed in and / or seated, you may be viewing your Operatory in split-screen mode, and may have adjusted the splitter bar too far up or down, so that you can see only one section of the display. Try dragging the splitter bar to a more accessible location (as described above).
Edit On-Deck Details from Arrival History - You can edit the Arrival, Seated and Exited times in the patient's Arrival History.