Grid Template Tools
Use
You can use Grid Tools as you create or edit templates from the Templates Editor, or to alter the scheduling cells for a specific date.
Create or Edit a Grid Template - Open the Templates Editor from the Grid Tools drop down menu, and select the template you want to work with. Click Edit to open Grid Tools. The name of the template appears at the top of the window. See "Grid Scheduler Templates Editor" for details.
When you edit an existing Grid Template, only new dates assigned to the template will be affected.
Edit a Specific Date - Open your  Grid Tools from the
For most Grid Tools functions, you will first select the cells you want to work with, then apply the text, class, color, or other feature to your template. When finished, you can either click Save to save and exit the template, or click Save As to leave the original template unchanged and create a template with a new name.
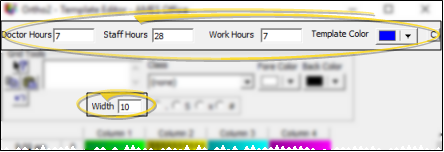
![]() Template Structure Settings - Certain Grid Tools features, including the template color, work hour values, cell width, captions, and column assignments are available only for scheduling templates that you create / edit from the Templates Editor: You cannot change these values for an individual date.
Template Structure Settings - Certain Grid Tools features, including the template color, work hour values, cell width, captions, and column assignments are available only for scheduling templates that you create / edit from the Templates Editor: You cannot change these values for an individual date.
Doctor, Staff, Work Hours - Enter values in these fields to be used for reporting purposes.
Template Color - The template color is used with your scheduler's Month View mode
Width - The cell width determines the maximum number of characters that can display in each time slot. If you define a template with wide columns, you may not be able to view the entire grid on your screen. In this case, you can use a scroll bar at the bottom of the window to view additional columns.
Column Assignments and Row Captions - Right click a row heading (i.e. 8:00 am) to edit the caption, or right-click a column heading (i.e. Chair 1) to review or change the current doctor, office, and assistant assignments, or to edit the caption. Any appointments scheduled to existing dates that use this template will be updated to the new assignments. (You can review existing assignments while editing a template for an individual date, but you can only change assignments and edit captions while creating or editing templates from the Templates editor.)
![]() Cell Settings - Use the icons and fields in the Grid Tools toolbar to classify. color, and add text to individual grid cells. You can apply these features to templates that you create / edit templates from the Templates Editor, and to templates for a specific date.
Cell Settings - Use the icons and fields in the Grid Tools toolbar to classify. color, and add text to individual grid cells. You can apply these features to templates that you create / edit templates from the Templates Editor, and to templates for a specific date.

Text - You can change the text that appears in unscheduled time slots. You might do this, for example, to identify the time of staff meetings or inservice presentations. Select the cells to work with, then use the "text" field to type whatever you want to see in the cell(s). Once an appointment is scheduled in that time slot, your text is replaced with appointment information.
Click an individual cell you want to work with. You can also click the first cell, then press your Shift key while you click the last cell of a consecutive group, or press your Ctrl key while you click additional individual non-consecutive cells. (If you plan to paste properties copied from other cells in this template be sure to select the width and length of cells you need.)
Class - Select the cells to work with, then choose the class you want to assign . You create and maintain your scheduling classes with the Classes editor, and specify which appointments should be scheduled to classified time slots with
Click an individual cell you want to work with. You can also click the first cell, then press your Shift key while you click the last cell of a consecutive group, or press your Ctrl key while you click additional individual non-consecutive cells. (If you plan to paste properties copied from other cells in this template be sure to select the width and length of cells you need.)
![]() Status - Select the cells to work with, then choose the status you want to assign.
Status - Select the cells to work with, then choose the status you want to assign.
Click an individual cell you want to work with. You can also click the first cell, then press your Shift key while you click the last cell of a consecutive group, or press your Ctrl key while you click additional individual non-consecutive cells. (If you plan to paste properties copied from other cells in this template be sure to select the width and length of cells you need.)
Open Start - Apply the Open Start status if you want appointments to begin with this cell. When you use
Restricted - Apply the Restricted status if you prefer not to schedule in this cell. If you select a Restricted cell for a patient appointment, you must confirm the choice to continue.
Prohibited - Apply the Prohibited status to cells that cannot be scheduled with patient appointments. You might apply the Prohibited status to cells that occur during a weekly meeting, or to chairs that are not available during a portion of your working day.
Although you may use your Grid Properties to select a different character to display in these cells, your Grid Tools toolbar will always identify them as shown above. See "Grid Scheduler Properties" for details.
Colors - Select the cells to work with, then choose the colors you want to assign .
Color Overrides Classification - Manually changing the color of classified cells will cause the classification to be ignored by your scheduler.
Click an individual cell you want to work with. You can also click the first cell, then press your Shift key while you click the last cell of a consecutive group, or press your Ctrl key while you click additional individual non-consecutive cells. (If you plan to paste properties copied from other cells in this template be sure to select the width and length of cells you need.)
![]() Copy, Paste, Undo Cell Properties - After applying one or more properties to grid cells, you can copy / past those properties to other cells.
Copy, Paste, Undo Cell Properties - After applying one or more properties to grid cells, you can copy / past those properties to other cells.
Select the cells to work with, the, then use the icons or use keyboard shortcuts to Copy( Ctrl+C) and Paste (Ctrl+V) those properties to other cells in the same template, or a different template. In addition, you can click Undo(or press Ctrl+Z on your keyboard) to reverse your last editing action.
When you paste a group of cells to a new location or a new template, the upper-left cell that you copied is placed at your cursor location, and the remaining cells that you copied are placed correspondingly. If you have selected a location that cannot accommodate all the cells you copied, none of the cells are pasted.
Click an individual cell you want to work with. You can also click the first cell, then press your Shift key while you click the last cell of a consecutive group, or press your Ctrl key while you click additional individual non-consecutive cells. (If you plan to paste properties copied from other cells in this template be sure to select the width and length of cells you need.)
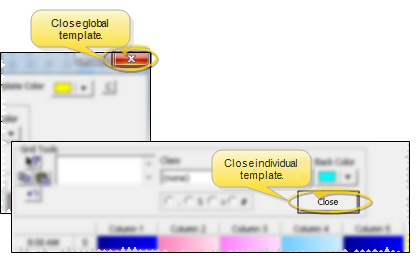
![]() Save Changes - If you have been working on a template in the Template Editor, click the X in the top-right corner of the window to save your changes and exit. If you have made template changes to an individual date, click the Close button to save your changes and return to your schedule.
Save Changes - If you have been working on a template in the Template Editor, click the X in the top-right corner of the window to save your changes and exit. If you have made template changes to an individual date, click the Close button to save your changes and return to your schedule.


