Use the Enter Payments option of the Post Transaction window, and select the Credit Card method to post credit card receipts to patient accounts. Then, you can either process the payments manually, or integrate through one of several electronic credit card processing providers.
Not posting a credit card payment? Click these links for information about posting cash, debit card,or auto receipt payments.
Get Started
Set up Financial Processing Integration - ViewPoint integrates with certain payment processing providers to automate your credit card and ACH electronic withdrawal transactions. Refer to the appropriate details for specific information about your integration provider:
If you do not use an integrated credit card processing provider, you can post credit card payments to ViewPoint patient accounts, but you will also need to then process the credit card transaction manually.
Use This Feature
Open the Post Transaction Window You can open this feature in multiple ways: Use the method that's most convenient for you. If a patient folder is not already open, you will use Fast Find to choose the patient
to work with. Otherwise, ViewPoint will default to working with the currently selected patient.
ViewPoint main menu Daily Activities > Post Transaction.
ViewPoint Toolbar Post Transactions.
ViewPoint Shortcut Menu Actions > Post Transaction. (Or, press Alt+A on your keyboard to open the Actions menu options.)
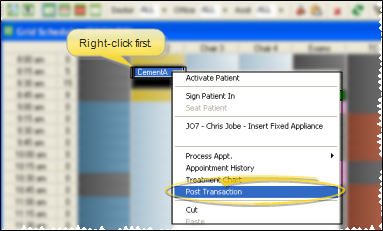
Grid Scheduler Right-click appointment > Post Transactions.
Patient Fingerprint - You can enable patients to open the post transactions window when they touch the fingerprint sensor installed at your workstation. See "Set Up ViewPoint Properties" for details.
Select Patient and Billing Party Choose the account to work with. If needed, you can launch Fast Find and choose a different patient. If the patient has multiple responsible parties and/or contracts, select the account holder and contract as well.
If the contract you want
does not appear,enable the All
Phases option to be sure you are viewing all accounts associated with this patient. In addition, the AR column at the far right of the post transactions window indicates whether the contract is set up with an Auto Receipts agreement, and the doctor and office assigned to the patient folder are displayed at the bottom of the list.
Payment Details Enter the payment date, amount, credit card method, description, and credit card processing provider.
Doctor / Office - The doctor and office that will be credited with this payment appear at the left of the transaction details. Confirm that these are correct before continuing.
As you log into ViewPoint, you may select your office location. Any receipts you post will be credited to that office, regardless of the office assigned to the patient folder. If you do not select a location as you log in, receipts you post are credited to the patient's home office. In addition, receipts are always posted to the orthodontist currently assigned to the patient folder.
Date - The transaction date defaults
to the posting date. To change the transaction date, you must have full access to the Transaction
Date option of the Patient section
of your security group rights. ( See "Set Up Security Access" for details.) If you are allowed to select another date,
you are asked to confirm your choice before posting the transaction.
Amount - The default is the contract amount due, but you can change it if needed.
Method - Select Credit Card. (Not posting a credit card payment? Click these links for information about posting cash, debit card,or auto receipt payments.)
Debit cards may be processed as credit card transactions if you do
not have a pinpad device, or if you use Element or Vanco integration: If you do have a pinpad device, and you use the X-Web (X-Charge) integration, you may use
the debit card payment method instead. See "Post PIN Debit Card Payments" for details.)
Description - Enter an appropriate description; be sure you do not type the credit card number in this field!
VP Credit Card Integration If ViewPoint finds any supported credit card processing integrations, they will be listed below the Description field; if you use more than one type of integration, select the appropriate option; otherwise the single available option will be selected by default. If you do not select an integration option, ViewPoint
will post the payment to the patient account, but you will have to process
the credit card transaction manually.
Post the Transaction - Click Post. ViewPoint calculates the new account balance and amount due, and asks you to confirm the transaction. Click Yes to complete the process, or click No to exit without posting the transaction.
Transaction Processing - If you are not using an integrated credit card payment processing service, you now need to manually process the transaction. Otherwise, if you are using an integrated service, continue with the following instructions:
Process Credit Card Details If you have selected to use a VP Credit Card Integration option, a Post Credit Card window appears. You can 1) Select to use the default credit card details that have been previously saved in the responsible party record; 2)
Swipe the credit card to use or; 3) Enable the Manual Credit Card Entry option at the bottom of the window to type the details.
If you are posting a credit card payment for an insurance account, you must either swipe the card, or use manual data entry: You cannot use credit card data stored in the associated responsible party record.
(Your credit card window may look different than our example below, depending upon which integration you are using.)
Post Authorization / Verbal Authorization - Enable this option if you must call the credit card company
to pre-authorize the charge. This is something that is occasionally requested
by a credit card company when there has been questionable or unauthorized
use of the card in the past.
Store Credit Card Information - Enable this option to automatically
transfer this credit card data to the responsible party tab of the patient folder, overwriting any previous credit card data. Note that the transaction must be successfully completed before the data is saved in the patient folder. (This feature is non-functional when posting to an insurance record.)
Post Credit Card Transaction- When you are satisfied with the credit card details, click Post at the bottom of the window.
Obtain Signature - If you use VP
Signature,
ask the client to sign on the E-Pad
device. If
you do not use VP Signature, the receipt dialog opens, and you will obtain
the client signature manually once the receipt is printed.
If
you do NOT use VP Signature, you may select from receipts labeled
"CC".
With these
receipts, two copies are generated when you click Print:
One for the responsible party to sign and return to you and one for them
to keep.
If you DO use VP Signature, you may select from receipts labeled "CCE".
These receipts expect to use the VP Signature ePad field that you were
prompted for as the transaction was being processed. One
copy of the signed receipt is printed for the cardholder’s records; a
second signed “copy” is stored in the patient’s Correspondence History.
More Information
Canceled Transaction Warning - For safety when posting, ViewPoint displays a warning when you click
No to cancel a credit card transaction.
Prior Transaction / Running Total The last posted transaction (either miscellaneous charge or payment) appears on the Post Transaction window, as well as the running receipt total. The running total is the total of all payments you have posted during this Post Transactions session. Any charges you post during this session do not affect this total. The running total is cleared when you exit and re-enter the Post Transactions window.
Ledger - Click the Ledger button at the bottom - left of the Post Transaction window, or press Alt+L on your keyboard, to
go to the patient's
financial ledger.
See "Patient Ledger" for details.
Notepad - Click the
Notepad button at the bottom - left of the Post Transaction window, or press Alt-N on your keyboard, to go to the patient's notepad. See "Use Notepads" for details.
Post Refund - Use the Post Refund feature to easily and effectively return money to a responsible party, or transfer overpaid funds to another patient contract.See "Post Refunds" for details
OOPS! - If you post a payment
in error, you must reverse
it properly to preserve the integrity of your accounting audit system. See "Reverse A Transaction" for details.
 Manual Credit Card Entry option at the bottom of the window to type the details.
 │
│ 


