Doctor / Office - The doctor and office that will be credited with this payment appear at the left of the transaction details. Confirm that these are correct before continuing.
As you log into ViewPoint, you may select your office location. Any receipts you post will be credited to that office, regardless of the office assigned to the patient folder. If you do not select a location as you log in, receipts you post are credited to the patient's home office. In addition, receipts are always posted to the orthodontist currently assigned to the patient folder.
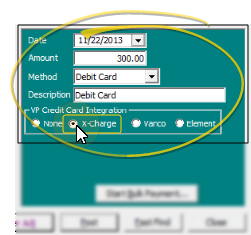
Date - The transaction date defaults
to the posting date. To change the transaction date, you must have full access to the Transaction
Date option of the Patient section
of your security group rights. ( See "Set Up Security Access" for details.) If you are allowed to select another date,
you are asked to confirm your choice before posting the transaction.
Amount - The default is the contract amount due, but you can change it if needed.
Method - Select Debit Card. (Not posting a PIN debit payment with the X-Web (X-Charge) integration? Click these links for information about posting cash, credit card, or auto receipt payments.)
Description - Enter an appropriate description; be sure you do not type the debit card number in this field!
VP Credit Card Integration If ViewPoint finds any supported credit card processing integrations, they will be listed below the Description field. Be sure the X-Charge option is enabled. If you do not select the X-Charge integration, ViewPoint
will post the payment to the patient account, but you will have to process
the debit card transaction manually.

 │
│ 


