Type free-form notes in patient folders as well as and dentist, referrer and insurance company records.
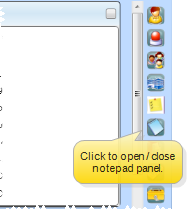
Note that the  Notepad icon is red unless the active record has notes already entered into it.
Patient notepad - ViewPoint toolbar > Notepad. Note that the icon is red, unless you have opened a patient folder that already contains notes. You can also open the notepad from the View shortcut menu options.
Dentist, referrer, professional, insurance company notepad - Open record > Notepad.
Employee notepad - Open HR employee record >  Notepad panel. See "View Employee Record" for details.
Because ViewPoint takes you to the top of the notepad page first, we suggest adding new notes to the top of the page so that the most recent information appears first.
Select page to work with - Click a tab at the bottom of the notepad to choose which page to work with. With the exception of the Patient History Notes page, you can then simply type your text to add a note. If a tab contains text, a [+] symbol appears beside the tab caption. (See "Set Up Notepad Tab Captions" for details about naming the pages.)
Add web address - In addition to regular text, you can type a URL (Internet address) into your notepad. Then, simply click the link to open that web page (active Internet connection required).
Patient History Notes - (Patient notepad only.) Click the Pat. Hist. Notes tab of a patient's notepad, then right-click to insert or delete a note from this page. The notes that appear on the Pat. Hist. Notes tab appear on the Complete Patient History form, and optionally the patient's Treatment Chart. Note that you can also insert and delete notes directly from the Complete Patient History form window, and add notes from the patient's Treatment Chart.
Overwrite prevention - To help prevent unintentional overwriting of your notes, if the notepad is updated by another user, the current user is informed about the change and allowed to review and save the changes. On saving the notepad data, ViewPoint checks to verify that the notes have not been updated by another user, while the current user was changing it. If the notes were updated, the user is provided with an option of reviewing the updated notes and changing it, before either committing it to the database or rejecting their own changes.
If the conflict cannot be resolved, the original and changed text are both stored in a text file (NOTES.TXT) that you can find in your ViewPoint directory.
Resize - You may resize the notepad to suit your needs. To do so, hover your cursor at the edge of the notepad until the resizing arrows appear. Then click and drag the edges to the appropriate size. Your notepad will remain that size until you choose to change it again.
Toolbar - Use the notepad toolbar to enhance text, as well as re-do and undo your last action.
 Cut - Highlight the text
you want to remove, then click Cut (or press Ctrl+X on your keyboard, or right-click and choose Cut.)
Cut - Highlight the text
you want to remove, then click Cut (or press Ctrl+X on your keyboard, or right-click and choose Cut.)
 Copy - Highlight the text you want to copy, then click Copy (or press Ctrl+C on your keyboard, or right-click and choose Copy.) The text is placed in your clipboard, ready to be pasted to another location in your notebook, or used in another application, such as an e-mail message.
 Paste - Position your cursor, then click Paste (or press Ctrl+V on your keyboard, or right-click and choose Paste) to insert the most recently cut or copied text at that location.
While you can copy and paste text among multiple patient notepads, you can also use the Notepad Subgroup feature to add text to multiple notepads simultaneously.
 Print - Click Print (or press Ctrl+P on your keyboard) to send the contents of the currently active notepad tab to any printer available to your workstation.
Add / remove bold - Select the text to work with, then click ![]() Bold (or press Ctrl+B on your keyboard, or right-click and choose Bold.)
Bold (or press Ctrl+B on your keyboard, or right-click and choose Bold.)
Add / remove italic - Select the text to work with, then click ![]() Italic (or press Ctrl+I on your keyboard, or right-click and choose Italic.)
Italic (or press Ctrl+I on your keyboard, or right-click and choose Italic.)
Add / remove underline - Select the text to work with, then click ![]() Underline (or press Ctrl_U on your keyboard, or right-click and choose Underline.)
Underline (or press Ctrl_U on your keyboard, or right-click and choose Underline.)
 Color - Select the text to work with, then click
  Color (or right-click and choose Color) and choose the color to apply to the text. You can also modify the color when you choose a font, described below.
 Font - Select the text to work with, then click Font (or right-click and choose Font) and choose the typestyle and/or color to apply to the text. Be sure you select a font that is available to everyone in your network, or or the text may not display correctly on some workstations.
 Undo /
  Redo - Click Undo (or press Ctrl+Z on your keyboard) to erase the most recently completed action, or Redo (or press Ctrl+Y) to reverse the last Undo.
 Reload - Click Reload to discard any changes you have made since entering the notepad.
![]() Save and exit - Click
Save and exit - Click  Exit to save any changes you have made, and exit the notepad.
Date stamp - Click  Date Stamp (or press F2 on your keyboard) to insert the current date and user's initials at the cursor location.
 Tab caption editor - Click Tab Caption Editor to edit the name of your notebook pages. (See "Set Up Notepad Tab Captions" for details.)
Changes are permanent - As soon as you exit the notepad, all changes are permanently saved: You cannot reload old notes that you have modified or removed.
Converted notes - If you converted to ViewPoint from another orthodontic practice management system, certain information from your original patient records such as additional comments and history comments may have been converted to your patient notepads automatically.
Notepad subgroups -Use the
 │
│  │
│  │
│ 
Ortho2.com │1107 Buckeye Avenue │ Ames, Iowa 50010 │ Sales: (800) 678-4644 │ Support: (800) 346-4504 │ Contact Us
Chat with Software Support │Chat with Network Engineering │ Chat with New Customer Care
Remote Support │Email Support │ Online Help Ver. 12/18/2015


