You need only a minimal amount of information to create a new patient folder, so you can track patients from the very first time they call your office. Note that once saved, you cannot delete a patient folder from your
Promote Record Option - If the new patient already has a sibling or responsible party record associated with an existing ViewPoint patient, we strongly recommend you use the Make Patient tool from the Family tab of the associated patient folder to promote the existing record to a patient, instead of creating it from scratch. See "Patient Folder Family Tab" for details.
Download Online Form Option - If you request that new patients complete an online form before coming to your office, you can download their information directly into a new patient record. See "Download & Link Online Form Results" for details.
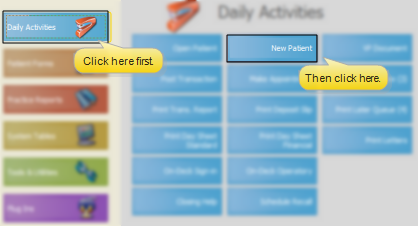
ViewPoint Main Menu - Daily Activities > New Patient.
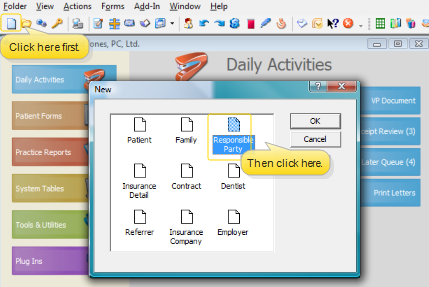
ViewPoint Toolbar -  New > Patient.
ViewPoint Shortcut Menu - Folder > New > Patient. (Or, press Alt+F on your keyboard to open the Folder options.)
Keyboard Shortcut - Ctrl+N > Patient.
General Navigation - Press Tab on your keyboard to go forward through all the fields, or Shift-Tab to go backwards through the fields of your new patient folder in sequence. You can also click on a specific field, or use the Alt key plus the underlined letter of the field label to go directly to that field. (For example, you can press Alt+h to go to the patient's phone number field.)
Duplicate Name Warning - If you enter a patient name that is identical to an existing patient name, you will see a warning message. You must then confirm your response before continuing.
Patient Section - Use this section of the New Patient window to enter general biographical information about the patient. Note that only the patient first name and last name are required in order to create the record.
Title - You may select a title for the patient.
First / M.I. / Last Name - You must enter a first and last name for the patient. The middle initial is optional.
Doctor / Office - These fields default to the settings in the New Patient Defaults tab of your Patient Folder Properties. You may change them for this patient as needed. (See "Set Up Patient Folder Default Responses" for details.)
Birthdate - Enter the patient's birthdate in this field.
Gender - Select the patient's gender; this information is primarily used for inserting the appropriate pronouns in your merge letters.
Address - Enter the patient's home street address in this field.
City / State / Zip - Select the appropriate zip code from the drop down list, and the city and state will be filled in for you automatically. You can also manually enter this information as needed. (See "Set Up Zip Code List" for details.)
Phone - Enter the patient's home phone number in this field. If you simply type 7 or 10 digits when you enter phone numbers, ViewPoint will add the appropriate parentheses and dashes automatically. If you use Edge Reminders or VP Reminders, you can optionally enable this contact for automated messages and/or texts, as described below.
Phone 2 / Additional Contacts - Use the drop down button to the left of the additional contact field (i.e. Phone 2) to select a contact type, then enter the contact information you want to include with this responsible party record. If you use Edge Reminders or VP Reminders, you can optionally enable this contact for automated messages and/or texts, as described below.
Enable Contacts For Reminders & Texts - If you use Edge Reminders or VP Reminders, enable the  Phone,
  Text, and/or
  Email buttons to the right of the contact fields to enable that contact for the delivery of automated messages and individual text messaging. If you flag multiple contact types, the party will receive multiple reminder messages; if you do not flag any contact types, the party will not receive any messages, even when they fit the subgroup you select. In addition, you can flag the same contact type for multiple messages: For example, you can flag the patient's cell phone to receive both phone and text messages.(See "Set Up Patients & Responsible Parties for Reminders" for details.)
Dentist / Referrer - Use the drop down buttons to the right of these fields to select the patient's general dentist and referral source. You can also press G to open the Dentist or Referrer table to create a new record, or review and edit dentist/referrer information.
Responsible Party Section - Use this section of the New Patient window to enter general biographical information about the primary billing party.
Title - You may select a title for the responsible party.
First / M.I. / Last Name - These fields default to information you entered in the Patient section of this window; you may change the name as needed.
Address / City / State / Zip - These fields default to the information you entered in the Patient section of this window; you may change them as needed.
Home Phone - This field defaults to the information you entered in the Patient section of this window; you may change it as needed. If you use Edge Reminders or VP Reminders, you can optionally enable this contact for automated messages and/or texts, as described below.
Work Phone - Enter the responsible party's work phone number in this field. If you simply type 7 or 10 digits when you enter phone numbers, ViewPoint will add the appropriate parentheses and dashes automatically. If you use Edge Reminders or VP Reminders, you can optionally enable this contact for automated messages and/or texts, as described below.
Phone 2 / Additional Contacts - Use the drop down button to the left of the additional contact field (i.e. Phone 2) to select a contact type, then enter the contact information you want to include with this responsible party record. If you use Edge Reminders or VP Reminders, you can optionally enable this contact for automated messages and/or texts, as described below.
Enable Contacts For Reminders & Texts - If you use Edge Reminders or VP Reminders, enable the Phone, Text, and/or Email buttons to the right of the contact fields to enable that contact for the delivery of automated messages and individual text messaging. If you flag multiple contact types, the party will receive multiple reminder messages; if you do not flag any contact types, the party will not receive any messages, even when they fit the subgroup you select. In addition, you can flag the same contact type for multiple messages: For example, you can flag the patient's cell phone to receive both phone and text messages.(See "Set Up Patients & Responsible Parties for Reminders" for details.)
Finish - After entering the new patient information, you have several options for completing the process.
Save - Choose this option (or press Ctrl+S on your keyboard) to save the new patient record, and verify the family assignment, described below. You then return to the ViewPoint main menu.
Save and Appoint - Choose this option to save the patient record, verify the family assignment, and open your Grid Scheduler so that you can schedule an appointment for the patient. (Use the  Explorer On option of your patient folder properties settings to specify whether the Explorer opens for the patient when you use the Save & Appoint feature from a new patient folder. If the Explorer On option is disabled, the Save & Appoint feature opens your Grid Scheduler to a scheduling grid, with the new patient activated.See "Set Up Patient Folder Default Responses" for details.)
Family Assignment - When you save a new patient record, the patient must be assigned to a family. If the patient last name and street address match an existing family, the patient is added to that family automatically. If either the patient last name or street address matches an existing family, you can either choose from a list of matching families, or select the Computer Generated option to create a new family based on the patient last name and street address. If neither the patient last name nor the street address match any existing families, only the Computer Generated family option is available, and ViewPoint will create a new family based on the patient last name and street address. See "Patient Folder Family Tab" for details.
Folder - Choose this option to save the patient record, then open it so that you can review default responses (such as the Status and Phase), complete additional information not available from the New Patient window. See "Patient Tab" for details about all patient folder fields.
Properties - You can choose this option (or press Ctrl+P on your keyboard) at any time to modify your patient folder properties, including New Patient Defaults, without saving the patient record. When you exit the properties dialog, you return to the New Patient window.
Cancel - Choose this option to cancel the new record and return to the ViewPoint main menu.
 │
│  │
│  │
│ 
Ortho2.com │1107 Buckeye Avenue │ Ames, Iowa 50010 │ Sales: (800) 678-4644 │ Support: (800) 346-4504 │ Contact Us
Chat with Software Support │Chat with Network Engineering │ Chat with New Customer Care
Remote Support │Email Support │ Online Help Ver. 12/18/2015


