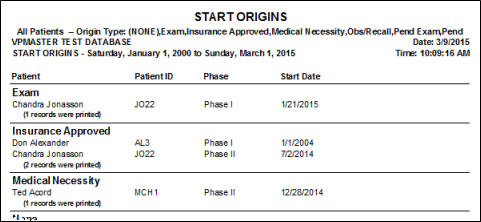
Run the Start Origins report to obtain a list of patients for any range of treatment start dates, grouped by Start Origin. You may include all start origin descriptions, or choose to include only specific descriptions on the report. Each section of the report lists the patient names and ID numbers, as well as the treatment phases and start dates for that start origin. Since a patient may have multiple treatment phases with start dates within your date range, patients may be included in the report multiple times.
Record Patient Start Origins - The Start Origins report uses the Start Origins field found on the Findings tab of the patient folder: You must maintain this data for all patients to ensure the accuracy of the report. See "Patient Findings / Tooth Chart" for details.
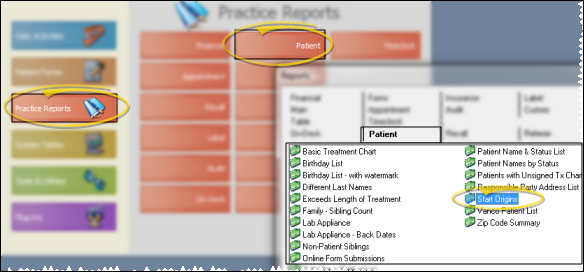
![]() ViewPoint Main Menu - Practice Reports > Patient > Start Origins.
ViewPoint Main Menu - Practice Reports > Patient > Start Origins.
![]() Select the options to use for choosing records and generating this report. Choose carefully, as your selections will affect which data is included in the report.
Select the options to use for choosing records and generating this report. Choose carefully, as your selections will affect which data is included in the report.
Manage Record Selections & Output - After selecting the report options, click Ok to continue to your output choices. See "Manage Record Selection & Output" for details.
Report Title & Header - Whether you view the report on your screen or print it, the report title and run date appear in the header of each report page. If you used subgrouping or other report options, the subgroup description appears just under the report title so you know which criteria was used to generate the results.
 │
│  │
│  │
│ 
Ortho2.com │1107 Buckeye Avenue │ Ames, Iowa 50010 │ Sales: (800) 678-4644 │ Support: (800) 346-4504 │ Contact Us
Chat with Software Support │Chat with Network Engineering │ Chat with New Customer Care
Remote Support │Email Support │ Online Help Ver. 12/18/2015


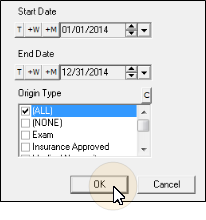
 All option to include all descriptions in the report. In addition, you can click the C button to clear all your choices and start over.