You may also indicate an e-mail
address
where you wish to be notified if the backup fails.
The following instructions take you
through the VP Backup Service Setup Wizard, which prompts you for all
the information needed to set up your VP Backup Service. Please
be aware that using the Wizard DELETES
any existing backup processes you have created! Therefore, if you have
already set up VP Backup to back up certain files, either be sure to include
them in your Wizard selections again, or choose to bypass the Wizard and
create
or modify your existing backup processes manually.
To use the VP Backup Setup Wizard you must first activate VP Backup:
Click
the [Start] button on your computer's
task bar.
Select{All Programs >}; {Ortho
II ViewPoint}; {ViewPoint Backup
Service}. This icon: appears in your computer's
status bar (usually the lower-right corner) to show that the VP Backup
Service is activated.
Right-click
the icon and select {Show Application}.
(Or, simply double-click the icon.)
If the VP Backup
Service Wizard does not start automatically, click the {Wizard} button on
the toolbar.
If you have not
yet acquired an off-site FTP hosting location, we recommend that you click
the link on the Welcome screen to sign up for our CyberLynk FTP hosting
service integration, as described in the Sign
Up for FTP Hosting Service
instructions.
If you do not
want to sign up for the FTP service at this time, click [Next>].
The VP Backup Wizard will now prompt you
to define your backup processes. Each screen is described below.
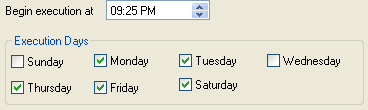
Select WHEN to Backup
.
Choose a time
that you are generally not using your computer, so the backup does not
interfere with any other work.
Select one
day or multiple days to
perform your backup. Later, the VP Backup Service will ask where to store
the backup files. If
you select multiple week days here, you can choose to use two backup locations,
and alternate between them on specific days of the week.
When
you have specified the time of day and days of the week you want to perform
a backup, click [Next>] to continue.
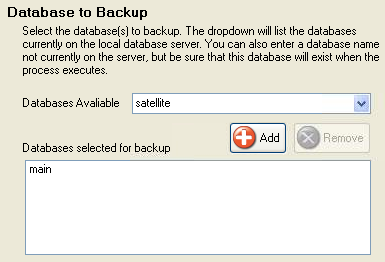
Select WHAT DATABASES to
Back Up
Click the [V]
button beside the Databases Available
field, and select a database you would like included in the backup. Or
type the name of a database that WILL
EXIST before this process is executed.
Click[Add] to include the selected
database in the Databases selected for
backup list.
Add additional databases to the backup as needed.
You can also click a database name in the list
and click [Remove] to remove a database from
the backup.
When all the ViewPoint databases you want to backup are in the list,
click [Next>] to continue.
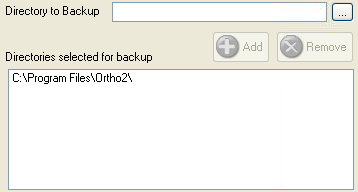
Select WHAT DIRECTORIES
to Backup
Click the [.
. .] button beside the Directory
to Backup field, and navigate
to a directory you would like included in this backup process.
Click [Add]
to include the selected directory in the backup.
Repeat adding directories to the backup as needed.
You can also click a name in the Directories Selected
for Backup list, and click [Remove]
to remove a directory from the backup.
Click [Next>] when all directories
have been selected.
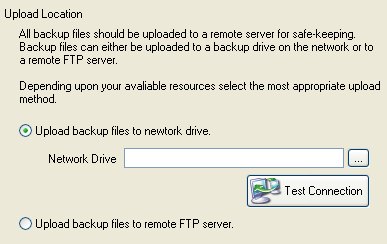
Select WHERE to Backup
You now select a location where you want your backup files to be saved.
Ideally, you should backup your data to a remove FTP server (that is,
a computer NOT in your office) for safe-keeping. (For
information about our recommended FTP Hosting Service, click here.)
If an off-site FTP server is not available, you can save the files to
a drive within your local network.
If you are setting up this backup process for multiple days of the week,
you will be able to choose a second location for certain days later in
this setup wizard.
If remote storage is NOT possible for you:
Select Upload
backup files to network drive.
Click the [.
. .] button beside the Network
Drive field, and navigate
to the drive and directory where you would like the backup files to be
stored.
Click the [Test
Connection] button to be certain that your selected location is
available to this computer. If you receive an error, select another location,
or correct the connection error before continuing.
Click [Next>]
to continue to the alternate days location option.
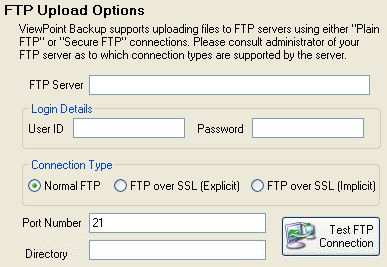
If you DO have a remote FTP server available,
the best option is to select Upload
backup files to remote FTP server. Then, complete the FTP upload
options settings (shown below) for your situation.
Contact your FTP server administrator to determine
the proper settings. If you have signed up through our recommended service,
use the information you recorded during the Signing
Up for FTP Service
instructions.
For added security of data transfer, you are
warned if you select the Normal
FTP connection type: This type of transfer does not encrypt your
data, making it vulnerable. If
at all possible, we highly recommend that you select one of the other
two connection types!
Click [Test
FTP Connection] to be certain that your FTP upload options are
available to this computer. If you receive an error, select another location,
or correct the connection error before continuing.
Click [Next>]
to continue to the alternate days location option.
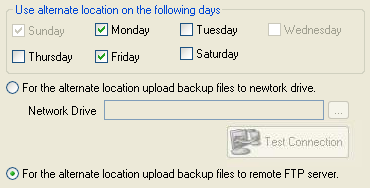
If you are using this backup process on multiple
week days, you can specify a second, or alternate, backup location for
specific days. This feature allows you to maintain at least a two-day
safety net of backup files, and allows you to store one set of backup
files on your local network and one set on a remote FTP server.
If you are using this backup process for only
one day of the week, or want to backup to one location only, ignore this
screen and click [Next] to continue.
To set up a second backup location, check
the days of the week you want
to use the alternate location, then define
the location just as you did in the previous step. Then click [Next] to continue.
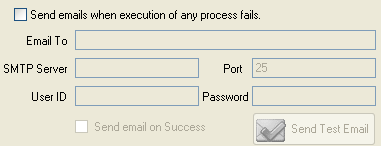
Select E-Mail Address for Notification
VP Backup can notify you via e-mail if a backup fails.
Check Send
e-mails when
execution of any process fails if you want to be notified of a
backup failure.
Supply the recipient e-mail
address. This address appears in the {To:} field of the e-mail
messages.
To send e-mails to more than one person, separate
the addresses with a semi-colon (“;”).
Contact your mail administrator for the SMTP
Server, Port, User
ID, and Password of the
account which will send the e-mails.
Check Send
email on Success if you want to be notified of successful backups
as well
Click [Send Test
Email] to be sure the settings are correct.
Click [Next>] to view a summary
of this backup process.
Finish
Click [Finish]
to save this backup process and exit. Or,
click [Back] to review/change
any process options.
Click [Done]
when VP Backup Service has finished creating the process.
That's it! The
VP Backup Service application appears for you to review. VP
Backup Service must be activated on your server (click
here to learn how to activate VP Backup Service!)
and the server must be powered on for your backup processes to begin automatically.
Additionally, your selected backup location must be available.
You can click the {Wizard}
button on the VP Backup application toolbar to use the wizard again. Be
aware that using the Wizard DELETES
any previously created backup processes!
Please note that you can also manually
create and edit backup processes,
which provides for additional customization (such as file filtering) not
available through the Wizard.

 │
│ 


