The most convenient way to tell VP Backup WHAT
and WHERE to backup is to use
the VP
Backup Setup Wizard.
However, if you just want to add another database or directory to your
existing backup protocol, you can create these processes manually. This
option also provides for additional customization.
These instructions show you how to
create a directory backup process, which tells VP Backup to include specific
files or folders in the backup. Click
here to create a database backup
or click
here to create a file upload process.
Select to Create a New Directory Backup Process
A directory backup process specifies a directory on your network that
you want to backup. To
create a new directory process:
Open the VP Backup Service application.
If the ViewPoint icon ( ) appears
in the status area of your taskbar, usually the lower right-hand corner
of your screen, double-click the
icon to open the VP Backup Service application.
If the ViewPoint icon ( ) is
NOT on your taskbar, you must
first activate
VP Backup Service,
then double-click the icon.
Select to create a new directory process with
one of the following methods:
Select {Processes}
then {New ->} and {Directory
backup} from the menu at the top of the screen.
If the toolbar
has an icon that looks like one cylinder: you can simply
click the icon to create a new database process.
If the toolbar
icon looks like two cylinders instead: you can click the
[V] beside the icon, then select [Directory Backup].
(The icon that appears on the toolbar reflects
the type of backup process you created most recently.)
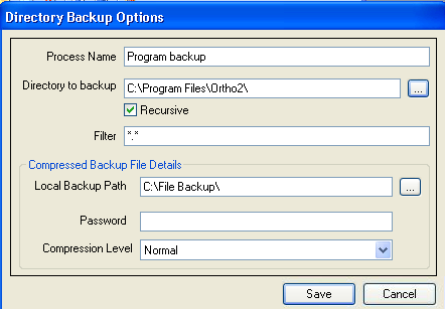
You can now define the directory backup process properties.
Define What Directory To
Backup
When you choose to create or modify
a directory backup process, you see the following dialog box, where you
enter the necessary information:
{Process
Name}: Provide an appropriate name for the process. The name can
contain up to 255 characters, letters and/or numbers. Characters such
as *,&,
? are invalid. If you are modifying an existing process, you cannot change
the name.
{Directory
to backup}: Select the directory you want to be backed up. You
may click the […] button to navigate
to the directory.
Recursive: If you want to include all sub-directories
within the selected directory, check this box.
{Filter}:
You can choose to backup only specific files by providing an appropriate
filter
To backup all files in the directory, leave
the field as *.*
To backup specific files, enter the appropriate
standard file/folder search operator. For
example, to backup only bitmap files within the directory, enter *.bmp
in the filter field.
{Local
Backup Path}: Specify where you would like the backed up directory
to be temporarily stored on your local machine. The files will be in this
location only until all other backup processes are executed, and the File
Upload process saves all your backup files to your "safe" location.
We recommended that you store all temporary
files in the system-defined temporary folder.
If you want to store the files in another
location, you may click the […]
button to navigate to an appropriate directory.
{Password}:
If you would like to further protect your data, enter a password in this
field.
{Compression
Level}: Specify the amount of compression (None, Normal or Maximum)
to use when backing up this directory. The rule of thumb is the greater
the compression level, the smaller the resulting file size, but the longer
the time for backing up..
Click [Save Changes]
to save the process properties.
You can re-order the processes in the list with the and
buttons on the toolbar as needed. Note that the file
upload process MUST be the last process in the list. Any
processes listed underneath the file upload process will NOT be included
in the final backup.
If you choose to create your backup processes manually, rather than
using the VP
Backup Service Wizard,
you will want to also schedule your backups to begin automatically on
the days and time most appropriate for your office. Click
here for more information.
 ) appears
in the status area of your taskbar, usually the lower right-hand corner
of your screen, double-click the
icon to open the VP Backup Service application.
) appears
in the status area of your taskbar, usually the lower right-hand corner
of your screen, double-click the
icon to open the VP Backup Service application.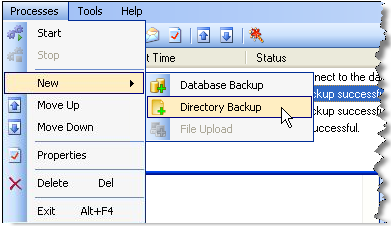

 │
│ 


