When you use the VP
Backup Service Setup Wizard,
you define when you want to automatically start your backups. If
needed, you can adjust that automated schedule manually. To
do so:
Open the VP Backup Service application.
If the ViewPoint icon ( ) appears
in the status area of your taskbar, usually the lower right-hand corner
of your screen, double-click the
icon to open the VP Backup Service application.
If the ViewPoint icon ( ) is
NOT on your taskbar, you must
first activate
VP Backup Service,
then double-click the icon.
Select to define the backup schedule in one of
these ways:
Click the {Schedule}
icon on the VP Backup Service toolbar.
Select {Tools}
then {Options ->} and {Schedule} from the VP Backup service
menu.
You see the following screen.
Select the appropriate time of day and days of
the week to begin your backups.
Choose a time
to {Begin execution at} that you
are generally not using your computer, so the backup does not interfere
with any other work.
Select one day or multiple
days to perform your backup. If you select multiple days of the
week, you can set up two backup locations and alternate between them on
specific days of the week. (These settings are defined in your file
upload process.)
Your scheduled backups will include all backup processes in your list,
which tell VP Backup what databases
and directories
you want to back up, and where you want your files
to be uploaded.
 ) appears
in the status area of your taskbar, usually the lower right-hand corner
of your screen, double-click the
icon to open the VP Backup Service application.
) appears
in the status area of your taskbar, usually the lower right-hand corner
of your screen, double-click the
icon to open the VP Backup Service application. {Schedule}
icon on the VP Backup Service toolbar.
{Schedule}
icon on the VP Backup Service toolbar.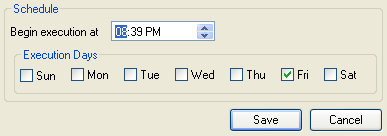

 │
│ 


