Use the Ortho-Vision records integration to open a patient's Ortho-Vision record directly from ViewPoint, and use those images within ViewPoint patient folders and merge documents.
This integration is user-specific: You must activate the integration on each workstation where you would like to use it.
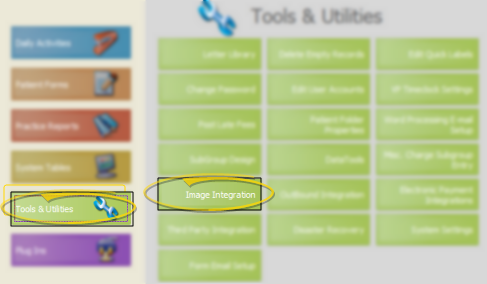
Open image integration tools - ViewPoint main menu > Tools & Utilities > Image Integration.
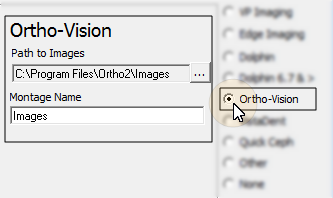
Enable Ortho-Vision integration - Choose the Ortho-Vision integration type and enter your details.
Enable Ortho-Vision - Select the Ortho-Vision integration.
Path to images - Navigate to the folder where your Ortho-Vision patient images are located. Frequently, this folder is named \Patients\OTP .
Montage name - Type the name of your Ortho-Vision montage.
Set up Ortho-Vision Records - Launch your Ortho-Vision Records software to confirm preferred settings.
Enable the Use ID/Number as File Name demographics property.
Activate the DOS 8.3 Filenames property (optional, but recommended).
Edit existing image filenames to include the patient's ViewPoint primary ID number. For example, the name of the image for a patient with the ViewPoint primary ID of JO18 would be JO18.rcf.
Select Standard8 (autocopy) when importing images into Ortho-Vision.
Open Ortho-Vision patient files - When you double-click the image box in a ViewPoint patient folder, or click Imaging from the ViewPoint toolbar, the Ortho-Vision record for that patient is launched. If no Ortho-Vision record exists for that patient, you are prompted to create one.
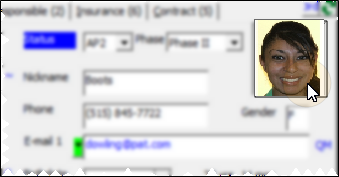
Use Ortho-Vision photo in ViewPoint patient folders - The image that is labeled Smile in Ortho-Vision is the image that will be displayed throughout ViewPoint, for example, in the patient folder, On-Deck, and the Treatment Chart.
Create / update imaging patient record - Right-click the image box in the ViewPoint patient folder, then select to create a new imaging record, or update an existing record. Note that the patient id number in your Ortho-Vision record must match the primary patient id in your ViewPoint patient folder.
Enlarge image - Right-click the image box in the ViewPoint patient folder, then choose Enlarge. The larger image appears in a separate window.
Missing thumbnails - Due to required filename conventions, certain pre-existing frontal smile images may not appear as the thumbnail image in your patient folders. When this occurs, you may still double-click the empty image box to load the patient images in Ortho-Vision Records.
Reconcile thumbnails - If you wish, you can reconcile existing Ortho-Vision images so that missing thumbnails will appear in your ViewPoint patient folder, You must follow this process for each patient.
Open the patient in Ortho-Vision.
Use Auto Copy to create a new standard montage.
Select the photos from the patient folder that were previously captured for this patient.
When complete, confirm the new photos have been created, and delete the original photos.
Use images in merge letters - Use your patient images in your ViewPoint merge documents. See "Mail Merge Tool: Patient Images" for details.
│
│
│
Ortho2.com │1107 Buckeye Avenue │ Ames, Iowa 50010 │ Sales: (800) 678-4644 │ Support: (800) 346-4504 │ Contact Us
Chat with Software Support │Chat with Network Engineering │ Chat with New Customer Care
Remote Support │Email Support │ Online Help Ver. 12/18/2015