Use the Kodak OMS integration to view and optionally export patient images directly from
(If you have Edge Imaging, you can activate the integration directly from your Edge Imaging Integrations options. See "Edge Imaging / Kodak OMS Integration" for details.)
This integration is user-specific: You must activate the integration on each workstation where you would like to use it.
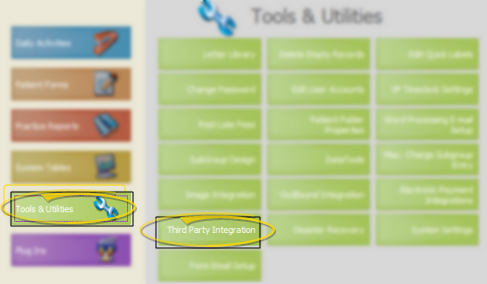
Open Third Party Integrations - ViewPoint main menu > Tools & Utilities > Third Party Integrations.
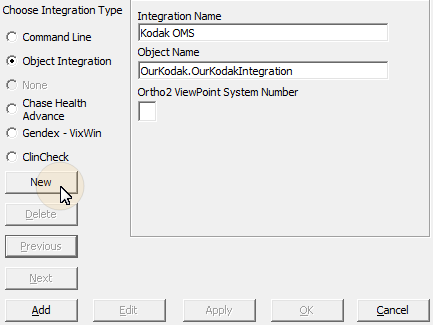
Create integration - Click New and enter your integration details.
Integration type - Choose the Object Integration integration type.
Integration name - Type a name for your integration, such as Kodak OMS.
Object name - Type OurKodak.OurKodakIntegration in this field.
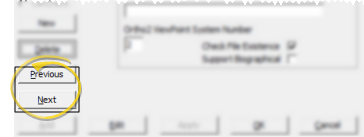
Ortho2 ViewPoint System Number - Ignore this field.
Finish - Click Add to submit your details, and Ok to complete the process.
Confirm patient identification - Confirm that patient records in your Kodak OMS database have the same Patient ID number as the corresponding ViewPoint patient folder.
View & export Kodak OMS image files - When you select the Kodak OMS integration from the ViewPoint toolbar Third-Party Integration icon,your Kodak software is launched, with the patient's Kodak record loaded. Images you then export from Kodak can easily be imported into your patient's ViewPoint Imaging page.
Edit integration - If you need to edit the integration, for example, to change a path, open your Third Party Integration tools, and use the Next / Previous buttons to select the integration to work with. Then, click Edit. Make your changes and click Apply. Then click Ok to exit.
Open your Third Party Integration tools:
Use Previous / Next to select the integration to work with.
Click Edit.
Make your changes and click Apply to save the changes.
Finally, click Ok to exit the integration dialog.
Remove integration - To remove the ViewPoint integration, open your Third Party Integration tools, and use the Next / Previous buttons to select the integration to work with. Then, click Delete.
Open your Third Party Integration tools:
Use Previous / Next to select the integration to work with:
Click Delete.
Confirm your action, then click Ok to exit the integration dialog.
Integration support - Ortho2 can help you with questions you have about system requirements, integration setup, and using your integrations within our system. However, you will need to contact the third-party supplier for specific details about using the integrated module.
│
│
│
Ortho2.com │1107 Buckeye Avenue │ Ames, Iowa 50010 │ Sales: (800) 678-4644 │ Support: (800) 346-4504 │ Contact Us
Chat with Software Support │Chat with Network Engineering │ Chat with New Customer Care
Remote Support │Email Support │ Online Help Ver. 12/18/2015