Use the Auto-Import feature to add a series of images to a patient record. The series is tagged with a timepoint, indicating the point in treatment when the images were taken. You can auto import additional image sets into other timepoints throughout treatment, providing you with a visual comparison of the patient's condition across time.
It is generally unnecessary to take digital images at full resolution: Doing so may significantly slow down the operation of your VP Image Editor. All imported and scanned images with a width or height over 1280 are converted to a width or height of 1280 to prevent significant slowing down of the VP Imaging system.
If the default order does not fit your office protocol, you can change the order as needed. See "Advnced Settings" or contact Ortho2 for assistance.
Click the Imaging button on the ViewPoint toolbar and select the patient to open (or open the Imaging tab of the patient folder).
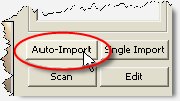
Click the [Auto Import] button at the bottom-right of the screen.
Select the timepoint to import into, or type a unique timepoint name for this patient.
Always auto-import your {Photos} LAST! You can use auto-import to add images to a timepoint until you have auto-imported {Photos}. Once you have saved images in the {Photos} image type, you can no longer auto-import into that timepoint.
For example, you can auto-import to the {Photos} image type of your {Initial} timepoint even after you have saved images in the {X-Ray} image type of the {Initial} timepoint. But, once you have saved {Photos}, you cannot add any images to any category of that timepoint.
Select the date the images were taken. Please note that this will be the date for ALL images imported at this time. To change the date of an individual image, see "Modify Burn-In Date".
Review the images. If you do NOT want to import an image into the patient folder, right-click the thumbnail image in the preview screen and select [Delete]. This feature is especially useful if, for example, you take several photos of the same type (i.e. Facial Smile), but want to import only the best one into the patient folder.
Select the Starting Point. By default, VP Imaging will begin importing from the first file on your storage device, and continue until all images are imported. To start at a different file, click the image you want to start with before you click [Import]. VP Imaging will start at your selected image, and continue to import all remaining images into the patient folder.
Click [Import].
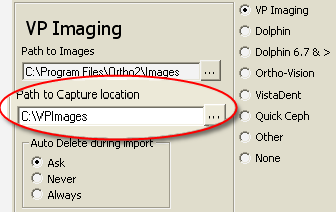
If your VP Imaging Properties are set to ask whether to delete the original image files, you click delete the Yesto delete the original image files from the capture location, or click No to leave the original image files intact.
If your VP Imaging Properties are set to always or never delete the original files, VP Imaging takes the appropriate action automatically.
As the images are imported, a progress bar keeps you informed of the situation: Larger images will take longer to import than smaller images. Once the images have been imported, you will see the Image Editor, with the layout of the new images. You may now view and edit images as needed.
Even if you do not want to manipulate images immediately after importing, you must click [Save] or [Save and Exit] from the Image Editor to create the thumbnail image files required for the layout viewer. If your VP Imaging system is set to burn labels onto this type of image, the label is imprinted at this time.
If you click [X] to close the Image Editor, the source images are still imported but the thumbnails and their position and scaling are not created.
 │
│  │
│  │
│ 
Ortho2.com │1107 Buckeye Avenue │ Ames, Iowa 50010 │ Sales: (800) 678-4644 │ Support: (800) 346-4504 │ Contact Us
Chat with Software Support │Chat with Network Engineering │ Chat with New Customer Care
Remote Support │Email Support │ Online Help Ver. 12/18/2015


