Advanced Setting
Purpose
Action
Add /edit image type
Add or change the names of image types.
Section: [ImageName] Show
me...![]()
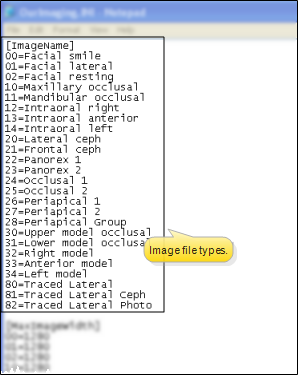
Do: Add the next number to the end of the list and type the image name.
Example: 35=Lateral facial smiling
This adds an image named "Lateral facial smiling" to your patient images. You can also edit image names to better meet your office needs.
Change import order
Change the order in which Auto Import adds your images to match the order you take images on your digital camera.
See "Auto Import Images" for more information.
Section: [ImportOrder] Show
me...![]()
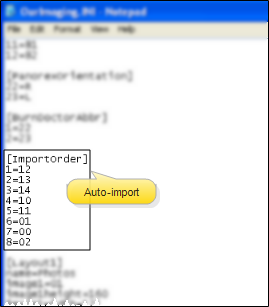
Do: List image numbers in the order you take them with your digital camera.
Example: Imagine you take your images in this order: Facial smile, facial resting, facial lateral, maxillary occlusal, mandibular occlusal, intraoral right, intraoral anterior, intraoral left. Assuming you have not changed the default [ImageName] settings (see above), your [ImportOrder] should look like this:
[ImportOrder]
1=00
2=02
3=01
4=10
5=11
6=12
7=13
8=14
Auto rotate
Rotate images 180 degrees upon importing them into VP Imaging to compensate for images taken with mirrors.
Section: [AutoRotateOnImport]
Show
me...![]()
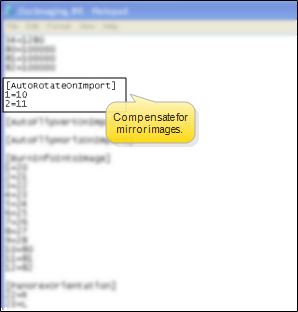
Do: List image numbers that you want rotated 180 degrees on importing into VP Imaging. Or, delete images from the list if you do not want them rotated.
Example: By default, VP Imaging auto rotates the mandibular and maxillary occlusal images, as shown below (assuming you have not changed the default [ImageName] settings).
[AutoRotateOnImport]
1=10
2=11
Auto flip
Flip image vertically (upside down) or horizontally (right to left) upon importing them into VP Imaging.
Section: [AutoFlipVertOnImport]
/ [AutoFlipHorizOnImport] Show
me...![]()
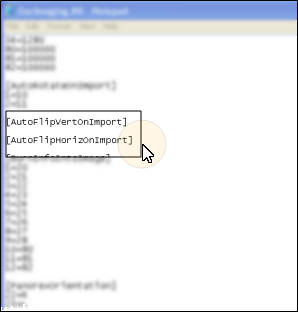
Do: List image numbers that you want flipped vertically (upside down) or horizontally (right to left) on importing into VP Imaging. Or, delete images from the list if you do not want them flipped.
Example:
[AutoFlipVertOnImport]
1=00
Assuming you have not changed the default [ImageName] settings, this would cause the facial smile image to be flipped upside down when imported.
Patient ID label
Burn permanent patient identification label onto image.
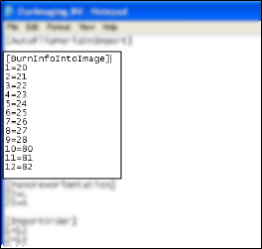
Section: [BurnInfoIntoImage]
Show
me...![]()
Do: List image numbers that you want labeled with permanent patient identification.
Example:
[BurnInfoIntoImage]
1=22
2=23
Assuming you have not changed the default [ImageName] settings, this would cause both panorex images to be burned with the patient ID label.
See "Burn ID Onto Image" for more information.
Panorex orientation label
Add panorex orientation (i.e. "R" or "L") label to images.
Section: [PanorexOrientation]
Show
me...![]()
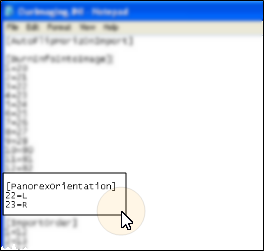
Do: Add the desired label text to the corresponding panorex image numbers.
Example:
[PanorexOrientation]
22=R
23=L
Assuming you have not changed the default [ImageName] settings, this would cause the Panorex 1 image to include the label "R", and the Panorex 2 image to include the label "L".
See "Panorex Orientation Label" for more information.
Date format
When you burn a label onto your images, you can choose either the American format (mm/dd/yy) or the Standard format (yyyy/mm/dd).
Section: [AmericanDate] Show
me...![]()
Do: Enter the value that corresponds to the date format you want to use.
Values:
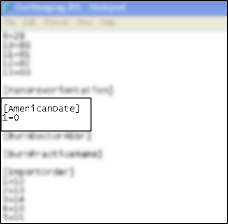
[AmericanDate]
1=0 results
in standard yyyy/mm/dd format.
1=1 results
in American mm/dd/yy format.
Assuming you have not made any changes, VP Imaging defaults to using the Standard format.
See "Burn ID Onto Image" for more information.
Orthodontist identification label
Add orthodontist name to images.
Section: [BurnDoctorAbbr] Show
me...![]()
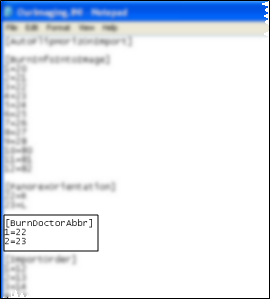
Do: List the images you want labeled with the attending orthodontist name.
Example:
[BurnDoctorAbbr]
1=00
2=01
Assuming you have not changed the default [ImageName] settings, this would cause the facial smile and facial lateral images to include the orthodontist name at the bottom.
See "Orthodontist Identification Label" for more information.
Practice name identification label
Add your practice name to images
Section: [BurnPracticeName]
Show
me...![]()
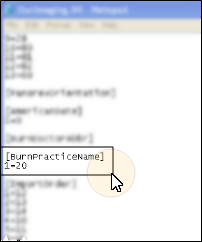
Do: List the images you want labeled with your practice name.
Example:
[BurnPracticeName]
1=00
2=01
Assuming you have not changed the default [ImageName] settings, this would cause the facial smile and facial lateral images to include the orthodontist name at the bottom.
See "Orthodontist Identification Label" for more information.
Edit / add layouts
Change the number or location of images that display in VP Imaging and print on your montage.
Section: [Layout#] Show
me...![]()
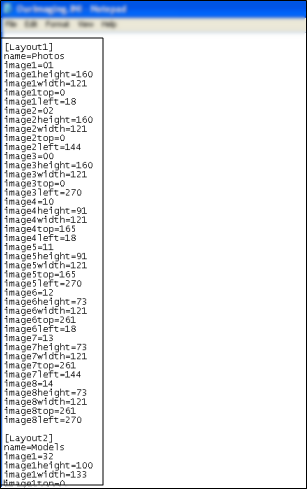
Do: Add or edit the desired image parameters to the corresponding layout number.
See "Edit Layouts" for more information.

 │
│ 


