Deposit Slip; Deposit Slip by Location
Run the Deposit Slip to obtain a list of all of the deposit receipts for a given
Print Final Transaction Report - If you want to print a Deposit Slip for today's receipts that you can take to the bank, be sure to first print the Final Transaction Report for the day. See "Transaction Report" for details.
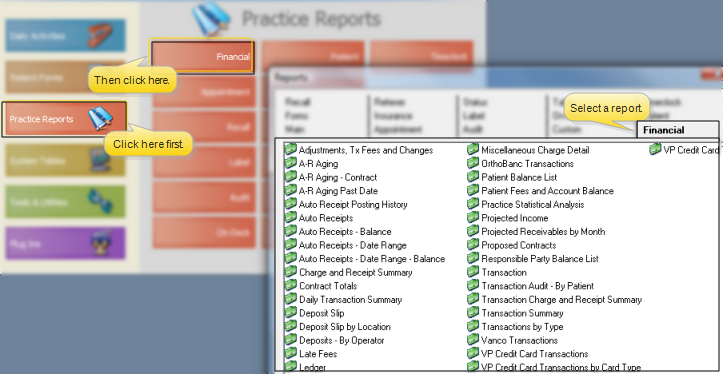
ViewPoint main menu > Practice Reports > Financial > Deposit Slip (select from several options):
Deposit Slip - This report provides you with your deposits, sorted either by entry date or responsible party name.
Deposit Slip by Location - This report provides you with your deposits grouped by your office locations.
Another deposit report, the Deposits by Operator, prints for a range of Transaction Reports, and is meant as an auditing tool and not a banking aid. See "Deposits by Operator" for details.
You can also print a Deposit Slip from the Daily Activities section of the ViewPoint main menu. Note that the security rights for this button are separate from the security rights of other financial reports and data. This provides a way for staff that is restricted from accessing other financial data to generate the deposit slip. To completely restrict access to the deposit slip, you must assign No Access to both the Reports> Financial reports and Miscellaneous> Print Deposit Slip (Daily Activities) options in your security group rights. See "Set Up Security Access" for details.
Select the options to use for choosing records and generating this report or form. Choose carefully, as your selections will affect which patients are included in the report.
Preliminary or Old report - Choose Preliminary Report to include information that has not yet been finalized on a Transaction Report. Choose Old Report to include finalized transactions.
Report date - (Available only for Old deposit slips: This field is ignored for Preliminary deposit slips, which include all non-finalized receipts.) Select to generate an Old deposit slip, then enter the transaction date to use. Generally, you print the Deposit Slip for today's transactions. However, you can re-create a Deposit Slip for a different date if needed.
Report number - (Available only for Old deposit slip: This field is ignored for Preliminary deposit slips, which include all non-finalized receipts.) You can use this field in place of the Report Date when generating an Old deposit slip, if you know the number of the Deposit Slip you want to print.
Office - Choose to include only the records for a specific office, or include the records for all office locations in your practice.
Orthodontist - Choose to include only the records for a specific orthodontist, or include the records for All orthodontists in your practice. Be sure you select the orthodontist appropriate for the deposit slip you want to generate.
Order by - Sort the transactions by entry date or responsible party name.
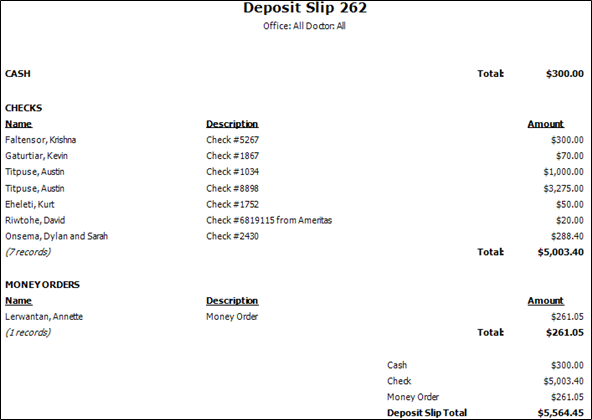
Report Title & Header - Whether you view the report on your screen or print it, the report title and run date appear in the header of each report page. If you used subgrouping or other report options, the subgroup description appears just under the report title so you know which criteria was used to generate the results.
Date - Notice the Deposit Slip can be printed for a single date only, and includes the receipt transactions that correspond to the Transaction Report of the same date.
Office / Orthodontist noted - If you generate the Deposit Slip for a specific doctor and/or location, the name will appear in the header of the report. If you seem to be missing transactions, try running the Deposit Slip again, but for All offices and orthodontists.
Deposit Slip Total - The bottom of the first page of the Deposit Slip summarizes the total of just the checks, cash and money orders, so that you can take this page to your back along with your deposit items.
Deposit Slip Grand Total - The bottom of the last page of the Deposit Slip summarizes all deposit transactions, including credit cards, debit cards and electronic transfers.
Manage Record Selections & Output - After selecting the report options, click Ok to continue to your output choices. See "Manage Record Selection & Output" for details.
Excluded from Deposit Slip Workflow Trigger - Use the Transaction Excluded from Deposit Slip Trigger to activate a workflow whenever you flag a ledger receipt with Exclude From Deposit Slip. (Note that receipt adjustments and refunds are always excluded from the deposit slip, and do not trigger this workflow.)
 │
│  │
│  │
│ 
Ortho2.com │1107 Buckeye Avenue │ Ames, Iowa 50010 │ Sales: (800) 678-4644 │ Support: (800) 346-4504 │ Contact Us
Chat with Software Support │Chat with Network Engineering │ Chat with New Customer Care
Remote Support │Email Support │ Online Help Ver. 12/18/2015


