Patient Treatment Findings
View a patient's current and prior Treatment Findings, treatment dates, and
Watch the movie. (Windows Media Player, an active Internet connection, and a valid Ortho2 customer login are required to run video tutorials, webinars, and training programs.)
Open a patient folder and select the Findings

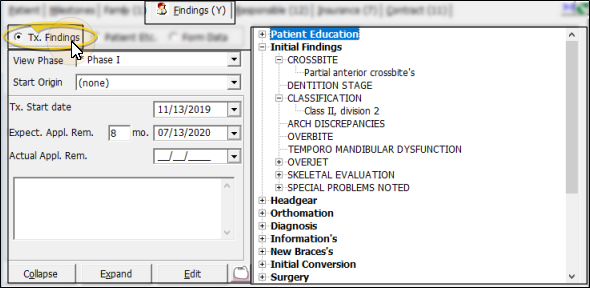
Select Tx Findings at the top of the window to view and work with your patients' medical, orthodontic, and dental findings.

Treatment Phase - Your patients' findings are stored by treatment phase to more accurately track treatment progress. Click the View Phase field to select the phase to work with. Only phases that have been previously assigned to the patient are available to you. An
Start Origin - The Start Origin is the reason or origin of the patient's decision to start this phase of treatment. You can apply the start origin when you first create the contract for this phase of treatment, or change it here as needed. (See "Start Origin Descriptions" for details about managing your list of responses.)
Treatment Dates - Each phase of treatment includes a treatment start date, number of expected treatment months, expected appliance removal date, and finally the actual appliance removal date.
Findings Details - The patient's findings for the selected treatment phase appear at the right of the window. You can expand and collapse the categories to view the details. To add or edit findings, first click the Edit button at the bottom of the window. See "Add/ Edit Patient Findings" for details.
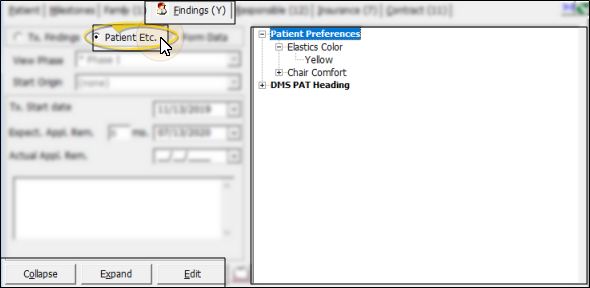
Select Patient Etc.at the top of the window to view and work with non-medical information you want to track for your patients.

The additional information appears at the right of the window. You can expand and collapse the categories to view the details for the patient. The information is not tracked by treatment phase: The same information appears on this screen regardless of the currently selected treatment phase. To add or edit additional information, first click the Edit button at the bottom of the window. See "Add/ Edit Patient Findings" for details.
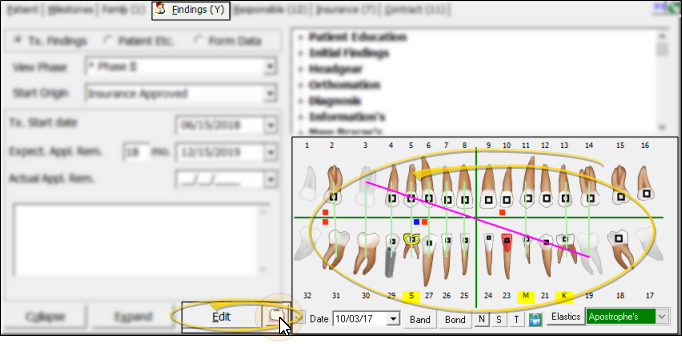
The

You can use the date drop down to view a different tooth chart, click the M in the upper-left corner to view and edit whole mouth procedures, and click the Notes icon to review and add notes to the tooth chart. To make additional changes, first click the Edit link at the top of the window. See "Patient Tooth Chart" for details. about how to use the tooth chart.
Click  Tooth chart to view / change the patient's current tooth conditions. See "Patient Tooth Chart" for details.

![]() Work with Treatment Findings - Your
Work with Treatment Findings - Your
Import Findings Into Treatment Chart / Plan - The data you enter into the Findings
Copy Findings to New Phase - When you update a patient's treatment phase from
Track Overtime Treatment - Run the Past Completion report to obtain details about the Past Completion totals on your Practice Statistical Analysis report. The report searches the Findings tab of your patient folders, and includes all treatment phases that have an expected appliance removal date less than or equal to the date you specify, and that do not have an actual appliance removal date. See "Past Completion Report" for details.
Print Available Responses - Run the Treatment Category report to review the list of responses you have available for inputting into the Findings
Print Current Patient Findings - Run the Patient Findings report to obtain the data you have recorded on the Findings
Add Findings to Mail Merge Documents - You can insert both the short and long descriptions of your patients' treatment findings and
Add Findings to Insurance Forms - You can import selected patient findings for the current treatment phase into the Insurance page of the patient folder, to be included on insurance forms.
![]() Treatments Filmstrips and Patient Findings – You can create Edge Animations filmstrips for specific patient findings that will automatically appear in a patient's Edge Animations list. For example, you might create a filmstrip containing videos you’d like to present to a patient with Class II, division 2 crowding. Once you have everything the way you want it, save that filmstrip to your Treatments tab. The filmstrip name must match your patient findings description EXACTLY. Then, when you launch Edge Animations for a patient with Class II, division 2 classification, and click the Patient tab, your Class II division 2 filmstrip will appear under the Findings heading. Clicking that finding will load the saved Treatments filmstrip.
Treatments Filmstrips and Patient Findings – You can create Edge Animations filmstrips for specific patient findings that will automatically appear in a patient's Edge Animations list. For example, you might create a filmstrip containing videos you’d like to present to a patient with Class II, division 2 crowding. Once you have everything the way you want it, save that filmstrip to your Treatments tab. The filmstrip name must match your patient findings description EXACTLY. Then, when you launch Edge Animations for a patient with Class II, division 2 classification, and click the Patient tab, your Class II division 2 filmstrip will appear under the Findings heading. Clicking that finding will load the saved Treatments filmstrip.


