Patient Online Forms Data
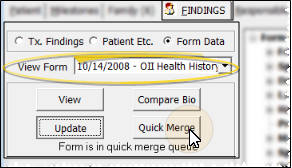
The Form Data option on the patient's Findings tab contains the results of online forms submitted by the patient. Use this page to review, compare, and update patient folder information based on online form data. You can also generate online form merge documents for the patient from this window.
Open the patient folder, and click the Findings tab. Then select the Form Data option at the top of the window.

Patients often accumulate multiple online forms as they update their health histories throughout treatment. You can view the results of each form whenever needed, and view responses according to the category assigned to them.
 Select Form to View- Use the View Form drop down to select the online form you want to work with. The results for that form appear at the right of the window.
 Filter Responses - Click View to open a new window. At the top of this window, select the type(s) of questions and responses you want to review. The results are color-coded for easy reference. (See "Online Form Question Categories" for detailsabout categorizing questions.)
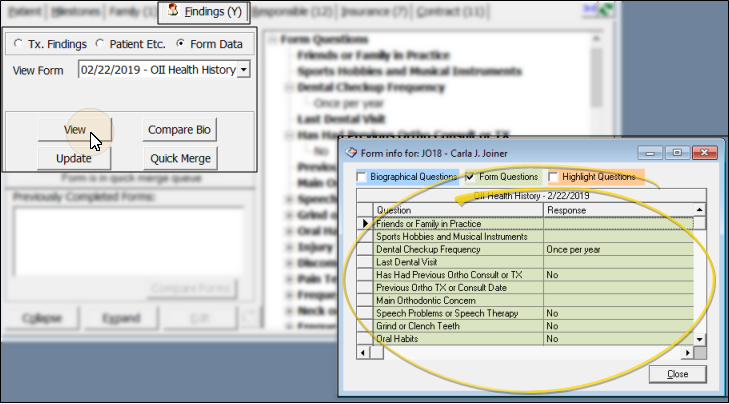
You can also view this window for the most recent health history by clicking the HH button from the patient's Treatment Chart toolbar. (See "Treatment Chart" for details.)
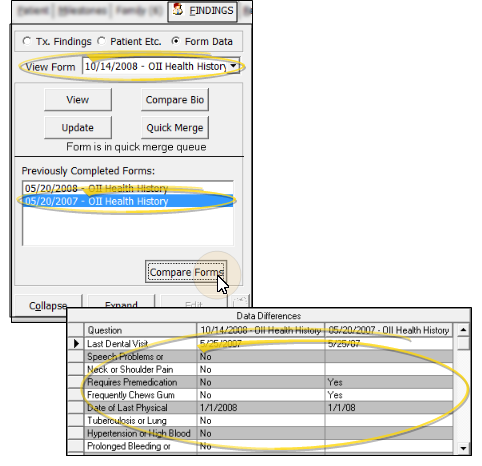
When a patient has completed two or more online forms of the same type, you can compare the results of those forms.
Use the View Form drop down to select the online form you want to work with. Then select the second form you want to compare from the Previously Completed Forms section of the window and click Compare Forms to see the differences between the forms. If you use multiple types of online forms, only forms that are the same type as your selected form appear in the Previously Completed Forms list.
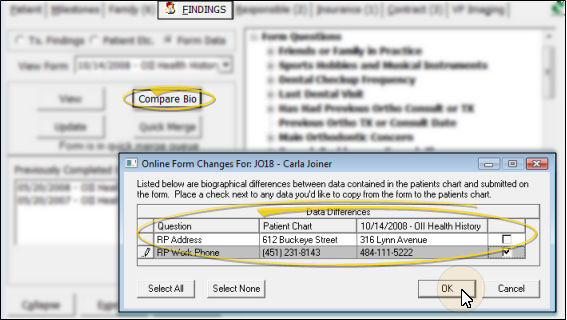
When you link an online form to a patient, the ViewPoint patient folder is not automatically updated. You can, however, use the Compare Bio option on the Form Data option on the patient's Findings tab to view data differences between an online form and the patient folder, and choose to update the patient folder as appropriate.
Use the View Form drop down to select the online form you want to work with. Then, click Compare Bio to show any discrepancies between the selected form and the biographical information currently in the patient folder. Individually select fields you want to update, or click Select All or Select None as needed. When you click Ok at the bottom of the window, the corresponding patient folder fields will be updated to match the data in the online form.
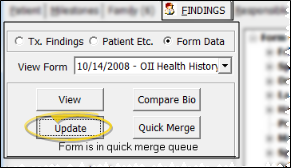
After a patient has completed at least one online form, you can launch the most recent form from the Findingstab of the patient folder to make updates to the responses.
Click Update to open the most recent online form, and ask the patient to make any changes. After the information is updated, and all required responses have been completed, click Submit at the bottom of the form. The updated form will be listed in the patient folder, along with the date. You might then want to use the Compare Bio button, described above, to update the patient folder as well. (See "Fill Out and Submit Online Forms" for details about completing online forms.)
Most often, you will use the Letter Queue function of the Online Forms window to generate the merge document that is linked to an online form. However, you can optionally generate the documents from the patient folder, even if you accidentally deleted the document from the Letter Queue.
Use the View Form drop down to select the online form you want to work with. If the linked document is already waiting in your Letter Queue, you will see a notice on the Forms Data window. To continue, click Quick Merge. The mail merge document will be generated in View mode (See "View Mail Merge Documents" for details). Once you capture or print the merged document, it is added to the correspondence history. If the document was in your online forms Letter Queue, it is removed from that list.
![]() Compare Data and Update Patient Folder
Compare Data and Update Patient Folder
![]() Compare Data and Update Patient Folder
Compare Data and Update Patient Folder