Patient Insurance Details
Use the Insurance tab of the patient folder to enter the information you will need for submitting insurance claims. You will need to enter insurance details for each treatment phase and insurance contract.
 Create an Insurance Detail Record - When a patient has insurance coverage, you must create a separate insurance detail record for each treatment phase as well as for each insurance company providing benefits.
The treatment phase assigned to the insurance detail record is determined by the
phase assigned to the Patient tab at the time the insurance record is created, and cannot be changed. When the patient enters a new treatment phase, you must create a new insurance detail record for that phase.
-
Confirm the Patient's Treatment Phase - Open the patient folder and be sure the correct treatment phase is selected.
-
Create a New Record - Click  New on the ViewPoint toolbar and select the Insurance Detail option. Or, press Ctrl-N on your keyboard from nearly any ViewPoint window. If a patient record is already active, that patient's information will be loaded automatically. Otherwise, you use Fast Find (either typing information or swiping a registered reward card) to search for the patient to work with. In this case, note that you will not be able to confirm the patient's treatment phase before creating the insurance record.
-
Select Responsible Party / Copy Existing Insurance Record - If the patient has multiple responsible parties, you must specify which is the insurance subscriber for this record. In addition, you can copy the details from an existing insurance record that is assigned to either the patient or a sibling.
Once the insurance record is created, you cannot change the responsible party that is assigned to it.
 Open Insurance Tab - Open the patient folder, and click the Insurance tab (or open the patient folder and press Alt-I on your keyboard). (See "Open Patient Folders with Fast Find" for details about opening a patient folder.) Notice the number of insurance detail records associated with this patient folder is indicated by the number on the Insurance tab heading.

Alert Stop - If the patient has an alert trigger enabled for this feature, the Alert Stop pop-up window will appear when you initiate this feature for the patient. Review the alert information, then either press Enter on your keyboard, or click the box to continue. You can also click the Edit link to open the Alert editor for that patient.
 Choose Insurance Detail to Work With - Since each insurance detail record is associated with a single treatment phase and a single contract, it is very common for a patient to have multiple records. The Insurance tab at the top of the patient folder window indicates the number of insurance detail records assigned to the patient. When a patient has multiple insurance detail records, use the <<Previousand Next >> buttons at the bottom of the window to move among them.
Coordinate multiple plans - When a patient is covered by multiple insurance plans, you first create each insurance detail record, then link the plans with the Covered by Another Plan option on Page 2 of each record. See Page 2 - Insurance Form Details, below, for more information.
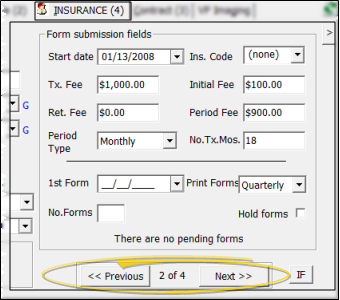
 Select Page to Work With - Each insurance detail record contains four pages of information, detailing the patient's insurance coverage for a specific phase of treatment. Use the [>] and [<] buttons near the top of the Insurance tab window to move among the pages of the same record.

 Page 1 - Subscriber, Contract, and Diagnosis Details - Page 1 of the Insurance tab identifies the subscriber, insurance company, financial contract, diagnostic codes, and scheduled insurance form generation. You can also print a one-time insurance form from this window.
 Subscriber Details - Identify the relationship among the patient, responsible party, and insurance company.
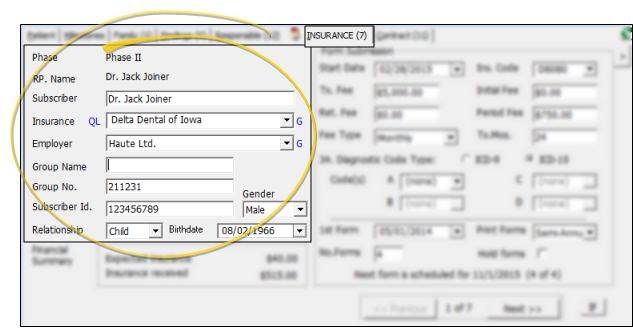
Subscriber - Enter the subscriber name as it should appear on insurance forms. Initially, this field defaults to the responsible party name. However, you may change it as needed without changing the responsible party name, and vice versa.
Insurance - Select the appropriate insurance company from your list.
If the insurance company is not in your list, select (new)
to create a new record. You can click the G button beside the name field to open the record for editing. (See "Insurance Company Table" for details.)
Print Quick Label - Click the QLbutton beside the name field to print a Quick Label for this party. See "Insurance Company Labels" for details.
Employer - Select the employer that is providing the insurance coverage. This field is not linked to the employer field on the Responsible tab of the patient folder. If the employer is not in your list, select (new) to go to the Employer table where you can create a new record. You can click the G button beside the name field to open the record for editing. See "Employer Records" for details
Electronic insurance requirement - If you submit insurance forms electronically, the Employer field must have a valid response. For this purpose, you might want to create a Self record in your Employer table.(See "Employer Records" for details.)
Group Name / Number - Enter the insurance group name and number.
Electronic insurance requirement - If you submit insurance forms electronically, the Group No. field must have a valid response. If no group number is available, enter 999999 in this field.
Subscriber
ID - Enter the identifying number the insurance company has assigned
to the subscriber. In the past, the social security number was the standard identifier. However, more
and more companies are assigning an alternate, unique number.
Gender - Indicate the subscriber's gender, not the patient's gender, in this field.
Relationship - Select the relationship between the subscriber and the patient from the available responses. This
field is not linked to the relationship field on the responsible party page of the patient folder.
Electronic Insurance Requirement - If the relationship is Self, the subscriber name and the patient name must match exactly.
Birthdate - Enter the subscriber's birthdate, not the patient's birthdate here. This date is often a required field, and is used for determining the primary coverage when multiple insurance companies are involved in the patient's care.
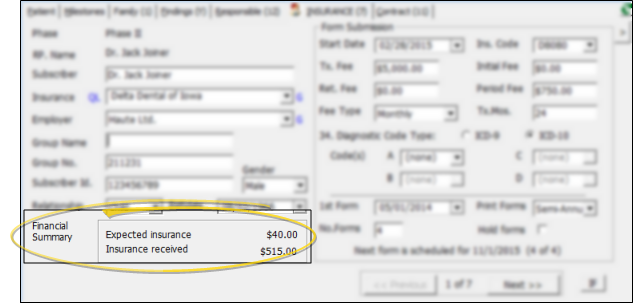
 Financial Summary - The summary shows you the portion of the contract you have allocated to this insurance coverage, and the amount insurance has paid so far.
 Form Submission Fields - Enter the dates and amounts to appear on insurance forms submitted for this financial contract, and select the appropriate diagnostic codes. Note that the dates and amounts are not linked to the patient's contract, and must be entered manually. Only certain fields are required for certain types of insurance forms.
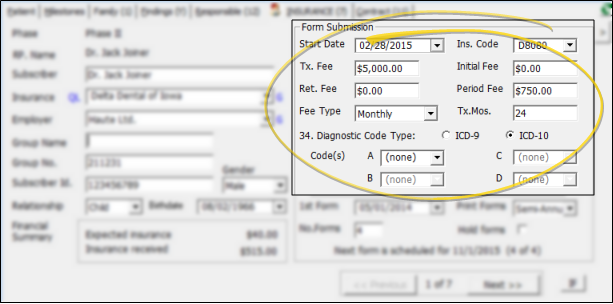
Start Date - (Not required for miscellaneous charge, pretreatment or partial forms) Enter the date the patient began treatment at your office. This field is not linked to the start date field in the patient contract or the patient findings.
Insurance Code - Select the appropriate CDT/ADA code for this patient's treatment. (See "Insurance Code Table" for details about maintaining your list of insurance codes.)
Fee Details - Enter the treatment fee, initial fee, retention fee, and period fee amounts, as well as the payment period and expected number of treatment months as you want them to appear on insurance contracts. These fields are not linked to the contract and must be entered manually.
Diagnostic Codes - Enable either the ICD-9 or ICD-10 option, then select the appropriate diagnostic code(s) to appear in section 34 of the ADA2012 insurance form. (See "Insurance Code Table" for details about maintaining your list of insurance codes.)
 Insurance Form Schedule - Set up when to generate continuation of treatment insurance forms for this insurance detail record.
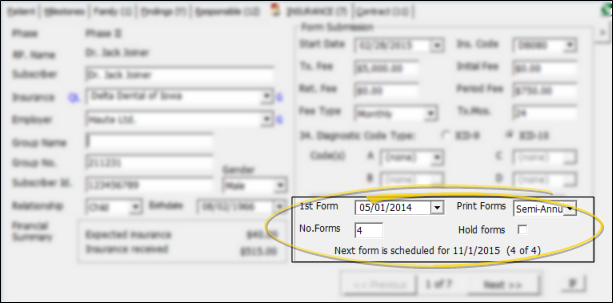
1st Form - Enter the date the first continuation of treatment form should be generated for this insurance detail. See "Insurance Forms" for details.
Print Forms - Select how often to generate continuation of treatment forms for this insurance detail.
Number of Forms - Enter the total number of forms to print throughout this insurance detail's contract. For example, if you selected to print forms quarterly, and you expect the contract to be paid off in one year, enter "4" to generate one insurance form per quarter for one year.
Hold forms - Enable this option to suspend generating scheduled forms for this record. Be sure to uncheck the box when you are ready to re-instate the schedule.
Next Scheduled Form Notice - If this insurance detail is currently set up for continuation of treatment forms, the next scheduled form date and number appear at the bottom of the window.
 Page 2 - Insurance Form & Multiple Plan Details - Page 2 of the Insurance tab includes details printed on the insurance form, and coordinates multiple insurance plans.
 Insurance Form Details - Use this section of Page 2 to indicate when and where treatment takes place, whether enclosures are included with the insurance form, and whether treatment is due to an accident.
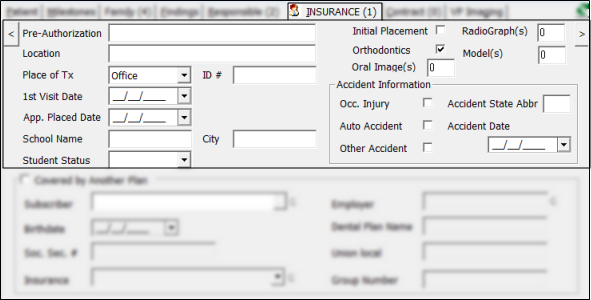
Pre-Authorization - Enter the pre-authorization number for this claim, if any.
Location - (AAO forms only.) Enter the information you would like printed in field 12 Location
(Local) of the AAO insurance form.
Place of treatment / ID# - Select the type of facility where treatment occurs, and enter the identification number of that facility.
First visit / appliances placed dates - These fields are used for insurance forms only, and are not linked to any other patient folder field.
School Name, School City, Student Status - Enter the patient's current academic situation, if applicable. These fields are not linked to any other School fields in the patient folder.
Initial Placement - Enable this option if applicable to the patient's orthodontic appliances.
Radiographs, Models, Oral Images Enclosed - If applicable, enter the number of each type of enclosure you are submitting along with the insurance form.
Orthodontics - Generally, you will enable this option for all patients.
Accident information - Complete these fields if applicable to the patient's treatment.
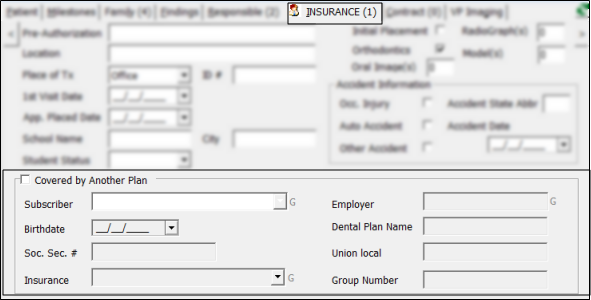
 Additional Coverage - Use this section of Page 2 only if a patient is covered by multiple insurance plans.
-
Create All Insurance Detail Records - When a patient has multiple insurance coverage, first create the insurance detail records for each insurance company, then use Page 2 to coordinate coverage, as described below.
-
Enable Additional Coverage Option - After creating all the necessary insurance detail records, enable the Covered by Another Plan option.
-
Select Subscriber - Click the dropdown button beside the Subscriber field and select the insurance detail record to coordinate. ViewPoint will auto-fill the remaining fields.
 Page 3 - Electronic Insurance Form Details - Page 3 of the Insurance tab includes details required for electronic insurance form submission. If you print and mail paper forms, you can ignore this page.
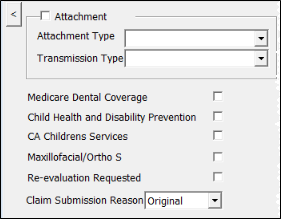
Attachment - Enable the Attachment option, then select the type of attachment you are sending, such as dental models, films, referral forms, or certain reports, and the method you will use to send the attachment, such as mail, email, or fax. The attachments are not sent automatically: You must manually send them as needed.
Medicare Dental Coverage - Enable this option if the serviced performed are covered by Medicare.
Child Health and Disability Prevention - Enable this option if the treatment is related to a previous Child Health & Disability (CHDP) screening.
CA Children's Services - Enable this option if services performed are authorized by California Children's Services (CCS).
Maxillofacial/Ortho S - Enable this option if the claim is for this type of service.
Re-evaluation requested - Enable this option to request the review of a prior authorization request.
Claim submission reason - Select the reason for generating this insurance form, specifying whether it is an original submission, a corrected claim, a replacement, or void.
 Page 4 - Treatment Narrative / Additional Information - The information you store on Page 4 of the Insurance detail record will be included in the Narrative Description fields of your Pre-treatment Estimate and Statement of Actual Services insurance forms, as well as electronic submissions. Generally, these fields are used to provide a treatment narrative, but you may enter any additional information required by the insurance company as needed.
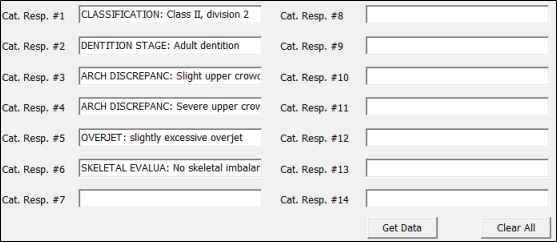
Manually add text - You may click in a field and type a unique response.
Auto-fill
treatment findings - You can import the patient's current findings into the insurance record.
Potential Data Overwrite - Using the import feature overwrites any existing responses!
Click Get Data to import data from the Findings tab of the patient folder into the fields on this page. This function imports the findings responses assigned to the phase that matches the phase assigned to this insurance detail record. Only categories flagged as Include on Insurance Forms in your Findings table are imported. If the patient has more than 14 flagged findings responses, additional responses are ignored.
Clear
All
- Click Clear All to erase all responses on this page. As a precaution, you must confirm your action before continuing.
Canadian Pre-Authorization form - When you generate Canadian Pre-Authorization forms, enable the Use Insurance Detail Data to print the fields on this page, or disable the option if you want to type the treatment narrative as the forms print.
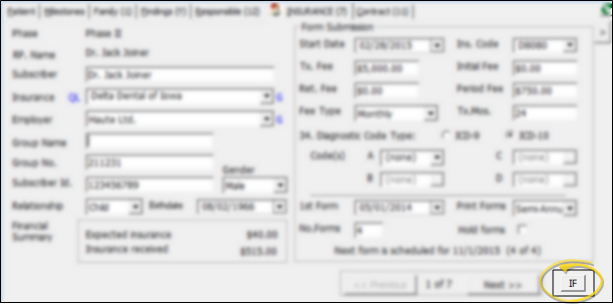
 Generate an Insurance Form - Go to the first page of the insurance detail record, and click the IF button in the lower-right corner of the window to generate a one-time insurance claim for this record. This feature is useful for generating one-time submissions, such as pretreatment estimates and miscellaneous charge insurance forms. To print regularly scheduled actual services forms, use the Print All Scheduled Insurance Forms feature. See "Insurance Forms" for details.
 Identify Primary Record - From the ViewPoint shortcut menu, select Actions then Order Folder Pages, Then use the arrows to re-order which responsible party and/or insurance record will appear first when you open that tab of the patient folder.
-
Select Actions then Order Folder Pages from the ViewPoint shortcut menu. (Or, press Alt+A on your keyboard to open the Actions menu options.)
-
Use the arrows to re-order the records as needed.
 Go to Previous / Next Patient - While viewing any tab of a patient folder, you can click <--
Previous and -->Next on the ViewPoint toolbar to navigate to the prior or next patient, alphabetically by last name.

Simultaneous Access - You may open multiple patient folders simultaneously, and multiple users may open the same patient folder simultaneously. However,
multiple users cannot change the same field in the same patient folder at the same time.
 Resize the Window - Hover your cursor at a corner of
the window, then click and drag to the desired size. ViewPoint remembers you preferred size, even after you exit and
re-enter.

Submit Insurance Claims - Run Insurance forms to generate and submit your patients' insurance claims either on plain paper with an approved laser printer, or electronically. Choose from a variety of formats and form types.See "Insurance Forms" for details.
![]() Create an Insurance Detail Record - When a patient has insurance coverage, you must create a separate insurance detail record for each treatment phase as well as for each insurance company providing benefits.
Create an Insurance Detail Record - When a patient has insurance coverage, you must create a separate insurance detail record for each treatment phase as well as for each insurance company providing benefits.![]() Open Insurance Tab - Open the patient folder, and click the Insurance tab (or open the patient folder and press Alt-I on your keyboard). (See "Open Patient Folders with Fast Find" for details about opening a patient folder.) Notice the number of insurance detail records associated with this patient folder is indicated by the number on the Insurance tab heading.
Open Insurance Tab - Open the patient folder, and click the Insurance tab (or open the patient folder and press Alt-I on your keyboard). (See "Open Patient Folders with Fast Find" for details about opening a patient folder.) Notice the number of insurance detail records associated with this patient folder is indicated by the number on the Insurance tab heading.![]() Choose Insurance Detail to Work With - Since each insurance detail record is associated with a single treatment phase and a single contract, it is very common for a patient to have multiple records. The Insurance tab at the top of the patient folder window indicates the number of insurance detail records assigned to the patient. When a patient has multiple insurance detail records, use the <<Previousand Next >> buttons at the bottom of the window to move among them.
Choose Insurance Detail to Work With - Since each insurance detail record is associated with a single treatment phase and a single contract, it is very common for a patient to have multiple records. The Insurance tab at the top of the patient folder window indicates the number of insurance detail records assigned to the patient. When a patient has multiple insurance detail records, use the <<Previousand Next >> buttons at the bottom of the window to move among them. ![]() Select Page to Work With - Each insurance detail record contains four pages of information, detailing the patient's insurance coverage for a specific phase of treatment. Use the [>] and [<] buttons near the top of the Insurance tab window to move among the pages of the same record.
Select Page to Work With - Each insurance detail record contains four pages of information, detailing the patient's insurance coverage for a specific phase of treatment. Use the [>] and [<] buttons near the top of the Insurance tab window to move among the pages of the same record.![]() Generate an Insurance Form - Go to the first page of the insurance detail record, and click the IF button in the lower-right corner of the window to generate a one-time insurance claim for this record. This feature is useful for generating one-time submissions, such as pretreatment estimates and miscellaneous charge insurance forms. To print regularly scheduled actual services forms, use the Print All Scheduled Insurance Forms feature. See "Insurance Forms" for details.
Generate an Insurance Form - Go to the first page of the insurance detail record, and click the IF button in the lower-right corner of the window to generate a one-time insurance claim for this record. This feature is useful for generating one-time submissions, such as pretreatment estimates and miscellaneous charge insurance forms. To print regularly scheduled actual services forms, use the Print All Scheduled Insurance Forms feature. See "Insurance Forms" for details.![]() Identify Primary Record - From the ViewPoint shortcut menu, select Actions then Order Folder Pages, Then use the arrows to re-order which responsible party and/or insurance record will appear first when you open that tab of the patient folder.
Identify Primary Record - From the ViewPoint shortcut menu, select Actions then Order Folder Pages, Then use the arrows to re-order which responsible party and/or insurance record will appear first when you open that tab of the patient folder.![]() Go to Previous / Next Patient - While viewing any tab of a patient folder, you can click <--
Previous and -->Next on the ViewPoint toolbar to navigate to the prior or next patient, alphabetically by last name.
Go to Previous / Next Patient - While viewing any tab of a patient folder, you can click <--
Previous and -->Next on the ViewPoint toolbar to navigate to the prior or next patient, alphabetically by last name.![]() Resize the Window - Hover your cursor at a corner of
the window, then click and drag to the desired size. ViewPoint remembers you preferred size, even after you exit and
re-enter.
Resize the Window - Hover your cursor at a corner of
the window, then click and drag to the desired size. ViewPoint remembers you preferred size, even after you exit and
re-enter.

 New on the ViewPoint toolbar and select the Insurance Detail option. Or, press Ctrl-N on your keyboard from nearly any


