Office Contacts Table
Use the Office Contacts
Watch the movie. (Windows Media Player, an active Internet connection, and a valid Ortho2 customer login are required to run video tutorials, webinars, and training programs.)
Office Contacts Security - Your security
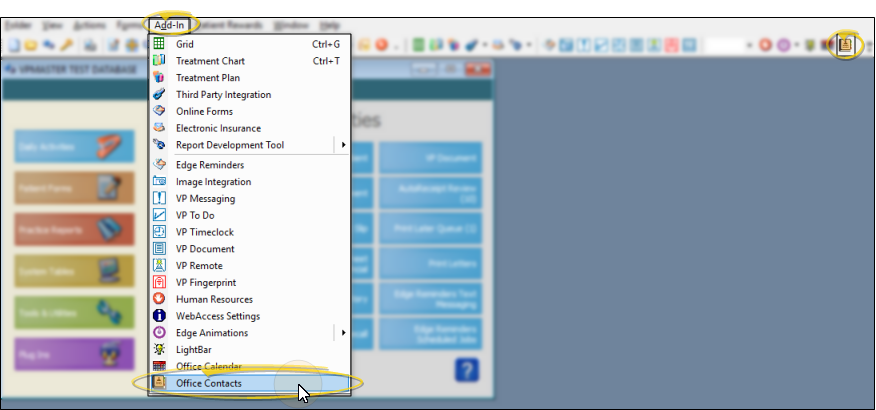
Select the -  Office Contacts icon from the ViewPoint toolbar, or open Office Contacts from the Add-in shortcut menu. (You can press Alt+D on your keyboard to open the Add-In menu options.) .

Quick Search - (View records only.) You can also use Quick Search to locate the record to work with. Quick Search only looks for the office contact Last Name field. Also, when you open the Office Contacts table with Quick Search, you can only view the information, not edit it
![]() Create or Edit Office Contacts
Create or Edit Office Contacts
![]() Select Existing Record - Choose an existing record from the drop down list at the bottom of the window, then edit the details as needed. You can also click Previous and Next to advance through all your choices. You can enable either the Show All or Show Active Only option to include / exclude inactive records in the dropdown list and Previous / Next toggle.
Select Existing Record - Choose an existing record from the drop down list at the bottom of the window, then edit the details as needed. You can also click Previous and Next to advance through all your choices. You can enable either the Show All or Show Active Only option to include / exclude inactive records in the dropdown list and Previous / Next toggle.

The records are listed alphabetically by last name, followed by company name.
![]() Create a New Record - Click New
Create a New Record - Click New


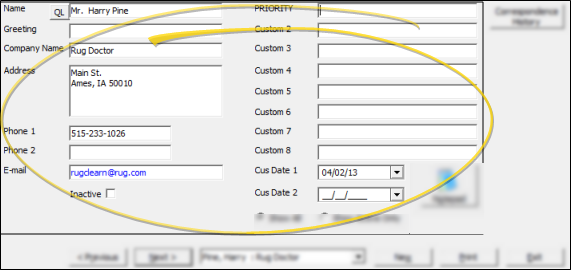
Name, Greeting, Company Name - Enter the name of the contact, the preferred greeting name, and the company name. The greeting field is primarily used for mail merge documents: Enter the greeting as you would like to see it in the salutation of a letter.
Quick Search only looks for the contact's last name.
Address, Phone, Email - Enter the address, phone numbers and email address of the party.
Inactive / Active Toggle - Once you create a record, you cannot delete it. You can, however, flag it Inactive. Records you flag as Inactive are not available for general use, but they remain in your system for reporting and other data collection needs. In addition, you can toggle records back to Active whenever needed.
Custom Fields - Use the User Defined Fields
Click the  Notepad icon to open the notepad window for this record. When the notepad is empty, the icon is red; when the notepad has existing text, the icon is blue. Use the notepad to type free-form notes. You can categorize your notes

![]() View Notes - Click a tab at the bottom
of the notepad window to choose which page to work with. If a tab
contains text, a plus sign (+) appears
beside the tab caption. (See "Set Up Notepad Tab Captions" for details about naming the pages.)
View Notes - Click a tab at the bottom
of the notepad window to choose which page to work with. If a tab
contains text, a plus sign (+) appears
beside the tab caption. (See "Set Up Notepad Tab Captions" for details about naming the pages.)

![]() Resize the Window - Hover your cursor at a corner of
the window, then click and drag to the desired size. ViewPoint remembers you preferred size, even after you exit and
re-enter.
Resize the Window - Hover your cursor at a corner of
the window, then click and drag to the desired size. ViewPoint remembers you preferred size, even after you exit and
re-enter.

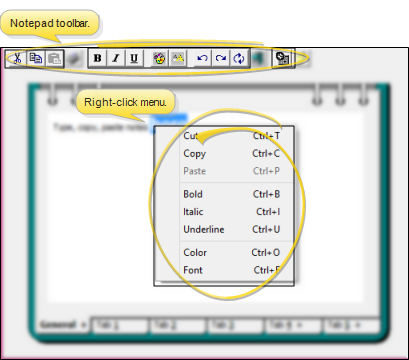
![]() Add & Edit Notes - Type your note in the notepad text box. You can use the notepad toolbar, right-click menu, and standard word processing keyboard shortcuts to complete your note, emphasize text, and add the current date and user initials. In
addition to regular text, you can type or paste a URL (Internet
hyperlink) into the field. Then, simply double-click the link to open that web page. (An active Internet connection is required for this feature to work.)
Add & Edit Notes - Type your note in the notepad text box. You can use the notepad toolbar, right-click menu, and standard word processing keyboard shortcuts to complete your note, emphasize text, and add the current date and user initials. In
addition to regular text, you can type or paste a URL (Internet
hyperlink) into the field. Then, simply double-click the link to open that web page. (An active Internet connection is required for this feature to work.)

Your toolbar icons may appear slightly different, depending on which notepad you are working with.
Date Stamp - Click  Date Stamp on the notepad toolbar (or press F2 on your keyboard) to insert the current date and user's initials at the cursor location.
Cut, Copy, Paste Text - You can use the icons on the notepad toolbar to  Cut,
Cut,  Copy, and
  Paste notepad text You can also right-click to access a basic text editing menu, or use standard cut, copy, and paste You can cut, copy and paste to add and edit text and/or images to many areas of your system using standard keyboard shortcuts ( Ctrl+X , Ctrl+C , Ctrl+V , respectively). Or, you can often right-click the field or image you are working with and select the action from a menu. In many cases, Ctrl+A selects all available text or images, ready for you to cut or copy, Ctrl+Z performs an Undo of the last action, and Ctrl+Y performs a redo of the last action. keyboard shortcuts.
Enhance Text - Use the notepad toolbar, right-click menu, or standard word processing keyboard shortcuts to edit the ![]() Bold,
Bold, ![]() Italics,
Italics, ![]() Underline,
Underline,  Color, and
  Font properties of your text. If you change the text font, be sure you select a font that is available to everyone in your network, or the text may not display correctly on some workstations.
Undo / Redo Last Action - Use the  Undo /
  Redo icons on the notepad toolbar (Or press Ctrl+Z / Ctrl+Y respectively) to erase the most recently completed editing action, or reverse the most recent Undo action.
Reload - Use the  Reload icon on the notepad toolbar to discard any changes you have made since entering the notepad. You must confirm your action before continuing: Once you reload the original text, the action cannot be undone.
Print - Click  Print from the notepad toolbar (or press Ctrl+P on your keyboard) to send the contents of the currently active notepad tab to any printer available to your workstation.
Save and Exit - When you close the notepad window with either the  Exit icon on the notepad toolbar, or the
  in the upper-right corner of the window, all your changes are saved immediately.
Overwrite Prevention - Because multiple users can access an individual record simultaneously, ViewPoint verifies that no one else has changed the notepad text you've been working on before you are allowed to save it. If the notepad has been edited by another user, you are given the option of reviewing and accepting the updated notes (overwriting your own changes), or rejecting the changes, and saving your own changes. If the conflict cannot be resolved, the original and changed text are both stored in a text file (NOTES.TXT) that you can find in your ViewPoint system directory.
![]() View Correspondence History -
View Correspondence History -

![]() Use Correspondence History - You can open and view correspondence history items, add new documents, restrict access to certain documents, change a document's category, and inactivate items that you no longer need to see.
Use Correspondence History - You can open and view correspondence history items, add new documents, restrict access to certain documents, change a document's category, and inactivate items that you no longer need to see.
Filter Documents - Use the list of categories at the left of the correspondence history window to include only certain documents in the list, or enable the All Categories option to include all documents. ViewPoint remembers your filter settings: So, no matter what workstation you use, or which correspondence history you are working with, your favorite filters go along with you.
Change Category Assignment - Documents are added to your correspondence histories with a default category. However, you can click in the Category column to change the assigned category as needed.
Inactive / Active Toggle - Once you create a record, you cannot delete it. You can, however, flag it Inactive. Records you flag as Inactive are not available for general use, but they remain in your system for reporting and other data collection needs. In addition, you can toggle records back to Active whenever needed.
Include Inactive - Enable the Include Inactive option at the bottom of the window to include items that have been flagged Inactive in the correspondence history. If this option is disabled, only active items will appear in the list.
View a Document - Click View to open the document for viewing and printing. You must have an appropriate viewing / editing tool, such as Adobe Acrobat, installed to be able to open files. Document restrictions, described below, may prevent you from opening certain documents.
![]() Document Restrictions - Document restrictions control who can open an item in the correspondence history.
Document Restrictions - Document restrictions control who can open an item in the correspondence history.
View Restricted Document - If the Restricted column, at the far right edge of the window, is flagged as Yes, only users assigned to a security group with Full Access to the Miscellaneous> Restricted Correspondence rights can view the document. If the Restricted column is No, anyone can view the document. (See "Set Up Security Access" for details.)
Add / Remove Restriction - To change the restriction status of a document, right-click the document and select the Restriction option. You can change document restriction status only if your security group allows Full Access to the Miscellaneous > Manage Restricted Correspondence rights. (See "Set Up Security Access" for details.)
Import Documents - You can import any document, in PDF form, into your dentist, professional, insurance company and office contacts correspondence histories, as well as into your VP Document practice correspondence history. See "Import Documents" for details.
Capture Documents - As you print a non-merge document, report, or other printable item, you can use the Capture tool to save a copy of that document in the correspondence history. See "Capture Documents" for details.
Scan Document - Use the Scan tool to send a digital copy of any document from your scanning device to a correspondence history.See "Scan Documents" for details.
Replace a Document - Use the Replace feature to overwrite a document in a correspondence history with a new document. You might do this, for example, to update your company policy and procedure handbook. Right-click a document, and select Replace. Then choose whether to import, capture, or scan the new document, overwriting the original document.
Click Exit (or press Alt+E) to save the changes you have made and close the editing window.

Print -
Print Quick Label - Click the QLbutton beside the name field to print a Quick Label for this party. See "Office Contacts Quick Labels" for details.


