Scan Documents
Use the Scan tool along with your digital scanner to make an electronic image of any picture or document, and store that image in a correspondence history, HR Manager document archive, or VP Document.
-
Prepare Your Scanner - Place the item to be scanned (or the first page of a multi-page document) in your scanner, and be sure the device is on and ready.
-
 Initiate Scan - Click Scan from the appropriate correspondence history.
 -
 Select Scanner - Choose which scanning device to activate for this scanning session. This step is necessary only if you have multiple scanners available.
 -
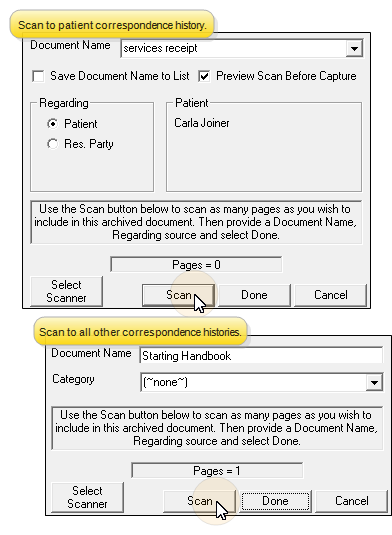
 Document Details - Enter the details for the document you want to scan, then click SCAN
 -
Select Settings & Start Scan - Select the settings you want to use, and scan the document according to the instructions for your local scanning device.
-
 Scan Additional Pages - After your scanning device has digitized the current page, you can insert another page in the scanner, and click SCAN to continue scanning a multiple-page document as needed. The scanning window indicates the number of pages that have been scanned into this document so far.
 -
Save and Exit - When you have scanned all pages, click Done at the bottom of the scanning window, and enter an output filename to complete the process.
Preview Option - If you enabled the Preview option before you started scanning, you can look at the scanned result before saving it. Once you close the preview window, you indicate whether you want to continue by saving the document to the correspondence history, or erasing the scan and starting over.
 Correspondence History > Scan.


