Capture Documents
As you print a non-merge document, report, or other printable item, you can use the Capture tool to save a copy of that document in a correspondence history.
-
 Initiate Capture - Open the appropriate correspondence history, and click Capture.
Capture to Patient Correspondence History - Open patient folder > ViewPoint toolbar >  Correspondence History > Capture.
Capture to HR Manager Employee Record - Open employee record > Employee Information ribbon bar > Edit section >  Document Archive> Capture.
Capture to Dentist, Professional, Insurance Company or Office Contacts Record - Open the dentist, professional, insurance company or office contact record > Correspondence History > Capture.
Replace a Document - Instead of capturing an additional document to the dentist, professional, insurance company or office contacts correspondence history, you could instead right-click an existing document, and select Replace > Capture to overwrite that document with your new one.
Capture to VP Document - ViewPoint toolbar >  VP Document > Capture.
Replace a Document - Instead of capturing an additional document to VP Document, you could instead right-click an existing document, and select Replace > Capture to overwrite that document with your new one.
-
 Document Details - Enter the details for the document you want to capture, and the resulting PDF file quality.

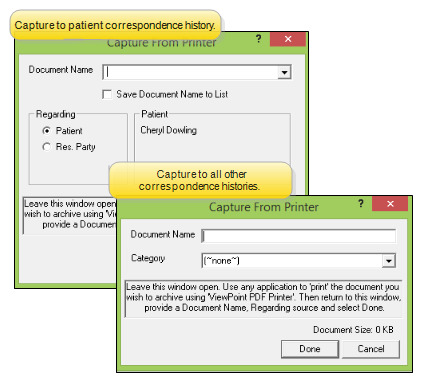
Document Name - Type a descriptive name for the document. Or, when adding a document to a patient correspondence history, you can click the drop down arrow to select a description from your Document Name table.
Save Document Name - (Patient correspondence history only.) Enable this option to save the name in the Document Name table for future use.
Category - (Not initially available for patient correspondence histories.) Choose a category for this document, from your History Categories table. After the document is saved, you can add a category assignment to your patient correspondence histories, and change the category in all correspondence histories if needed.
Regarding - (Patient correspondence history only.) Choose whether this document is regarding the patient or a responsible party. If the patient has multiple responsible parties, you may select the party to assign to the document.
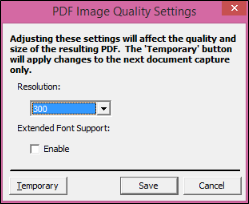
 PDF Settings - (Optional.) Open the PDF Settings window to choose the document quality, and specify whether you need extended font support, for example, to include a bar code. You might use these options to select a lesser quality resolution in order to reduce the document file size.

Resolution - Choose the quality of the document output. The higher the number, the better the quality, but the bigger the document file will be. Documents over 2mb may not be saved to the correspondence history correctly.
Extended Font Support - Enable this option if the document will contain special characters, such as a bar code.
Temporary / Save - Click Temporary to use these settings for this capture only. Or, click Save to keep these settings for all future captures.
-
Leave the capture window open.
-
Go to the application where the desired document resides (i.e. Word).
If you want to print something from ViewPoint, you will need to open another ViewPoint session.
-
Print the document, selecting the ViewPoint PDF Printer. You can now close the source application.
-
Return to the original capture window and click Done to save the document with the details you provided above.
Capture Merge Document from Print Later Queue - You can capture a merge letter to the correspondence history directly from the Print Later queue. See "Print Later Queue" for details.
Capture Merge Document from Word - The Capture to Correspondence History option provides you with a way to save a merged document to a correspondence history without having to print the letter. Depending on the letter properties, the document may be added to both the dentist, professional, or responsible party correspondence history as well as the patient correspondence history.See "View Mail Merge Documents" for details.
Size Limitation - Files larger than 2MB may not be successfully incorporated into your correspondence history records. You might want to change the PDF settings (described in "Document Details," above) to a lower resolution so the resulting file is smaller.
 Initiate Capture - Open the appropriate correspondence history, and click Capture.
 Document Details - Enter the details for the document you want to capture, and the resulting PDF file quality.
 Correspondence History > Capture.
 Document Archive> Capture.


