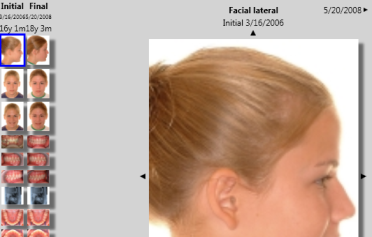
The patient Imaging page shows you the images you have imported for this patient. You can select to view the images in any of your available layouts, and choose which timepoint to display.
How to Get Here
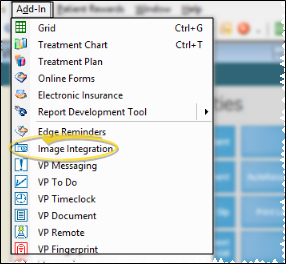
You can open this feature in multiple ways: Use the method that's most convenient for you.
Work with an Image Click to select an image. Then, depending on the layout type you are viewing, you can use navigation, double-click and right-click tools to maximize, compare, copy, email, and export the image.
Navigate Index or Card Flip Layout - If you are viewing a card flip or index layout you can use either the arrows at the margins of the image or the arrow keys on your keyboard to move through all images in the layout. Notice you can select a different timepoint with either the arrows at the sides of the image, or the timepoint date captions that appear above the image.
Navigate Card Flow Layout - When viewing a card flow layout, click the image that comes "before" or "after" the current image, or use the slider bar at the bottom of the window to move through the images in the timepoint. You can also click Over at the right edge of the slider bar to turn the current image card over and view additional details.
Compare Image - Right-click and select Compare to open the Compare Images window with this image as the default first image to use. You can also open the Compare Images window from the Imaging section of the Edge Imaging ribbon bar. See "Compare Images" for details.
Copy to Clipboard - Right-click and select Copy to copy this image to your clipboard. You can also copy images from the Imaging section of the Edge Imaging ribbon bar. See "Copy Image / Layout to Clipboard" for details.
Copy to Another Patient - Right-click and select Copy To to copy this image to another patient folder. You can also copy images to another patient from the Imaging section of the Edge Imaging ribbon bar. See "Copy Image / Timepoint to Another Patient" for details.
Email Image - Right-click and select Email to send this image as an email attachment. You can also email images from the Imaging section of the Edge Imaging ribbon bar. See "Email Images & Layouts" for details.
Single Import - Right-click and select Single Import to replace this image with a different imported image. You can also open the Single Import window from the Imaging section of the Edge Imaging ribbon bar. See "Import a Single Image" for details.
Export - Right-click and select Export to save this image as a .JPG file. You can also export images from the Imaging section of the Edge Imaging ribbon bar. See "Export Image / Layout to JPG" for details.
Maximize - Double-click, or right-click and select Maximize to display this image as large as possible on your screen.See "Maximize Images" for details.
Properties - Right-click and select Properties to view the image file details. You cannot edit any details while viewing images, but you can change the Date Taken and Notes fields when in editing mode. See "Image Properties" for details.
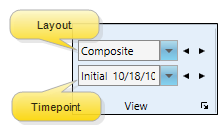
View Options Use the timepoint and layout fields in the View section of the Imaging ribbon bar to choose a different set of images to view. You can also toggle to different timepoints while viewing a cardflip layout, or while viewing a maximized image.
Layout - Click the layout field and select from your list of layouts. Or, click < and > to toggle through all options. The way your images look on your screen depends upon your layout editor settings.
Timepoint - Click the timepoint field and select from the timepoints available for this patient. Or, click < and > to scroll through all timepoints. You can also select to view All Timepoints for the patients. (Note that you can limit Dynamic layouts to including only the first and last timepoints when you choose to view All Timepoints. This option is useful for presenting "before" and "after" images. See "Set Up Image Layouts" for details about selecting this option.)
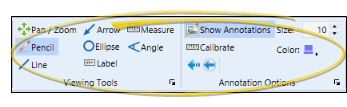
Annotation / Viewing Tools Use the Viewing Tools and Annotation Settings section of the Edge Imaging ribbon bar to move the image in its window, as well as add lines, measurements, labels, and
free-hand illustrations to an image. This feature is especially useful
during patient/parent presentations. See "Image Annotation Tools & Options" for details.
Imaging General Options Use the tools in the Imaging section of the Edge Imaging ribbon bar to morph images and timepoints, initiate integrations, compare, copy, email and export images, and initiate the importing process.
Edit - Click Edit from the Imaging section of the Edge Imaging ribbon bar to use editing tools, actions, adjustments, and options. Editing mode is not available from Card Flow layouts. You can, however, maximize individual images in a Card Flow layout to edit them. Your Edge Imaging background changes slightly to indicate when you are in Edit mode. When finished, click Cancel to return to viewing mode.
Animations - Click Animations from the Imaging section of the Edge Imaging ribbon bar to open Edge Animations with this patient's images loaded. See "Edge Animations" for details.
Timepoint Morph - Use Timepoint Morph tools to create an animated presentation of the changes that have occurred over the course of the patient's treatment, using any image type, and any number of timepoints you have added to the patient's Edge Imaging page. You can view the animations immediately, save them as independent video files, or export them to Edge Animations. See "Timepoint Morph" for details.
Image Morph - Use Image Morph tools to cosmetically manipulate images. This feature is especially useful for cleaning up patient photos, sharpening the details of x-ray images, and showing patients the potential results of orthodontic treatment. See "Image Morphing" for details.
SmartCeph - (Ceph tools are part of Premier Imaging, an optional module, available from Ortho2.) Click to select the patient's lateral ceph, then click SmartCeph to open your SmartCeph tools. The SmartCeph button is available only when you have selected to view the patient's lateral ceph: Otherwise, the button appears dim on the ribbon bar. When you save a traced ceph or analysis report in SmartCeph, a copy is saved in the appropriate timepoint of the patient's Edge Imaging page. You can view these images from the Index layout, or from any layout that includes SmartCeph image types.
Compare Images - Click Compare from the Imaging section of the Edge Imaging ribbon bar, or right-click an image and select Compare. See "Compare Images" for details.
Integrations - Click Integrations from the Imaging section of the Edge Imaging ribbon bar, then select the Edge Imaging integration to open, such as Submit ABO Case.
Auto-Import - Use the Auto-Import feature to add a series of images to a patient record. The series is tagged with a timepoint, indicating the point in treatment when the images were taken. You can auto import additional image sets into other timepoints throughout treatment, providing you with a visual comparison of the patient's condition across time. See "Auto-Import Images" for details.
Single Import - Click Single Import from the Imaging section of the Edge Imaging ribbon bar, or right-click an image and select Single Import to import a new image into the patient record. See "Import a Single Image" for details.
Copy to Clipboard - Click Copy from the Imaging section of the Edge Imaging ribbon bar to copy this image or layout to your clipboard. You can also right-click to copy individual images See "Copy Image / Layout to Clipboard" for details.
Copy to Another Patient - Click Copy from the Imaging section of the Edge Imaging ribbon bar to copy this image or layout to another patient folder. You can also right-click copy individual images to another patient . See "Copy Image / Timepoint to Another Patient" for details.
Email Image - Click Email from the Imaging section of the Edge Imaging ribbon bar to send this image or layout as an email attachment. You can also right-click to email individual images. See "Email Images & Layouts" for details.
Export - Click Export from the Imaging section of the Edge Imaging ribbon bar to save this image, layout, or original image as .JPG files. You can also right-click to export individual images. See "Export Image / Layout to JPG" for details.
Refresh - Click Refresh from the Imaging section of the Edge Imaging ribbon bar to refresh your screen with the latest imaging changes for this patient.
Select All - Click Select All from the Imaging section of the Edge Imaging ribbon bar to select all images in the displayed layout for copying, emailing, or exporting.
Full Screen - Use the Full Screen option to fill your entire monitor with the active window, without status bars, ribbon bars, or other distractions. This feature is often useful for presenting progress images to patients and parents. See "Full Screen Mode" for details.
Presenter - Use the Presenter to duplicate whatever is currently being shown on your Edge Imaging, or Edge Animations screen onto your secondary display screen. This feature is particularly useful for showing patient images to parent and professionals, as well as presenting case, compliance, and treatment progress information.See "Presenter" for details.
More Information
Images Appear Distorted - If a dynamic layout has both Stretch to fit and Equal row heights enabled, the proportions of some images may distorted. See "Set Up Image Layouts" for details.
 Edge Imaging from the ViewPoint toolbar.
 │
│  │
│  │
│ 


 Over at the right edge of the slider bar to turn the current image card over and view additional details.


 Cancel to return to viewing mode.


