You are here: Modules & Integrations > Edge Imaging > Use Edge Imaging > Copy Images /Timepoints to Another Patient

Copy Image / Timepoint to Another Patient

You can copy an individual image or an entire timepoint to another patient. This feature is particularly useful when images were accidentally imported into the wrong patient folder.

  1. Open the Patient's Image Layout - View the image layout that contains the images you want to copy: You cannot copy from a cardflow layout. (See "View Patient Images" for details.)

  2. Select Image to Include - (Not required when copying an entire timepoint.) Click the individual image you want to copy to another patient.

  3. Initiate CopyClick to Open 
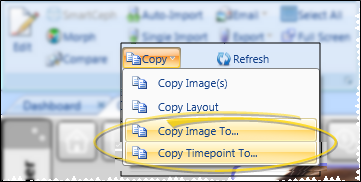
Click Copy from the Imaging section of the Edge Imaging ribbon bar, and choose Copy Image To if you want to copy only the selected image, or choose Copy Timepoint To if you want to copy the entire timepoint. (If you have not selected an individual image, the Copy Image To choice is not available.)

    You can also right-click an image and select Copy To.... In this case, you can only copy that image, and not the timepoint.

  4. Choose Patient & Image DetailsClick to Open Choose the patient to copy the image(s) to, and enter the image details.

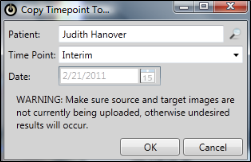
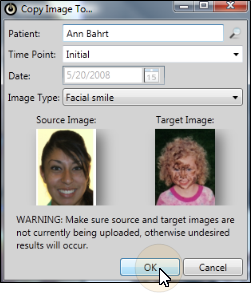
  5. Save - Click Ok to continue. If the target already has images in place, you must confirm you action to continue. Once the copying is completed, the image is now saved in the new patient folder, and is also still in the original patient folder.

More Information

Additional Options - To copy an image or layout so you can use it in a document or other application, use the Copy to Clipboard or Export feature instead.

Table of Contents │ Get More Help │ Remote Support │ New Customer Care

Ortho2.com │1107 Buckeye Avenue │ Ames, Iowa 50010 │ Sales: (800) 678-4644 │ Support: (800) 346-4504 │ Contact Us

Chat with Software SupportChat with Network Engineering │ Chat with New Customer Care

Remote SupportEmail Support │ Online Help Ver. 12/18/2015