Open the Patient's Image Layout - View the static image layout that contains the images you want to export: You cannot export from a cardflow layout. (See "View Patient Images" for details.) You can also export an image from the Image Morph window.
Select Images to Include - (Not required when exporting an entire layout or Image Morph window.) Click an individual image to work with. To select multiple consecutive images, hold down the Shift key, then choose the first and last image to include. To select multiple non-consecutive images, hold down the Ctrl key, then click each image you want to include. In addition, you can click Select All from the ribbon bar (or press Ctrl-A on your keyboard) to include all images.
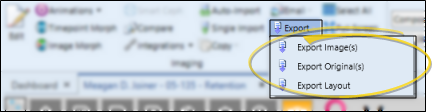
Initiate Export![]() Click
Click  Export from the
Finish![]() Navigate to the folder where you want to save the image files. Individual images are saved automatically with a default filename: Layout exports prompt you to confirm the filename before saving.
Navigate to the folder where you want to save the image files. Individual images are saved automatically with a default filename: Layout exports prompt you to confirm the filename before saving.

 │
│ 


