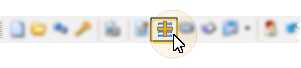
 Add to Stacks from the ViewPoint toolbar or the Actions section of the ViewPoint shortcut menu to create stacks, and assign employee responsibility for the tasks.
Use Stacks to flag patients for further action. When you find yourself needing to complete additional work for a patient at a later time, simply add the patient to an appropriate stack, or add the task to someone else's stack. When you have finished the task, you can remove the patient from the stack. Stacks do not leave an audit trail.
Watch video tutorial. (Windows Media Player, an active Internet connection, and a valid Ortho2 customer login are required to run video tutorials, webinars, and training programs.)
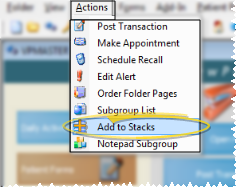
Create New Stacks - Click Add to Stacks from the ViewPoint toolbar or the Actions section of the ViewPoint shortcut menu to create stacks, and assign employee responsibility for the tasks.
ViewPoint toolbar:
Shortcut menu:
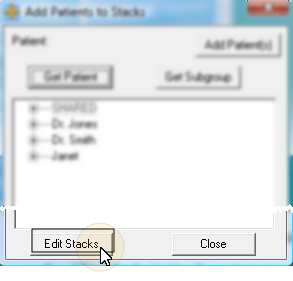
Click Edit Stacks from the bottom of the Add to Stacks window.
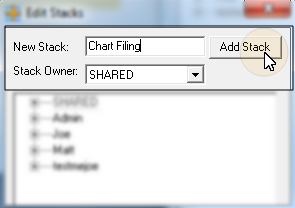
Enter a name in the New Stack field, and select the Stack Owner. You can choose from everyone with a ViewPoint user account, or select Shared, which makes the stack available to all users. Finally, click Add Stack.
Add Patients & Manage Existing Stacks - Click Add to Stacks from the ViewPoint toolbar or the Actions section of the ViewPoint shortcut menu to assign patients and work with your stacks.
ViewPoint toolbar:
Shortcut menu:
Add A Patient to a Stack - Click Get Patient to choose the patient to work with, then select the appropriate stack. Finally, click Add Patient to add the patient to the selected stack. You can repeat the process to add the patient to multiple stacks.
Click Get Patient and use Fast Find to select the patient to work with. (If a patient folder is already open, that patient is the default and you do not need to use Get Patient.) The name of the selected patient is added to the Add to Stacks toolbar.
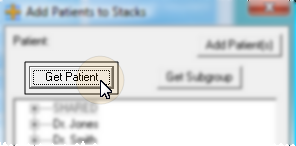
Click the stack name to work with. You can add a patient to your own stack, someone else's stack, or a shared stack. If the patient has already been assigned to the stack, the stack name is highlighted in yellow, and ViewPoint prevents you from assigning the patient to this stack again.

Click Add Patient to complete the process.

The stack name is highlighted in yellow to indicate the patient has been added. You can select another stack and click Add Patient to add the currently selected patient to that stack as well, or use Get Patient or Get Subgroup (described below) to select different patients to work with, or click Close to exit the Add to Stacks function.
You can also use an auto-event to add a patient to a stack whenever a particular appointment event occurs. See "Set Up Procedure List" for details.
Add a Subgroup of Patients to a Stack - Click Get Subgroup to choose the patients to work with, then select the appropriate stack. Finally, click Add Patients to add all patients that fit your subgroup to the selected stack. You can repeat the process to add the patients to multiple stacks.
Click Get Subgroup and choose the subgroups to work with. A description of the subgroup is added to the Add to Stacks toolbar.
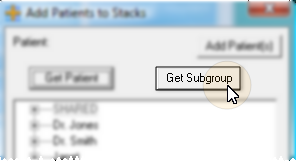
Click the stack name to work with. You can add the patients to your own stack, someone else's stack, or a shared stack.
Click Add Patients to complete the process.
You can select another stack and click Add Patients to add the currently selected patients to that stack as well, or use Get Patient (described above) or Get Subgroupto select different patients to work with, or click Close to exit the Add to Stacks function.
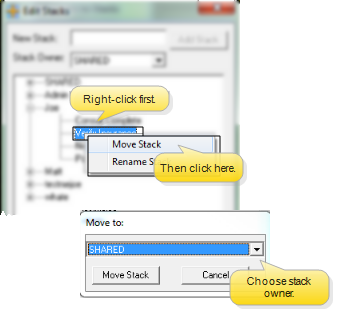
Move Stack to New Owner - Click Edit Stacks. Right-click a stack name, and select Move Stack. Then choose the new stack owner. Click Move Stack to confirm you action.
Click Edit Stacks from the bottom of the Add to Stacks window.
Right-click the stack to work with, and select Move Stack. Then choose the new owner and click Move Stack to confirm your action.
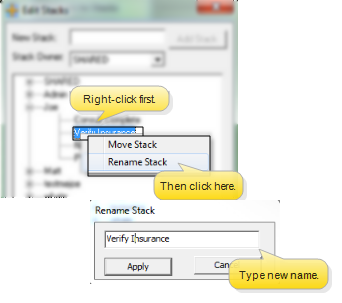
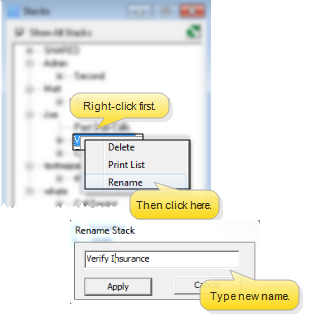
Edit Stack Name - Click Edit Stacks. Right-click a stack name, and select Rename Stack. Then type the new stack name. Click Apply to confirm you action.
Click Edit Stacks from the bottom of the Add to Stacks window.
Right-click the stack to work with, and select Rename Stack. Then type the new stack name. Press Enter on your keyboard, or click Apply to confirm your action.
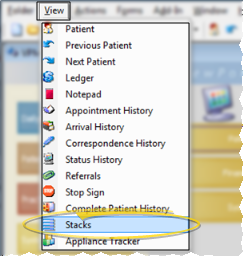
View & Work With Patients In Stacks - Use the  Stacks option from the View section of your ViewPoint shortcut menu to see the list of patients assigned to your stacks, grouped by the user each stack is assigned to.
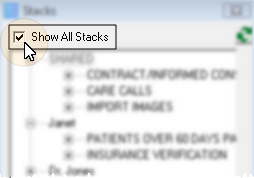
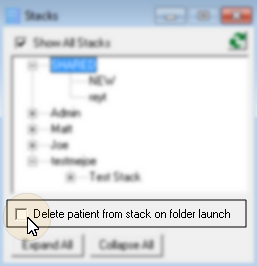
Show All Option - Enable the  Show All Stacks option to see all users' stacks. Disable the option to see only your own stacks and shared stacks.
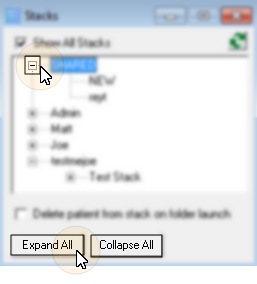
Expand / Collapse Details - You can collapse and expand individual stacks as needed, or use the Collapse / Expand buttons to affect all stacks.
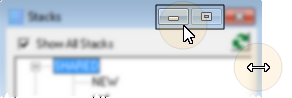
Change Stacks Window Size & Location - Drag the edges of the Stacks window, or use the resizing buttons on the title bar to change the window size. You can also drag the window to a new location on your screen by clicking and dragging the title bar at the top of the window.
Perform a ViewPoint Task for a Patient - Click a patient name in a stack, then click an icon from the ViewPoint toolbar to perform that task for the patient. If the Delete
patient from stack option at the bottom of the Stacks window is enabled,
the patient will be removed from the stack automatically as soon as you
initiate the task.
Otherwise,
you will need to remove the patient from the stack manually, as described
below. If
you perform a task for the patient when the Stacks feature is not open, that
action does not remove the patient from the stack.
Open a Patient Folder - Double-click a patient name in a stack to open that patient folder. If the Delete
patient from stack option at the bottom of the Stacks window is enabled,
the patient will be removed from the stack automatically as soon as you
open the patient folder.
Otherwise,
you will need to remove the patient from the stack manually, as described
below.
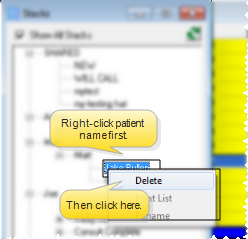
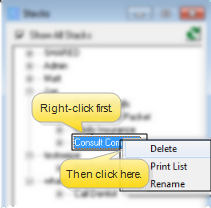
Remove a Patient From a Stack - Right-click a patient name in a stack and select Delete to manually remove the patient from the list.
Edit Stack Name - Right-click a stack name and select Rename Stack. Then type the new stack name. Press Enter on our keyboard, or click Apply to confirm you action.
Delete a Stack - Right-click a stack name and select Delete. When you delete a stack, you also delete the list of patients associated with that stack.
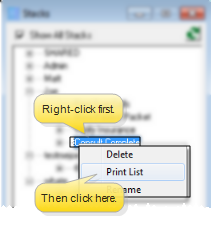
Print a Stack - Right-click a stack name and select Print List to generate a printed copy of that stack. The output includes the stack name, date printed, and the patients currently assigned to the stack. This feature is useful for keeping your list at hand while you perform non-ViewPoint tasks, and for sharing at staff meetings.
Refresh List - If you leave the View Stacks window open for a length of time, click
the  Refresh
button in the upper-right corner of the window to be sure you are viewing
the most current information.
Refresh
button in the upper-right corner of the window to be sure you are viewing
the most current information.
 │
│  │
│  │
│ 
Ortho2.com │1107 Buckeye Avenue │ Ames, Iowa 50010 │ Sales: (800) 678-4644 │ Support: (800) 346-4504 │ Contact Us
Chat with Software Support │Chat with Network Engineering │ Chat with New Customer Care
Remote Support │Email Support │ Online Help Ver. 12/18/2015


