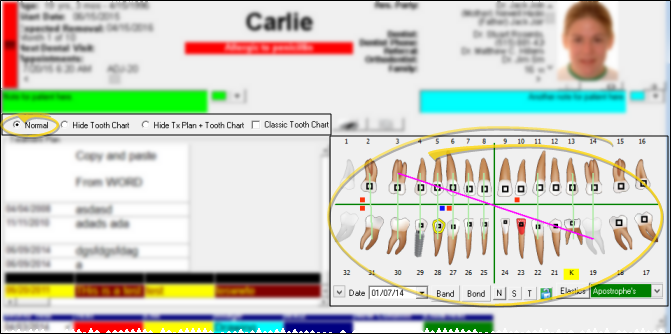
Use the tooth chart to record and review the state and health of your patient's
teeth. Tooth chart data is saved
by date and treatment phase so you can review progressive tooth conditions as necessary. You can view the tooth chart from a patient folder, and include it in mail merge documents, and on your patient appointment cards.
How to Get Here
You can open this feature in multiple ways: Use the method that's most convenient for you.
Treatment Chart Select the Normal viewing option on the patient's Treatment Chart to view and edit the patient's tooth chart.
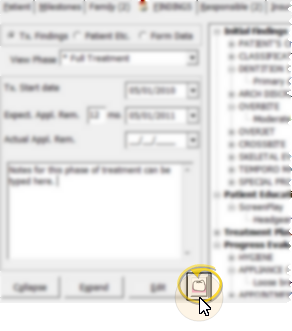
Patient Folder Findings tab. Click the Tooth Chart button at the bottom of the patient folder Findings tab or Findings tab editor to view or change the patient's tooth chart.
Use This Feature
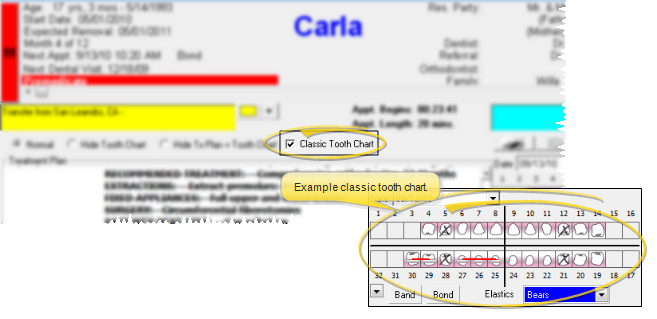
Enable / Disable Classic Tooth Chart (Available only when viewing the tooth chart from the Treatment Chart.) Choose whether to view the tooth chart in graphical or classic mode on the patient's treatment chart. (The tooth chart always displays in graphical mode when viewed from the Findings tab of the patient folder.) While the classic tooth chart is smaller, providing more screen space for the treatment plan and chart records, not all editing features are available when you view the tooth chart in classic mode.
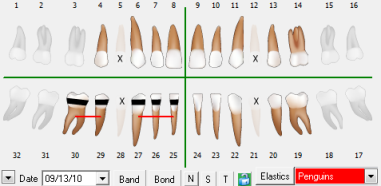
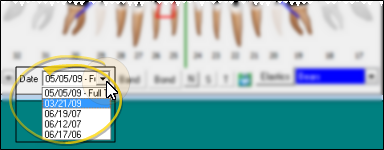
Select Record to View Choose the date you wish to review. Tooth chart data is saved by date and treatment phase. The appearance of a patient's tooth chart depends upon the appliances and conditions you have selected for each tooth.
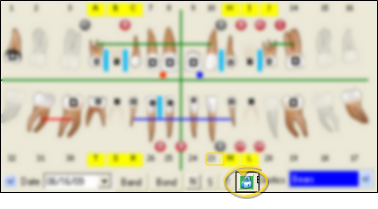
Lock Editing Mode (Not available in classic viewing mode.) Click Lock to prevent accidental editing of the tooth chart. The lock stays in effect for this station only. Click Lock again to allow editing
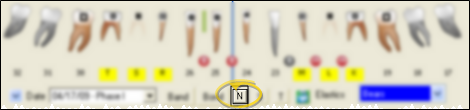
Numbering Method Click N while viewing the tooth chart from a patient's Treatment Chart, or while editing the tooth chart from the Findings tab to temporarily change the numbering system while you consult with dentists, oral surgeons or other professionals. When you exit and reload the patient folder, your default numbering system is used. (The default numbering method is always used when simply viewing the tooth chart at the bottom of the Findings tab.) (See "Tooth Numbering Data Tool" for details about selecting your default numbering method.)
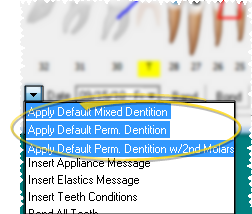
Dentition Stage You can select the dentition stage of individual teeth as needed, or apply a pre-determined dentition template to all teeth at once.
Toggle Individual Tooth Dentition - To toggle the dentition of an individual tooth, click the tooth you want to work with. Or right-click the tooth to select the Deciduous or Permanent stage. (The dentition will not toggle if any editing mode is enabled at the bottom of the tooth chart window.)
Apply Dentition Template - Click the additional options button ( [V] ) at the bottom of the tooth chart window, then select a dentition template.
Visual Indicators - Each tooth stage is illustrated by a different type of graphic: Deciduous; Permanent
Click vs Drag Tooth Chart Actions - When you click and release a tooth, the tooth chart toggles the dentition stage. When you click and hold a tooth, you can then drag to add elastics. (Elastics are described below.)
Elastics Click a tooth, then drag to add elastics between teeth in the tooth chart. You can also select the elastics type to use, and remove elastics as needed.
Set Up Elastics Types - Use the Tooth Elastics table to set up the list of elastic types to use with your patient tooth charts. See "Set Up Tooth Chart & Elastics Options" for details.
Set Up Elastics Templates - (Optional.) Use the Elastics Library to set up pre-determined elastics templates that you can apply to your patients' tooth charts. See "Set Up Elastics Library" for details. You can also create elastics templates directly from a patient's tooth chart, described below)
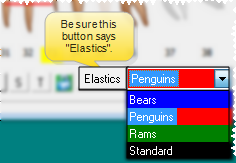
Choose Elastics Type (Optional.) - Click in the Elastics field at the bottom of the tooth chart, then select the type of elastics to use. ViewPoint remembers the elastics type you used last, and provides it as the default. (Note that if you click the Elastics button instead, you toggle to using the Elastics Library feature. .
Draw Individual Elastics - Click and hold the first tooth you want to work with. Then, drag your cursor to the last tooth you want included in the group and release your mouse button.
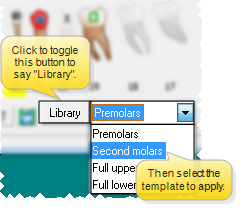
Apply Elastic Template - Click the Elastics button at the bottom of the tooth chart to toggle to the Library feature, if needed. Then select the template to apply. The template is added to any elastics already in the patient's tooth chart. (You can create elastic templates directly from the tooth chart, or create them with the Elastics Library table.)
Remove Individual Elastic - Right-click the elastics line you want to work with and select Remove.
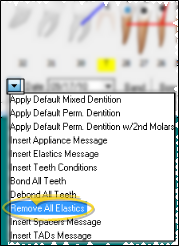
Remove All Elastics - Click the additional options button ( [V] ) at the bottom of the tooth chart window, then select Remove All Elastics to clear all elastics from a patient's tooth chart.
Visual Indicator - Teeth that have elastics applied display this graphic, in the selected elastics color:
Click vs Drag Tooth Chart Actions - When you click and release a tooth, the tooth chart toggles the dentition stage. When you click and hold a tooth, you can then drag to add elastics. (Applying dentition is described above.)
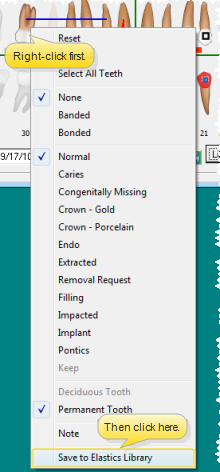
Save Elastics to Library - In addition to creating elastics templates with the Elastics Library, you can create a template from a patient's tooth chart by clicking the options button ( [V]) at the bottom of the tooth chart and selecting Save to Library.
Bands, Bonds, TADS & Tooth Conditions Right-click the tooth to work with, then enable / disable the checkmark beside the appliance or tooth condition you want to apply or remove. Certain tooth conditions can also be applied by using the buttons at the bottom of the tooth chart.
Band - Apply and remove the Band option to individual teeth as needed. Tell me more...
Bond - You can bond / debond individual teeth as needed, or select to bond / debond all teeth at once. Tell me more....
Caries- Apply the Caries condition to individual teeth as needed.
Congenitally Missing- Apply the Congenitally Missing condition to individual teeth as needed.
Crown - Gold- Apply the Crown - Gold option to individual teeth as needed.
Crown - Porcelain- Apply the Crown - Porcelain option to individual teeth as needed.
Endodontics- Apply the Endodontics condition to individual teeth as needed.
Extracted - Apply the Extracted condition to individual teeth as needed.
Extraction request - Add extraction requests to a patient's tooth chart. You can then use mail merge to automatically include those requests in correspondence you send to dentists and other professionals participating in your patient's care. Tell me more...
Filling - Apply the Filling condition to individual teeth as needed.
Impacted- Apply the Impacted condition to individual teeth as needed.
Implant - Apply the Implant option to individual teeth as needed.
Keep - Apply the Keep condition to primary teeth that should not be included in an extraction request.
Pontics - Apply the Pontics option to individual teeth as needed.
Tads - Add TAD (temporary anchorage device) placements and requests to a patient's tooth chart. You can then use mail merge to automatically include those requests in correspondence you send to dentists and other professionals participating in your patient's care.Tell me more....
SpacersClick S to enable spacer mode from the bottom of the tooth chart window, then click between teeth to add / remove spacers.
Enable Spacer mode.
Then click between teeth to add / remove spacers.
Tooth Notes - Right-click the tooth to work with and select the Note option. Then type the text of the note and click Ok. You can then hover over the Note icon that appears above the tooth to see a tooltip of the note contents.
Multiple Conditions - Teeth with multiple health conditions have a blue box above them (). Right-click the tooth to see all the conditions that have been applied to that tooth.
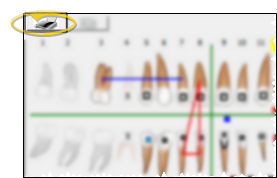
Print Tooth Chart (Available only from the Treatment Chart.) Click the Print icon just above the tooth chart in the Treatment Chart window, then select the printer to use to print the currently displayed tooth chart graphic.
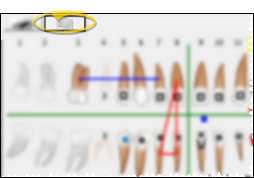
Copy Tooth Chart (Available only from the Treatment Chart.) Click the Copy icon just above the tooth chart in the Treatment Chart window to copy the current tooth chart graphic to your clipboard. You can then paste the graphic in another application, such as a word processing document or email message.
Save - Click Ok to save any changes you make to the tooth chart, or click Cancel to ignore your changes.
More Information
Tooth Chart / Treatment Chart Integration (Optional.) - The tooth chart / treatment chart integration provides a way for you to add narrative text to a patient's treatment chart as you edit a patient tooth chart. Simply add a new record to a patient's treatment chart, and place your cursor in a text or list and text column. Then enter data into the tooth chart. The
tooth chart data will be translated into a narrative description in the
active column of your treatment chart record.See "Add, Edit, & Sign Treatment Chart Records" for details.
Print Tooth Chart on Appointment Cards - You can optionally include the patient's current tooth chart on your appointment cards. See "Appointment Cards" for details.
Mail Merge Options - Include the Tooth Chart variable (found in the Treatment Chart section of the variables list). the Extraction Request variable, and/or the TAD variables, in mail merge document to automatically include those details in the letter. See "Mail Merge Tool: Variables" for details.
 Normal viewing option on the patient's Treatment Chart to view and edit the patient's tooth chart.
 Tooth Chart button at the bottom of the patient folder Findings tab or Findings tab editor to view or change the patient's tooth chart.
 Lock to prevent accidental editing of the tooth chart. The lock stays in effect for this station only. Click
  Lock again to allow editing
 Note icon that appears above the tooth to see a tooltip of the note contents.
 Print icon just above the tooth chart in the Treatment Chart window, then select the printer to use to print the currently displayed tooth chart graphic.
 Copy icon just above the tooth chart in the Treatment Chart window to copy the current tooth chart graphic to your clipboard. You can then paste the graphic in another application, such as a word processing document or email message.
 │
│  │
│  │
│ 


 Deciduous;
  Permanent