Apply / Remove TAD Option - You can either right-click a TAD circle to select a TAD option, or
First, enable Tad mode.
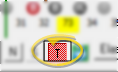
Then click the circle to toggle TAD options.
TAD Placements & Requests
Apply / Remove TAD Option - You can either right-click a TAD circle to select a TAD option, or
First, enable Tad mode.
Then click the circle to toggle TAD options.
Apply / Remove TAD Request -
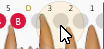
Visual Indictors -  TAD not present,
  Buccal TAD,
  Buccal + Lingual TAD,
  Lingual TAD. TAD requests show the same graphics, but with gray backgrounds.
Mail Merge Option - Include the TAD Placement or TAD Removal Request variable or a tooth chart variable in a mail merge document to automatically include the requests in letters you send to a patient's dentist or other professional. See "Mail Merge Tool: Variables" for details.
Update Records - Remember to return to a patient's tooth chart to change the TAD status from a request to a placement when you receive confirmation that the procedure has taken place.