Use the editing mode of your patients'
Manage Findings Categories & Responses - Use the Findings
Manage Start Origin Descriptions - Use the Start Origin
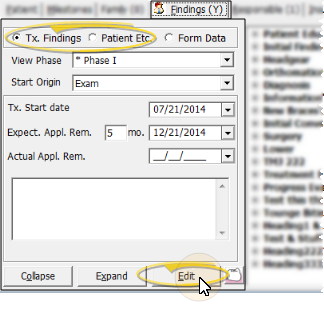
Patient Folder![]() Findings tab > Tx. Findings or Patient Etc. > Tx. Phase > Edit. (You can alternately press Alt+E on your keyboard to open the editing window.) When editing treatment findings, be sure you select the appropriate treatment phase to work with before opening the editing window: Only phases that are currently or were previously assigned to the patient are available. Also note that you edit the start origin, treatment dates, and notes of your treatment findings without enabling editing mode. See "Patient Findings / Tooth Chart" for details.)
Findings tab > Tx. Findings or Patient Etc. > Tx. Phase > Edit. (You can alternately press Alt+E on your keyboard to open the editing window.) When editing treatment findings, be sure you select the appropriate treatment phase to work with before opening the editing window: Only phases that are currently or were previously assigned to the patient are available. Also note that you edit the start origin, treatment dates, and notes of your treatment findings without enabling editing mode. See "Patient Findings / Tooth Chart" for details.)
Online Form Data is entered and updated in a different manner: See "View & Update Online Form Results" for details.
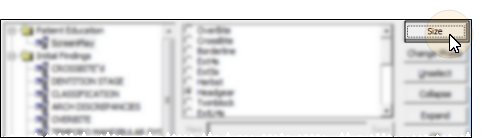
Change Viewing Size![]() Click Size to toggle between large and small display of the responses. The large display is useful for entering data with a touchscreen.
Click Size to toggle between large and small display of the responses. The large display is useful for entering data with a touchscreen.
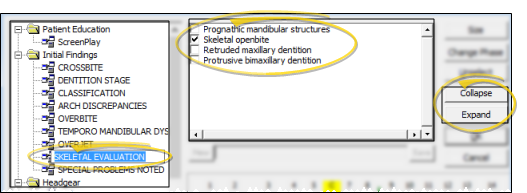
Review Categories & Responses![]() The left side of the editing window lists your headings and categories. You can expand and collapse individual heading folders as needed, or use the Collapse and Expand buttons to show / hide all categories. After you select a category, the available responses appear in the center panel, with the patient's currently selected response(s) selected. (See "Set Up Treatment Findings Categories & Responses" for details about creating your treatment categories and response lists.)
The left side of the editing window lists your headings and categories. You can expand and collapse individual heading folders as needed, or use the Collapse and Expand buttons to show / hide all categories. After you select a category, the available responses appear in the center panel, with the patient's currently selected response(s) selected. (See "Set Up Treatment Findings Categories & Responses" for details about creating your treatment categories and response lists.)
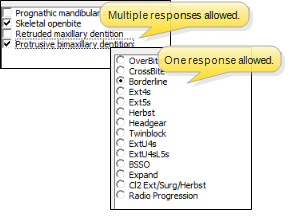
Select / Deselect Responses![]() Click an available response to select it for the patient. Certain treatment categories (set up in your Findings
Click an available response to select it for the patient. Certain treatment categories (set up in your Findings
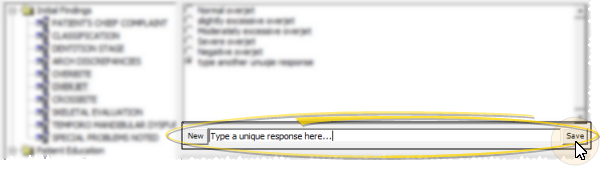
Create a Custom Response![]() (Available only if the Findings
(Available only if the Findings
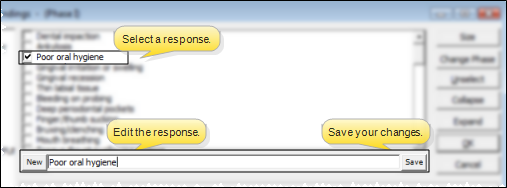
Edit a Response![]() (Available only if the Findings
(Available only if the Findings
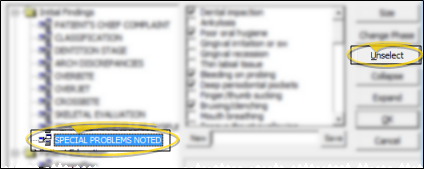
Remove All Responses![]() To clear all of the patient's answers for a specific category, click the category name, then click Unselect.
To clear all of the patient's answers for a specific category, click the category name, then click Unselect.
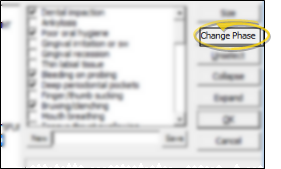
Change Phase![]() (Use sparingly!) On rare occasions, you may need to click
Change Phase to transfer
the findings responses from the current phase to a
new phase. You also have the opportunity to copy the treatment dates and notes. The new phase you select cannot have any information assigned to it. When
you change the phase, all findings information, and all notes for the
original phase are MOVED to your
newly selected phase, and ERASED
from the original phase. The Patient Etc. data type is not affected.
(Use sparingly!) On rare occasions, you may need to click
Change Phase to transfer
the findings responses from the current phase to a
new phase. You also have the opportunity to copy the treatment dates and notes. The new phase you select cannot have any information assigned to it. When
you change the phase, all findings information, and all notes for the
original phase are MOVED to your
newly selected phase, and ERASED
from the original phase. The Patient Etc. data type is not affected.
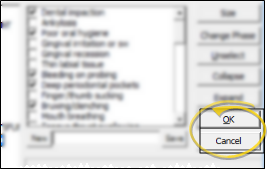
Save![]() Click Ok on the right side of the editing window to save any changes you have made, or click Cancel to ignore your changes.
Click Ok on the right side of the editing window to save any changes you have made, or click Cancel to ignore your changes.
Edit Tooth Chart - The tooth chart appears on the Findings
Import Findings Into Treatment plan - The data you enter into the Findings
Copy Findings to New Phase - When you update the Phase on the Patient tab of the patient folder, you have the opportunity to copy the current treatment findings, and optionally treatment dates and notes, to the new phase. See "Patient Tab" for details.
 │
│  │
│  │
│ 
Ortho2.com │1107 Buckeye Avenue │ Ames, Iowa 50010 │ Sales: (800) 678-4644 │ Support: (800) 346-4504 │ Contact Us
Chat with Software Support │Chat with Network Engineering │ Chat with New Customer Care
Remote Support │Email Support │ Online Help Ver. 12/18/2015