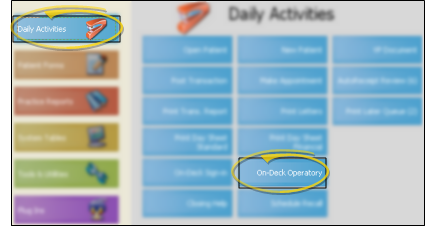
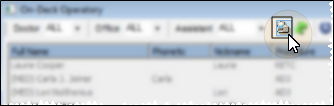
You are here: Modules & Integrations > Patient Reward System > Patient Rewards > Set Up Prize Selector on Sign-In Screen

Set Up Prize Selector on Patient Sign-In Screen

Motivate your patients by displaying your list of Patient Reward prizes on your Patient Sign-In screen. Patients can then select a reward as they check in, initiating the prize processing sequence automatically.

(This option is available for the Contemporary style sign-in screen only, not the Classic style.)

  1. Enable Contemporary OptionClick to Open ViewPoint main menu > Daily Activities > On-Deck Operatory > Properties > Greeting Tab > Contemporary.
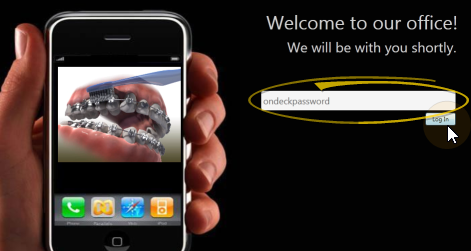
  2. Open Patient Sign-In EditorClick to Open ViewPoint main menu > Daily Activities > On-Deck Sign-In > Password > Log In. Or, if you do not have a sign-in prompt, you can press Ctrl+E on your keyboard and enter your sign-in password to enter editing mode.
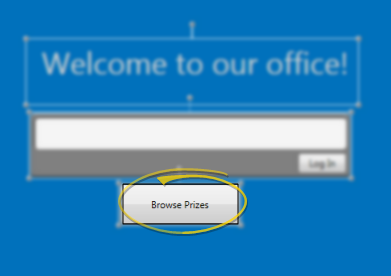
  3. Prize Selector ButtonClick to Open Motivate your patients by displaying your list of Patient Reward prizes on your Patient Sign-In screen. Patients can then select a reward as they check in, initiating the prize processing sequence automatically.

    To insert a prize selector on your sign in screen, click Add from the Sign-In Editor ribbon bar, and select Prize Selector Button. You can then click and drag to move the element, and right-click within the element to modify additional properties.

    Show out of stock prizes - Enable this option to include all prizes in the prize selector list, even if you do not have any on hand. If this option is disabled, only prizes in your inventory will be included. (See "Set Up Prizes & Manage Inventory" for details.)

    Enable lookup by reward card - Enable this option to allow patients to first press the prize button, then swipe their reward card to activate the prize selector. If this option is disabled, patients must 1) Have an appointment scheduled for today, and; 2) Select their birthday month and day to open the prize selector.

    Change Text - Select this option, then type the text you would like to appear on the button.

    Font Size, Font, Foreground, Background - Use these options to change the text size, style, and color, as well as the colors used for the sign-in button and related screens.

    Remove - Select this option to remove this object from your sign-in greeting screen.

  1. Save ChangesClick to Open  From the Sign In Editor ribbon bar, click Layout, and choose Save Layout (or press Ctrl-S on your keyboard) to save any changes you have made to the screen. (See "Manage Sign-In Screen Layouts" for details about creating and using multiple layouts.)

  2. Exit Edit ModeClick to Open When you have finished making changes to your sign-in screen, click the Main button on the Sign In Editor ribbon bar. You can then choose Close Edit Mode (or press Ctrl-E) to reactivate patient sign-in, or Exit (or press Ctrl-Q) to close the sign-in window. If you re-activate Patient Sign-In without first saving changes, any changes you have made will remain in effect until you fully exit Patient Sign-In. When you then re-launch Sign-In, the layout changes will be erased.

Table of Contents │ Get More Help │ Remote Support │ New Customer Care

Ortho2.com │1107 Buckeye Avenue │ Ames, Iowa 50010 │ Sales: (800) 678-4644 │ Support: (800) 346-4504 │ Contact Us

Chat with Software SupportChat with Network Engineering │ Chat with New Customer Care

Remote SupportEmail Support │ Online Help Ver. 12/18/2015