The mail merge Fill-In code is a simple way to insert a typed response into a specific location in a merge letters. When you generate a document that has a Fill-In code, the merge will stop and prompt you to enter the text you want to print in place of the Fill-In command. The text you type is not saved: It is used only for the current merging job, and only in the specific location where the Fill-In code exists in the merge document.
Word 2002/2003 - Click the Insert menu and select Field. (No illustration available.)
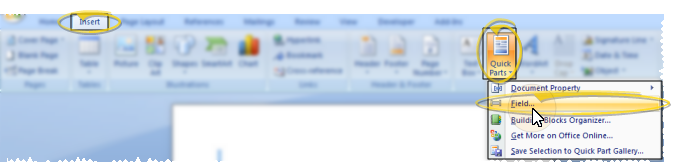
Word 2007 or greater - Click the Insert ribbon bar, and select Quick Parts. Then choose the Field option.
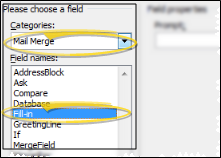
Initiate Fill-in Code - Select Mail Merge in the Category box, and choose the Fill-In field name option. Click Ok to accept your choice, and Ok again to accept a blank prompt and insert the code into your document. If you do not see the merge code, or if you see an error, press Alt+F9 to toggle the merge code display. (If you wish, consult your Word documentation for details about setting up other "switches" for this type of code.)
Initiate Fill-In code.
Example empty merge code: {FILLIN \*MERGEFORMAT}
Remove code - Remove the text \*MERGEFORMAT from the code. Example: {FILLIN}
Insert prompt - Position your cursor at the space after the FILLIN, but inside the braces, and type the prompt you want to appear when merging the letter, enclosed in quotation marks. Example: {FILLIN "Please enter your initials." }
Insert alternate text (Optional.) - Type /d "" after your prompt to specify a blank entry as the default response. You can also add alternate text inside the quotation marks to use if the prompt is left blank.
Example blank default response (nothing is between the default's quotation marks): {FILLIN "Please enter your initials."\d ""}
Example default response of kar (the initials kar are between the default's quotation marks): {FILLIN "Please enter your initials."\d "kar"}
Save & Exit - Click the X in the upper right corner of the Word document window. As you exit, you have the opportunity to save the document.
More Information
Toggle Merge Code Display - When creating and editing documents with mail merge codes (such as variables and conditional statements), it is helpful and sometimes necessary to be able to see the codes. During regular daily use, however, you may wish to have them off. While different versions of Word have different ways of accessing this setting, an easy way to toggle the merge code display, regardless of your version of Word, is to press ALT+F9 on your keyboard.
Ask / Ref Codes - The mail merge Ask / Ref field code combination is a handy way to insert a typed response into one or more locations in a merge document, or to use that response in a conditional statement. When you generate a document that has Ask / Ref codes, the merge will stop and prompt you to enter unique text. You can then either print that text in one or more locations in the document, or use it to test conditional statements. The response you type is not saved: It is used only for the current merging job. See "Mail Merge Tool: "Ask / Ref" Codes" for details.

 │
│ 


