Open the Setup & Maintenance option of your Outbound Integration tools:
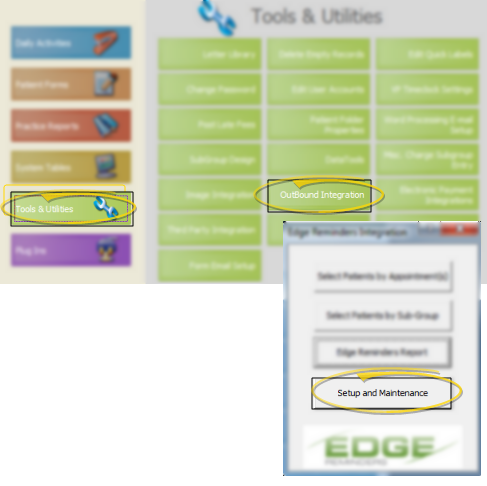
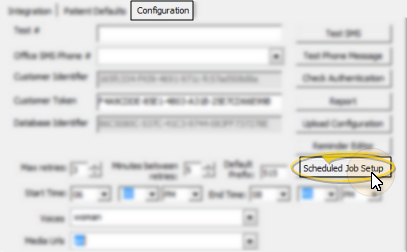
Select the Configuration tab and click Scheduled Job Setup.
Use the
Set up your messages - Use your Reminders Editor to create and edit the Edge Reminders messages you send via email and text message. (To create and update telephone voice messages, contact Ortho2.) You must have at least one message created before you can schedule reminders.
Set up schedules - Use the Job Schedules tab of your Scheduled Job Setup editor to create and edit the schedules you want to use for automating Edge Reminders messages. You can create as many schedules as you need, and assign them to any number of scheduled reminder messages.See "Set Up Edge Reminder Schedules" for details.
Set up Scheduled Job Services workstation - Use the Service Setup tab of your Scheduled Jobs Setup editor to configure the workstation(s) that you want to use for sending automated Edge Reminder messages, and review the dates and times message sets have been processed.See "Set Up Scheduled Reminders Service" for details.
ViewPoint Main Menu - Tools & Utilities > Outbound Integration > Setup & Maintenance > Configuration > Scheduled Job Setup. (If the Edge Reminders option is not available, you first need to activate your Edge Reminders integration. See "Activate Edge Reminders Integration" for details.)
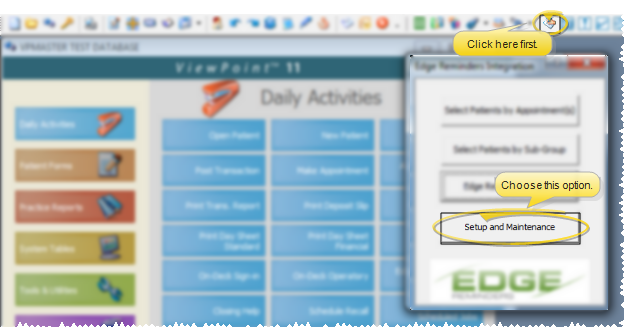
Open the Setup & Maintenance option of your Outbound Integration tools:
Select the Configuration tab and click Scheduled Job Setup.
ViewPoint Toolbar -  Edge Reminders > Setup and Maintenance > Configuration > Scheduled Job Setup. (If the Edge Reminders option is not available, you first need to activate your Edge Reminders integration. See "Activate Edge Reminders Integration" for details.)
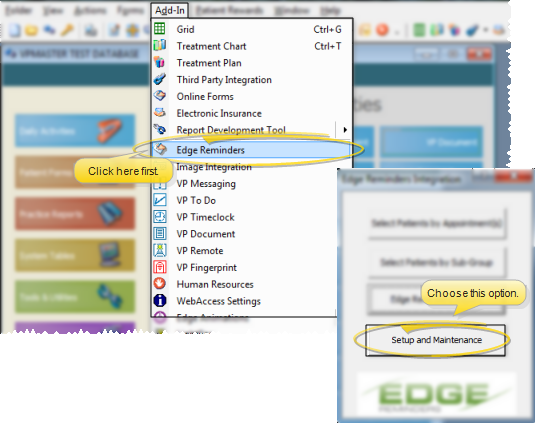
Open the Setup & Maintenance option of your Outbound Integration tools:
Select the Configuration tab and click Scheduled Job Setup.
ViewPoint Shortcut Menu - Add-In > Edge Reminders > Setup and Maintenance > Configuration > Scheduled Job Setup. (If the Edge Reminders option is not available, you first need to activate your Edge Reminders integration. See "Activate Edge Reminders Integration" for details.)
Open the Setup & Maintenance option of your Outbound Integration tools:
Select the Configuration tab and click Scheduled Job Setup.
Open Job Details - Click to open the Job Details tab.
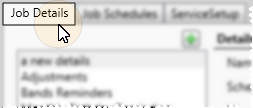
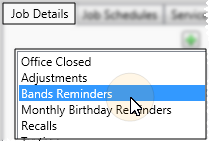
Choose Record to Work With - Your list of existing records appears at the left. Click the record to work with. The details for that record appear at the right.
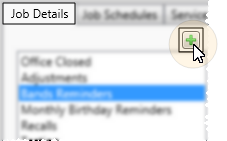
Create a new automated reminder - Click  New at the top of the window. Then complete the reminder details, described below.
Job details - Select the reminder to work with, then complete the details portion of the window.
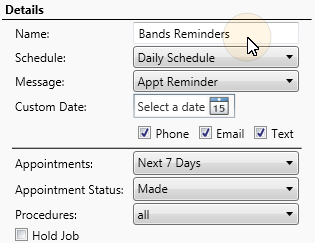
Name - Use a descriptive name for your scheduled reminder.
Schedule - Choose when to process this automated reminder by selecting a job schedule. (See "Set Up Edge Reminder Schedules" for details about creating schedules.)
Message - Choose the message to send when this reminder is run. (See "Set Up Edge Reminders Messages " for details about setting up your messages.)
Custom date - If you have chosen an office closure message, enter the date to include in the message in this field. Otherwise, this date is ignored.
Choose delivery method(s) - Enable each type of delivery method, telephone, email, and/or text, that you want to use for this set of reminders. (You flag which phone number / email address to use for each type of message in the patient and responsible party
Appointments - Select from a list of "smart dates," such as Today, Tomorrow, Last Week, etc. to indicate whose appointments to include. The appropriate dates will be calculated from the date the reminders are processed (and not the date you created the scheduled reminder job).
Appointment status - Select whether to include appointments that are Made (currently scheduled), or appointments that have been processed as Kept, or Missed in the message group.
Procedures - Choose which appointment procedures to include in the message group.

All places both normal (scheduled) and recall procedures in the list of procedures to be included. After you select All, you can use the arrows to move individual procedures to and from the Included Procedures and Excluded Procedures boxes to further identify the procedures to include.
Normal places only scheduled procedures (not recall procedures) in the list to be included. After you select Normal, you can use the arrows to move individual procedures to and from the Included Procedures and Excluded Procedures boxes to further identify the procedures to include.
Recall places only recall procedures (not scheduled procedures) in the list to be included. After you select Recall, you can use the arrows to move individual procedures to and from the Included Procedures and Excluded Procedures boxes to further identify the procedures to include.
Custom requires that you use the arrows to move individual procedures to and from the Included Procedures and Excluded Procedures boxes to define which procedures should be included in your scheduled reminder.
 Hold job - Enable this option to prevent the reminder from being processed as scheduled. When you want the scheduled reminder to start being processed again, simply return to this screen and disable the option. Note that you can also hold an individual job date (instead of holding the job indefinitely) from the Edge Reminders Scheduled Jobs window. See "Review Edge Reminders Scheduled Jobs" for details.
Apply / save your changes - Click Apply to save any changes you have made and refresh your Scheduled Reminders setup window, or click Save to save the changes you have made and exit the window.
Preview scheduled reminders - You can preview the details of reminders that are scheduled to be activated from the Edge Reminders Scheduled Jobs feature. See "Review Edge Reminders Scheduled Jobs" for details.
 │
│  │
│  │
│ 
Ortho2.com │1107 Buckeye Avenue │ Ames, Iowa 50010 │ Sales: (800) 678-4644 │ Support: (800) 346-4504 │ Contact Us
Chat with Software Support │Chat with Network Engineering │ Chat with New Customer Care
Remote Support │Email Support │ Online Help Ver. 12/18/2015


