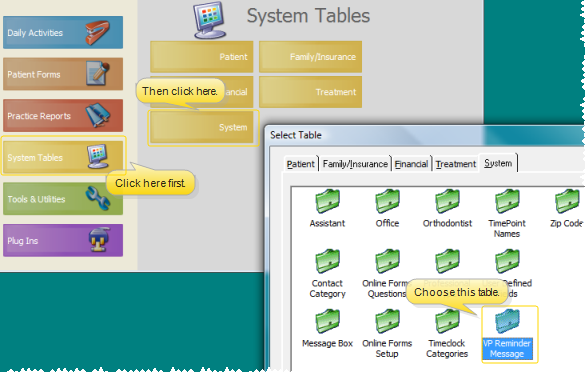
Use your VP Reminder Message table to create and maintain your message texts.
Note - Due to operating system incompatibility and device availability issues, as of September 30, 2012, Ortho2 will discontinue support for the telephony portion of VP Reminder, and the Way2Call and Dialogic devices that make the phone calls. Support for other reminder types will remain in place. Although you will still be able to use the telephony feature and devices if you wish, Ortho2 will no longer be able to help you with any hardware device malfunctions or other significant issue regarding VP Reminder telephony services.
ViewPoint Main Menu - System Tables > System > VP Reminder Message.
You can also open the table directly from VP Reminder. See "Telephone Message Setup", "E-mail Message Setup", "Select Patients by Appointment" and "Select Patient Subgroup" for more information.
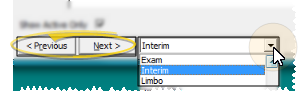
Choose Record to Work With - Use the Previous and Next buttons, or the dropdown button at the bottom of the table window to choose an existing record to work with.
Create new message - Click New. Then enter the details, described below. You can create a record for any type of message you want to send, including appointment reminders, emergency weather closings, event invitations, and so on.

Edit message - Select a message to work with, and edit the fields described below. If you just created a new message, it is selected automatically.
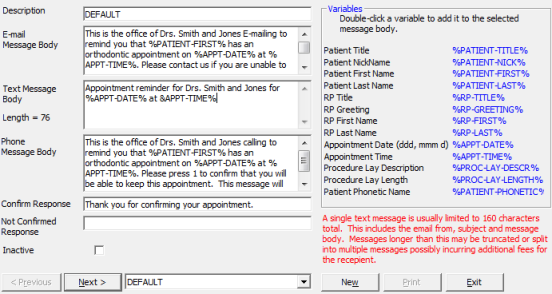
Description - Enter a description of the message's purpose.
E-Mail, Text, Phone Message Body - Type the text for each type of message delivery. Do not use special characters (such as @ or $ ) that may be misinterpreted by the VP Reminder system. You can use standard word processing editing tools (such as Cut, Copy, and Paste) to facilitate entering the text. Note that some cell phones are capable of receiving a maximum of 160 characters. Also, note that Ortho2 no longer supports VP Reminder telephone messages.
Insert Variables - Double-click a variable at the right of the window to insert it at the end of the currently selected message body. If needed,you can use cut and paste to reposition the variable as needed.
Confirm response - Enter the message to use at the end of the call if the recipient presses the keypad number that confirms the appointment. We suggest something like Thank you. We look forward to seeing you soon.
Not confirmed response - Enter the message to use at the end of the call if the recipient does not press the keypad number that confirms the appointment. We suggest something like Please call soon to reschedule.
Inactive / active toggle - Once you create a message, you cannot delete it. You can, however, flag it  Inactive. Inactive records cannot be selected for use.
Save & Exit - Click
 │
│  │
│  │
│ 
Ortho2.com │1107 Buckeye Avenue │ Ames, Iowa 50010 │ Sales: (800) 678-4644 │ Support: (800) 346-4504 │ Contact Us
Chat with Software Support │Chat with Network Engineering │ Chat with New Customer Care
Remote Support │Email Support │ Online Help Ver. 12/18/2015


