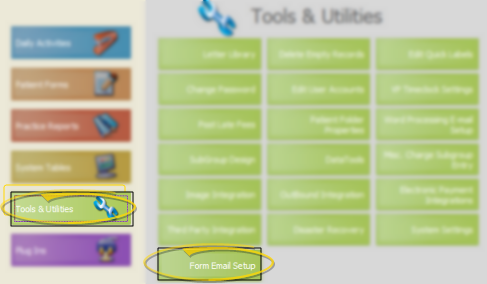
ViewPoint main menu > Tools & Utilities > Form Email Setup.
Use the Form Email Setup tools to set up your online correspondence system. The setup options include specifying your return email address, web site, and logo, as well as creating the text of appointment card and receipt messages.
ViewPoint main menu > Tools & Utilities > Form Email Setup.
General settings & logo- The options on the General tab of your Form Email Setup include your default return email address, your practice web site address (if any), and a logo to include with your electronic forms.
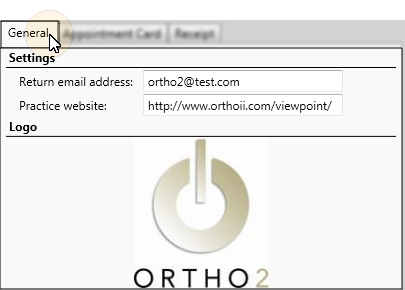
Return email address - Enter the default email address to use as the return address on your electronic correspondence. Note that you can override this address on the Appointment Card and/or Receipt settings if desired.
Practice web site - If you have a web site, you can enter the address in this field. The address will be included in the identification block of your electronic appointment cards and payment receipts. You can also include the practice web site variable in the text of your appointment card and/or receipt messages (described below) to provide a link directly from the message to your site.
Logo - Drag a graphical file of your logo onto the logo box, or click the box to browse for a file you have stored on your computer. Note that the file must be available to all workstations in your network that will be using email correspondence.
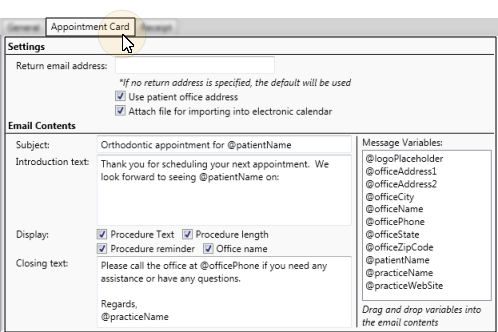
Appointment card settings - Click the Appointment Card tab to set up the details specific to sending electronic appointment cards.
Appointment card email options:
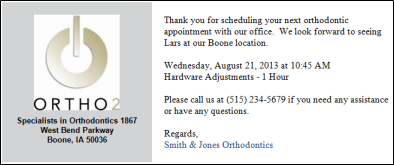
Example electronic appointment card:
Return email address (Optional.) - Enter the email address to use as the return address on electronic appointment cards. If you do not enter an address here, your default address from the General tab of your Form Email Settings editor will be used.
Use patient office address - Enable this option to use the address of the office assigned to the patient folder in the identification block of your electronic appointment cards. If this option is disabled, your primary office address will be used for all patients.
Attach file for importing - Enable this option to include the appointment date and time as a file attachment that patients and responsible parties can use to import the data into their personal electronic calendar.
Subject - Type the text you would like to include as the subject of your appointment card messages, such as "Orthodontic Appointment Reminder". You can optionally type or drag and drop variables, such as @patientName from the Message Variables list at the right of the window into the subject.
Introduction text - Type an introductory greeting, such as "Thank you for scheduling an appointment with us. We look forward to seeing @patientName on:" Note that you do not need to include the appointment details in this section of text. You can optionally type or drag and drop variables, such as @patientName, from the Message Variables list at the right of the window into your introductory message.
Details to display - Enable each appointment detail that you want to include in the appointment card message. The text of this section is auto-generated, and appears between your introductory text (described above), and your closing text (described below).
Closing text - Type a closing for your message, such as "Please call us at @officePhone if you need any assistance or have any questions". You can optionally type or drag and drop variables, such as @officePhone, from the Message Variables list at the right of the window into your closing message.
Patient Rewards Integration - If you award patient rewards points, you might want to include the @rewardPointBalance variable in one of your Appointment Card text areas to notify patients of their point balance, and motivate them to keep their appointments at your office. See "Patient Rewards" for details about this compliance-rewarding system.
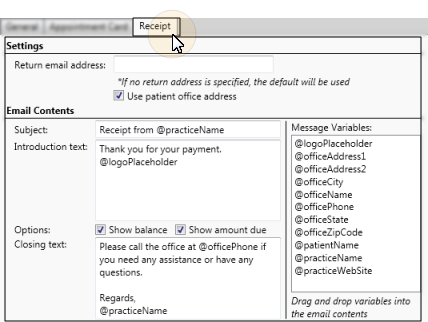
Receipt settings - Click the Receipt tab to set up the details specific to sending electronic payment receipts.
Receipt email options:
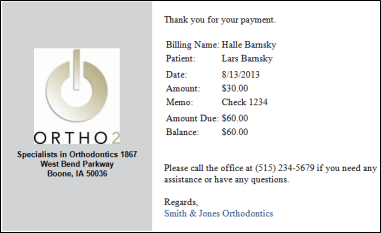
Example electronic payment receipt:
Return email address (Optional.) - Enter the email address to use as the return address on electronic payment receipts. If you do not enter an address here, your default address from the General tab of your Form Email Settings editor will be used.
Use patient office address - Enable this option to use the address of the office assigned to the patient folder in the identification block of your electronic payment receipts. If this option is disabled, your primary office address will be used for all patients.
Subject - Type the text you would like to include as the subject of your receipt messages, such as "Payment receipt from @practiceName". You can optionally type or drag and drop variables, such as @practiceName from the Message Variables list at the right of the window into the subject.
Introduction text - Type an introductory greeting, such as "Thank you for your payment" Note that you do not need to include the payment details in this section of text. You can optionally type or drag and drop variables, such as @patientName, from the Message Variables list at the right of the window into your introductory message.
Account details to include - Enable / disable the account balance and amount due options to include / omit the information from the receipt message. The text of this section is auto-generated, and appears between your introduction text (described above), and your closing text (described below).
Closing text - Type a closing for your message, such as "Please call us at @officePhone if you need any assistance or have any questions". You can optionally type or drag and drop variables, such as @officePhone, from the Message Variables list at the right of the window into your closing message.
Save - Click Save at the bottom of the window to save any changes you have made to any of the Form Email Setup tabs.
Set up default & individual email flags - While you set up email form defaults for new patients in your Patient Properties, you can turn these features on/off directly from the Patient and Responsible tabs of the patient folder. Note that when you generate a form that is sent via email, rather than printed, it is still recorded in the appropriate correspondence history.
Override email option - If you enable the electronic correspondence option for a patient or responsible party, you can always override the email, and choose to print an appointment card or receipt instead: When you generate a payment receipt by right-clicking a transaction in the patient ledger, you can choose to print or email the form. Or when you generate a receipt or appointment card from the ViewPoint Forms menu, you can check the Disable Electronic Submit option to override the electronic correspondence setting, and print the form on paper.
Patient reward points - Note that you can set up your system so that patients earn points toward your Patient Rewards system when they opt into electronic correspondence. See "Set Up Patient Reward Triggers" for details.
 │
│  │
│  │
│ 
Ortho2.com │1107 Buckeye Avenue │ Ames, Iowa 50010 │ Sales: (800) 678-4644 │ Support: (800) 346-4504 │ Contact Us
Chat with Software Support │Chat with Network Engineering │ Chat with New Customer Care
Remote Support │Email Support │ Online Help Ver. 12/18/2015


