ViewPoint toolbar >  Quick Appointment Card.
Use the Quick Appointment Card feature to easily generate appointment cards in your most common format.
ViewPoint toolbar > Quick Appointment Card.
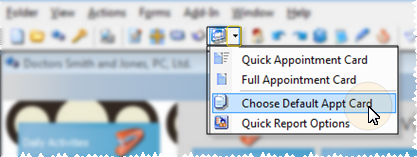
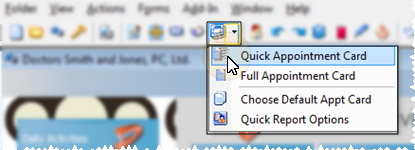
Choose default appointment card - Before you can use the one-click feature of the Quick Appointment Card, you must select a default appointment card form. Click the arrow beside the Quick Appointment Card icon, and select the Choose Default Appt Card option. Then choose the appointment card format you want to use as your one-click card.
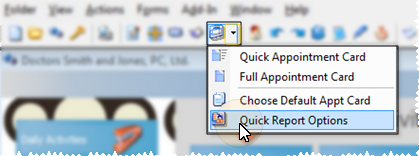
Choose quick appointment card settings - Click the arrow beside the Quick Appointment Card icon to set up the options for your selected default card.
Open Quick Report Options:
Set up appointment card options:
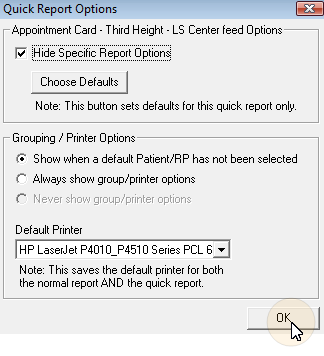
 Hide specific report options - Enable this option to use the default appointment card settings for your one-click cards. If you disable this option, you will be prompted for appointment card settings whenever you launch a Quick Appointment Card.
Choose defaults - Click this button to open the settings dialog for the appointment card format you have selected as your default quick appointment card. Then set up the card options as you would like them to function for a one-click card. See "Appointment Cards" for details about the settings available for each appointment card format.
Enable / disable one-click capability - Select one of the following options to enable / disable one-click appointment card capability:
 Show when a default patient/RP has not been selected - Enable this option to activate the one-click appointment card capability, and automatically generate a default appointment card if a patient folder is open, or a patient is active in your Grid Scheduler.
Show when a default patient/RP has not been selected - Enable this option to activate the one-click appointment card capability, and automatically generate a default appointment card if a patient folder is open, or a patient is active in your Grid Scheduler.
Default printer - Choose the printer to use for this appointment card format.
One-click card - (One-click capability is available only if your settings have enabled both the Hide Specific Report Options and Show when a default patient has not been selected options, described above.)
If a patient folder is open, or a patient is active in your Grid Scheduler, click the Quick Appointment Card icon to send the form, along with the pre-set options, to your printer immediately. If a patient folder is not open, you can select to generate the form for an individual patient or a sub-group. (You can also launch a Quick Appointment Card by clicking the arrow beside the icon, and choosing the Quick Appointment Card option.)
Initiate one-click card:
Launch card from Quick Appointment Card options:
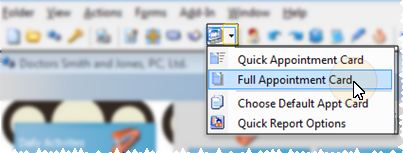
Full appointment card - Click the arrow beside the Quick Appointment Card icon, then select the Full Appointment Card option. You can then define all the appointment card options before generating it for one or more patients. (See "Appointment Cards" for details about your appointment card choices.)
 │
│  │
│  │
│ 
Ortho2.com │1107 Buckeye Avenue │ Ames, Iowa 50010 │ Sales: (800) 678-4644 │ Support: (800) 346-4504 │ Contact Us
Chat with Software Support │Chat with Network Engineering │ Chat with New Customer Care
Remote Support │Email Support │ Online Help Ver. 12/18/2015


