Set Up VP Reminder Telephone Messages
Use the Telephony tab of the Setup & Maintenance options to define and test your VP Reminder telephone message, determine how those calls are handled, and get a report of your VP Reminder messages.
Due to operating system incompatibility and device availability issues, as of September 30, 2012, Ortho2 discontinued support for the telephony portion of VP Reminder, and the Way2Call and Dialogic devices that make the phone calls. Support for other reminder types will remain in place. Although you will still be able to use the telephony feature and devices if you wish, Ortho2 will no longer be able to help you with any hardware device malfunctions or other significant issue regarding VP Reminder telephony services. Please contact Ortho2 if you are interested in upgrading to our Edge Reminders module for your telephone reminder system services.
 Open Telephony Options WIndow - Open the Telephony tab of your Outbound Integration setup window to set up your telephone reminders.
-
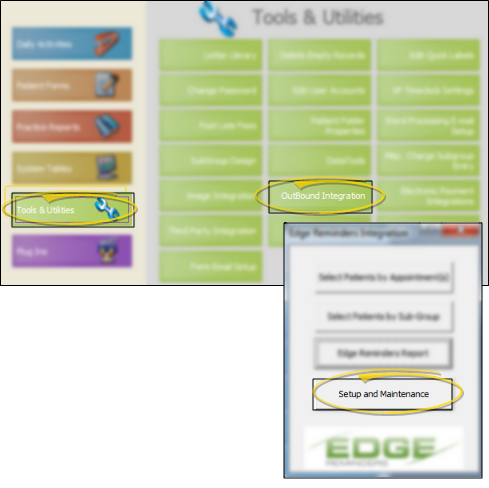
Open Outbound Integration Setup Window - You can open this feature in multiple ways: Use the method that's most convenient for you.
ViewPoint main menu - Tools & Utilities > Outbound Integration > Setup & Maintenance.
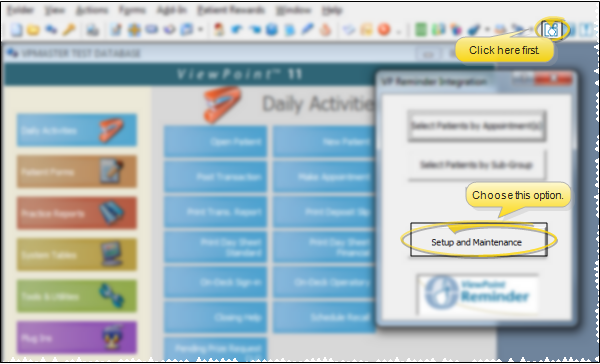
ViewPoint toolbar -  VP Reminder > Setup and Maintenance.
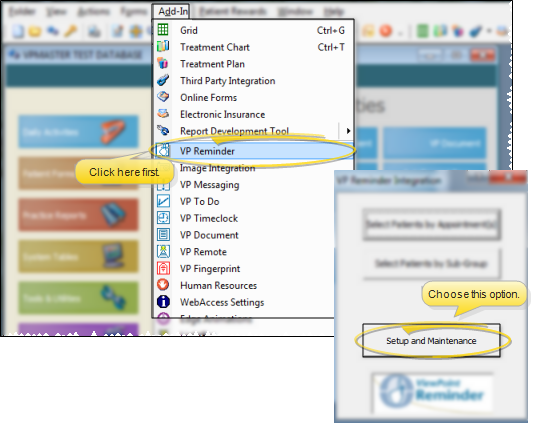
ViewPoint shortcut menu - Add-In > VP Reminder > Setup and Maintenance. (If the VP Reminder option is not available, you first need to activate your VP Reminder integration. See "Set Up VP Reminder Integration" for details.)
-
Select Telephony Tab - Click the Telephony tab at the top of the window to select and test your telephone message options.
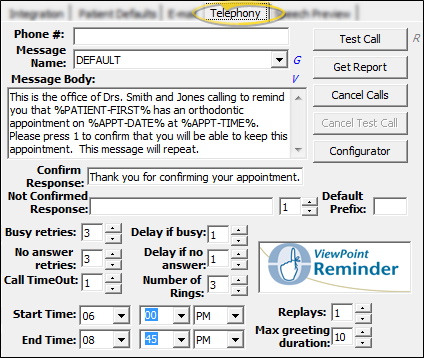
Telephony Tab Settings - Set up how your VP Reminder telephone messages will function.
Phone Number - Enter the phone number to use for testing your VP Reminder telephone messages (i.e. your own phone number). Enter the digits without any punctuation (5551234).
Message Name / Message Body - Select the message to use to test your VP Reminder system. (See "Set Up VP Reminder Messages " for details about setting up your messages.) You can also press G beside the Message Name field to open your message table, or V beside the Message Body field to view the list of message variables, which may help you better understand the message text.
Confirm Response - Enter the message to use at the end of the call if the recipient presses the keypad number that confirms the appointment. We suggest something like Thank you. We look forward to seeing you soon.
Not Confirmed response - Enter the message to use at the end of the call if the recipient does not press the keypad number that confirms the appointment. We suggest something like Please call soon to reschedule.
Confirmation Number - Use the numerical field at the end of the Not Confirmed Response field to enter the telephone keypad number that you want the recipient to press to confirm the appointment.
Default Prefix - Enter your local telephone prefix in this field. Telephone numbers without a prefix will default to including this prefix for your VP Reminder telephone messages.
Busy Retries - Enter the number of times to re-dial a phone number that is busy. If VP reminder cannot connect after the specified number of re-tries, the message will not be delivered. (Your VP Reminder report will include this statistic.)
Delay If Busy - Enter the number of minutes to wait between retries if the phone number is busy.
No Answer Retries - Enter the number of times to re-dial a phone number that rings with no answer. If VP Reminder cannot connect after the specified number of re-tries, the message will not be delivered. (Your VP Reminder report will include this statistic.)
Delay If No Answer - Enter the number of minutes to wait between no-answer retries.
Call Timeout - Enter the number of seconds VP Reminder will wait for the confirmation number to be pressed after the message has finished.
Number of Rings - Enter the number times VP Reminder will allow the
recipient’s phone to ring before classifying the call as "no answer".
Start Time / End Time - Enter the time of day to make your reminder phone calls. We recommend you start after your office
has closed so your phone lines are not tied up with the reminder messages, and end at a reasonable hour in the evening. Your reminder calls will stop at your end time, even if not all patients have been called.
Replays - Enter the number of times the message will be repeated if the confirmation number is not pressed. Enter 0 to play the message only once; Enter 1 to play the message, then repeat it one more time, etc. before disconnecting.
Maximum Greeting Duration - Enter the number of seconds VP Reminder will wait before playing your message after it has detected a voice. We suggest you choose a number high enough so the message does
not begin before an answering machine begins recording, but low enough
so a person
answering the phone doesn't think that no one is there.
Test Your Settings - Click Test Call to initiate a test of your VP Reminder telephone message. The call will be placed to the phone number you entered at the top of the window. You can also click R to display the current status of a test, and Cancel Test Call to stop a VP Reminder telephone message test.
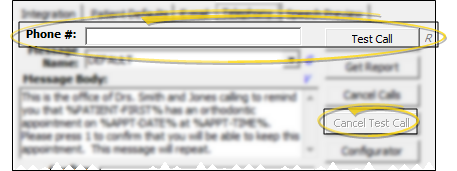
Get Report - Click Get Report to generate a report of how your VP Reminder messages were received.(See "VP Reminder Report" for details.)
Cancel Calls - Click Cancel Calls to stop VP Reminder from sending any more telephone messages for the current reminder set.
Configurator Options - Use the Configurator settings of your Setup & Maintenance options to set up your
modem(s) and
other system devices for use with VP Reminder telephone messages. See "Configure VP Reminder Modems & Devices" for details.
Save Your Changes - Click Close to save the changes you have made and close the editing window.