Image Layouts Options
Edge Imaging comes with standard layouts that will likely meet most of your needs. You can, however, add and change layouts as needed for your practice. These settings are system-wide: Any changes you make to these settings are immediately applied to all machines and users in your system.
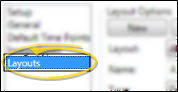
From the File ribbon bar, choose Edge Imaging Options. Then select Image Layouts.
System Layouts - The Index layout that is available while viewing images in a patient folder does not show up in the editor's drop down list, because it simply shows all images in all timepoints and cannot be changed. The Image Print Layout is used for printing the image you have currently selected in a patient folder, and can only be changed to add your logo and / or image captions.
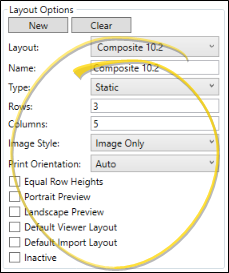
Use the Layout Options section of the window to enter the general settings for this image layout.
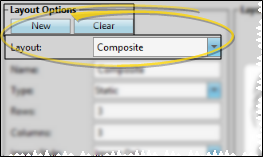
Clear - Select a layout, then click Clear to remove all image types and properties from the layout, while retaining the format of the Layout Grid at the right of the window.
Name - Describe the purpose of the layout. (Note that the Image Print Layout name cannot be changed.)
![]() Type - The layout type determines how the images are displayed on your screen, and how you navigate them. Select the layout type that is best suited for the purpose of the layout. The remaining layout options depend upon the type you choose. (Note that the Image Print Layout type cannot be changed.)
Type - The layout type determines how the images are displayed on your screen, and how you navigate them. Select the layout type that is best suited for the purpose of the layout. The remaining layout options depend upon the type you choose. (Note that the Image Print Layout type cannot be changed.)
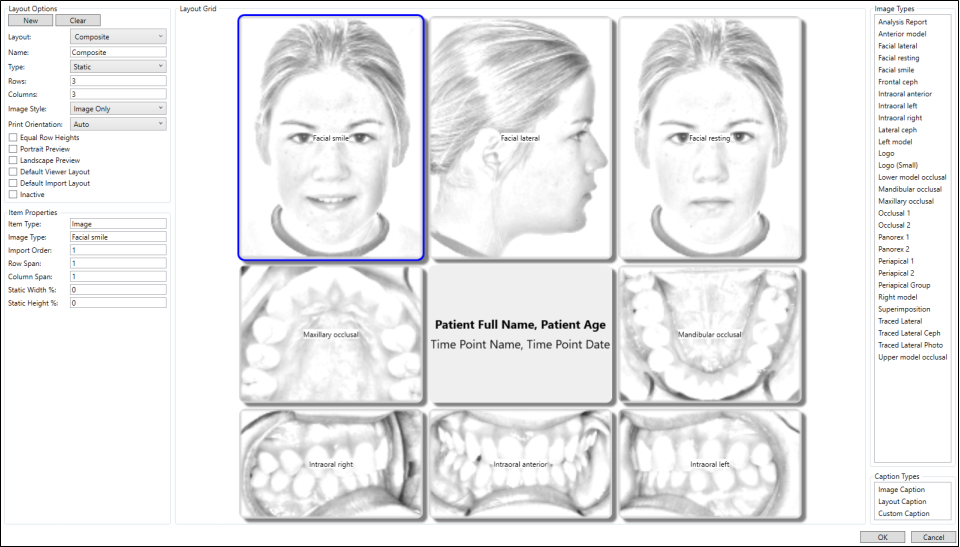
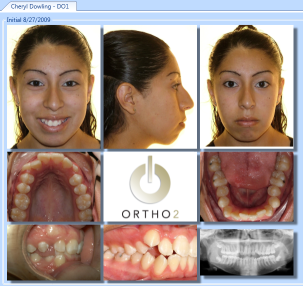
![]() Static Layout - A static layout is a table with a specific number of rows and columns, with specific image types assigned to each position in that table. Static layouts are especially useful for printing and correspondence purposes.
Static Layout - A static layout is a table with a specific number of rows and columns, with specific image types assigned to each position in that table. Static layouts are especially useful for printing and correspondence purposes.
The portrait and landscape preview options (described below) show you how your static layout will print on a standard piece of paper. Our example shows a static layout that displays the image-only image style in three rows and three columns, not equal row heights, including the practice logo in the center. See below for details about each setting.
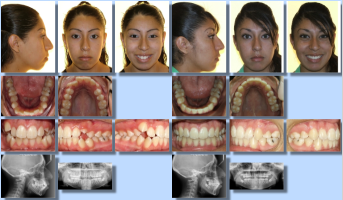
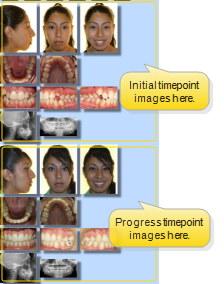
![]() Dynamic Layout - The dynamic layout is similar to the static layout table, with the compare feature built in. When you view a dynamic layout, you can choose to view a single time point (similar to the static layout described above), or all time points for the patient (similar to the compare feature). This makes dynamic layouts a good tool for reviewing overall treatment progress. In addition, you can limit the "all time points" view to include only the first and last time points, which is useful for presenting "before" and "after" images.
Dynamic Layout - The dynamic layout is similar to the static layout table, with the compare feature built in. When you view a dynamic layout, you can choose to view a single time point (similar to the static layout described above), or all time points for the patient (similar to the compare feature). This makes dynamic layouts a good tool for reviewing overall treatment progress. In addition, you can limit the "all time points" view to include only the first and last time points, which is useful for presenting "before" and "after" images.
Our example shows a dynamic layout with four groups displayed vertically (or one on top of another). When you view all time points, as shown below, the time points can be displayed horizontally (side-by-side) as in our example, or vertically. Your dynamic layout settings determine the number of groups, and the orientation of both the groups and time points.
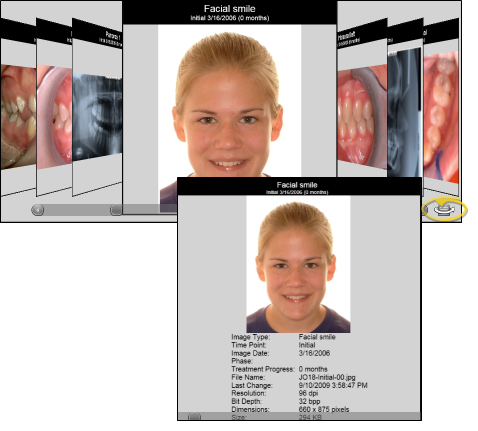
![]() Card Flow Layout - The card flow layout type is an attractive presentation tool. One image is positioned in the center of the screen clearly labeled with the image type, timepoint and date. Click
Card Flow Layout - The card flow layout type is an attractive presentation tool. One image is positioned in the center of the screen clearly labeled with the image type, timepoint and date. Click  Over to see a smaller version of the image along with the image details, and the age of the patient at the time the image was taken. You can also click an image that comes "before" or "after" the current image to bring that image to the foreground, or use the scroll bar at the bottom of the window to move forward and backward through the series of images.
You can enable / disable the image reflection option in your General Imaging settings. .
![]() Card Flip Layout - The card flip layout type presents one image in the center of the screen clearly labeled with the image type, timepoint, and date. Click the arrows at the top and bottom of the image to scroll through additional images in this timepoint. Click the arrows on either side to view the "previous" and "next" timepoint.
Card Flip Layout - The card flip layout type presents one image in the center of the screen clearly labeled with the image type, timepoint, and date. Click the arrows at the top and bottom of the image to scroll through additional images in this timepoint. Click the arrows on either side to view the "previous" and "next" timepoint.
.png)
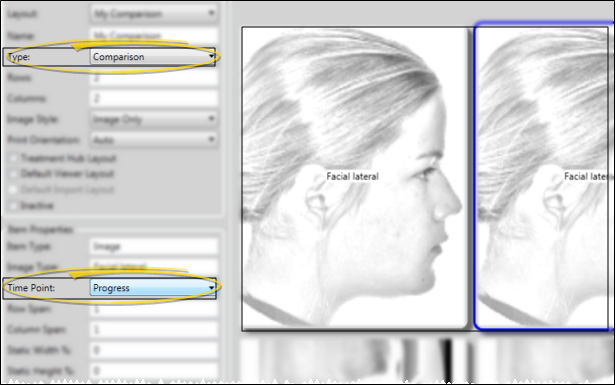
![]() Comparison Layout - The comparison layout type provides a way to view multiple image types from multiple timepoints simultaneously.
Comparison Layout - The comparison layout type provides a way to view multiple image types from multiple timepoints simultaneously.
Comparison Layout Type vs. Compare Images Feature - Use the Comparison layout type to view specific image types from multiple time points for an individual patient in a set format. You might use this layout, for example, to showcase "before" and "after" images during patient progress evaluations. Use the Compare Images feature to select up to 5 image types and / or time points to view side-by-side. These images can from an individual patient or from multiple patients. You might use this feature to evaluate individual progress, or compare and contrast the outcomes of similar cases. This article describes using the Comparison Layout type: See "Compare Images" for details about comparing images instead.
When you drag an image type onto the grid of a Comparison layout, be sure to select the time point you want to display. Note that only default time points, and not unique time points created for an individual patient, work with this layout type.
If you include a logo in a Comparison layout, the logo caption will show the time point names, dates, and patient ages.
Rows / Columns - (Static & Comparison layouts only.) Enter the number of columns and rows you want in your layout. The layout grid at the right will change to reflect your settings.
![]() Group Orientation / Groups / Time Point Orientation - (Dynamic layouts only.)The Group Orientation, Groups, and Time Point Orientation settings are specific to the dynamic layout type. These setting determine how each set of images will be displayed on your screen.
Group Orientation / Groups / Time Point Orientation - (Dynamic layouts only.)The Group Orientation, Groups, and Time Point Orientation settings are specific to the dynamic layout type. These setting determine how each set of images will be displayed on your screen.
![]() Group Orientation - Choose whether the groups of images in your dynamic layout are displayed horizontally or vertically.
Group Orientation - Choose whether the groups of images in your dynamic layout are displayed horizontally or vertically.
Vertical group orientation.

Horizontal group orientation.
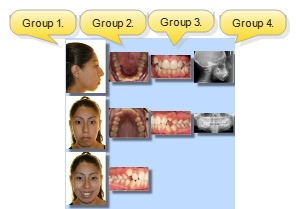
Groups - Enter the number of groups to include in your dynamic layout. You then drag the image types to include in each group onto the Layout Grid. When you view your dynamic layout, the groups will be arranged horizontally or vertically, depending on the Group Orientation setting described above.
![]() Time Point Orientation - When you view your dynamic layout with all time points simultaneously, choose whether time points appear horizontally (side-by-side) or vertically (one above the other).
Time Point Orientation - When you view your dynamic layout with all time points simultaneously, choose whether time points appear horizontally (side-by-side) or vertically (one above the other).
Example vertical time point orientation.
Example horizontal time point orientation.
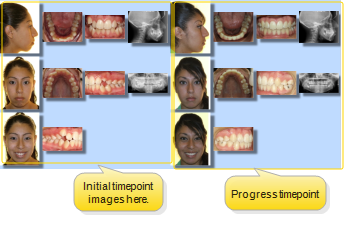
Image Style - (Static, Dynamic, Comparison and Image Print layouts only. The card flow and card flip layouts have their own image style.) Choose how your images will display in your layout: Choose the Image Only option to display the image with no caption. Choose the Image with Caption option to include a description of the image type at the bottom of the image. Choose the Image Card option, which includes both the image type label and the date the image was taken. Choose the Image Import Order option to include the image description and the import order number of that image type.
Print Orientation - (Not available for Image Print Layout.) You can choose whether an image layout will be printed in portrait (normal) or landscape (wide) mode, or you can auto select the orientation, which will print the layout according to the best aspect ratio.
Stretch to Fit - (Dynamic layout only.) Enable this option to equalize the width of all columns, regardless of image size. Disable this option to determine column width by the maximum width of the images in that column. (Caution: If a dynamic layout has both Stretch to fit and Equal row heights enabled, the proportions of some images may be distorted.)
Equal Row Heights - (Static and Dynamic layouts only.) Enable this option to equalize the height of your layout rows, regardless of the image sizes. Disable this option to determine row height by the maximum height of the images in that row. (Caution: If a dynamic layout has both Stretch to fit and Equal row heights enabled, the proportions of some images may distorted.)
First / Last Time Points Only - (Dynamic layout only.) Enable this option to include only the first and last time points in the display (ignoring any other time points) when you choose to show All Time points for a patient. This option is useful for presenting "before" and "after" images.
Portrait / Landscape Preview - (Static layout only.) Enable one of these options to see how your static layout will fit onto a standard 8.5" x 11" piece of paper when printed or copied to another application. The preview appears in the Layout Grid at the right of the window.
Default Viewer Layout - (Not available for Image Print Layout.) Choose the layout to view when you first open the . Only one layout can be selected: If you enable this option, the previously selected default is disabled automatically.
Default Import Layout - (Not available for Image Print Layout.) Choose the default layout to use when auto-importing images into a patient folder. Only one layout can be selected: If you enable this option, the previously selected default is disabled automatically.
Inactive / Active Toggle - Once you create a record, you cannot delete it. You can, however, flag it Inactive. Records you flag as Inactive are not available for general use, but they remain in your system for reporting and other data collection needs. In addition, you can toggle records back to Active whenever needed.
Use the Layout Grid at the right of the screen to format your imaging layout. You can drag and drop image types, logos, and captions onto the grid, and drag and drop to rearrange the items as needed.
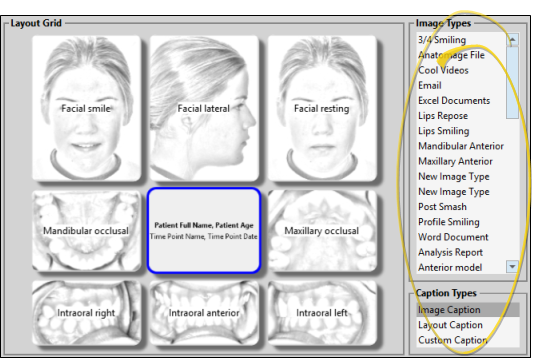
Add Images to the Layout - Click and drag an item from the Image Typeslist onto a cell of the Layout Grid. You can also drag an item that is already on the grid to another position. If an item is already in that position, it will "swap" positions with the item you are dragging. To remove an item, drag it off the Layout Grid and back onto the list. (The Analysis Report, Traced Lateral, Traced Lateral Ceph, Traced Lateral Photo, and Superimposition are image types associated with SmartCeph, part of the optional Premier Imaging package. See "Introduction to SmartCeph" for details.)
Add Your Logo to the Layout - If you have imported your logo file as an image type, you may drag it from the Image Types list onto the layout. When you view or print this layout for a patient, your logo will be included along with the information you have selected for your Logo Captions.
Logo Display Issues - If your image layout includes your logo as the only image in a column/row, you may have issues with images overlapping. To solve this issue, enable the Equal Row Heights option, then use the row span setting to force the interfering image to be bigger than your logo.
Add Captions to the Layout - Click and drag an item from the Caption Types list onto your Layout Grid to include descriptive text in the layout. The Image Caption lists the patient name, age, and image date. The Layout Caption lists the patient name, age, time point name, and time point date. The Custom Caption is a single line of the text of your choice. The Item Properties, described below, provide for choosing the caption font style, among other properties. The caption text size is determined automatically, according to the space allotted to it.
Click to select an item in the Layout Grid, then set up the Item Properties for that item. The properties available depend upon the type of layout and type of item you are editing.
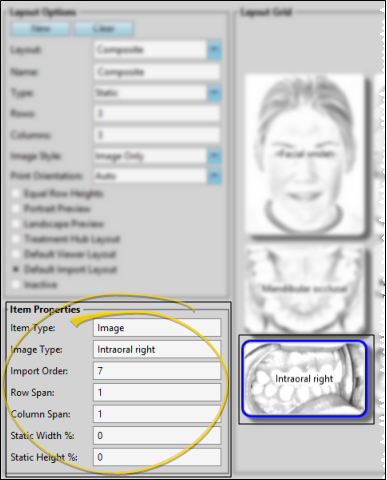
Item Type / Image Type / Import Order - This field displays the type of item you are working with, and cannot be changed. Images and logos also show you the Image Type, and images show the Import Order of the item.
Row / Column Span - Static layouts only. Row span not available for custom or layout captions.) This is the number of row / column cells to reserve for this item. Generally, this number is "1". However, larger images, such as your logo or an image you want as the "focus" of the layout, may have a row and/or column span of "2" or more.
Static Width / Height % - Use this option to set an item to a static size, regardless of its original file size or resolution. To use this option, set the width and/or height to a percentage of the area available. This is particularly useful for assuring that all the images in a static layout look similar, and to set the size of custom captions. If you leave these values at 0, an image will default to its original resolution, with large images shrinking to fit within the allotted cell size, and custom captions will appear as large as possible to fit the cell.
Font - (Logo and custom captions only.) Select the font style to use when displaying and printing your custom caption.
Text alignment - (Logos and custom captions only.) Select the position of your custom caption within its cell: Left, Right, Center, or Justifiy. Note that unless you adjust the Static Width and Static Height values, your custom caption will be as large as possible, and thus appear to be centered, regardless of the text alignment setting.
Custom Text - (Custom captions only.) Type the text to appear in your custom caption. Note that the text will appear as a single line, shrinking as necessary to fit the cell.
Enable Caption - (Logos only.) Enable this option to include your Logo Caption in the cell along with your logo graphic. (Use your Imaging Captions options to set up the optional caption contents. See "Image Captions Options" for details.)
Click