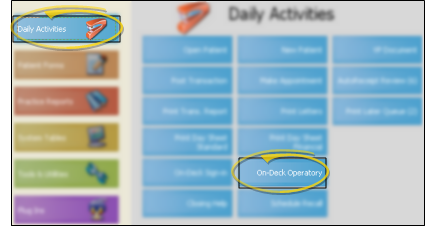
ViewPoint main menu > Daily Activities > On-Deck Operatory >  Properties.
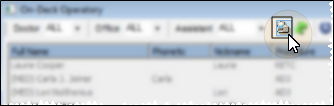
Open your Operatory Display.
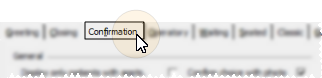
Open your On-Deck Properties.
Use the Closing tab of your Sign-In editor to set up the messages and optional image your patients see as they complete the patient sign-in process.
ViewPoint main menu > Daily Activities > On-Deck Operatory > Properties.
Open your Operatory Display.
Open your On-Deck Properties.
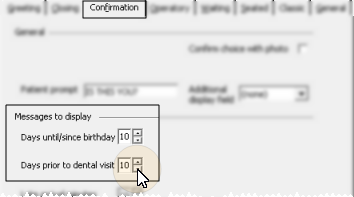
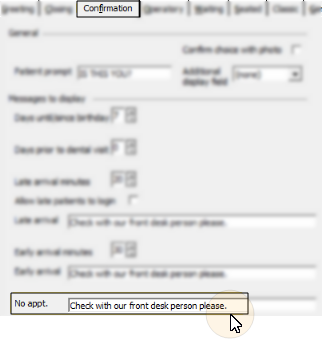
Open Confirmation tab - Click to open the Confirmation tab of your On-Deck properties. Note that the settings available will be different, depending on whether you have enabled the Classic or Contemporary greeting style.
Appointment today - (Classic style only: This feature is always enabled for the Contemporary style.) Enable the  Display Only Patients with Appointments option to include only patients with appointments
scheduled for that day on the patient list. This property often shortens
the list of names, making it easier for your patients to find their name. Otherwise, all
patients whose name matches the searched name are included in the list.
Display Only Patients with Appointments option to include only patients with appointments
scheduled for that day on the patient list. This property often shortens
the list of names, making it easier for your patients to find their name. Otherwise, all
patients whose name matches the searched name are included in the list.
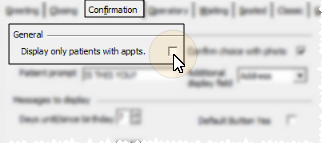
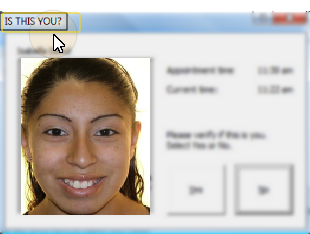
Patient photo
Enable patient photo option.
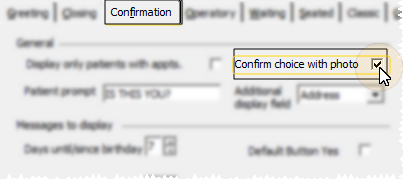
Patients view the photo as they sign in.
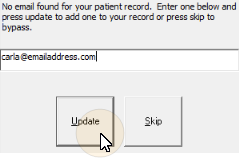
Prompt for missing email - (Classic style only.) Enable this option if you want the sign-in system to prompt patients to provide you with their email address, if one is not already recorded in their ViewPoint patient folder. If they choose to enter an address, the Email1 field of their ViewPoint patient folder is updated automatically.
Enable the prompt for email option.
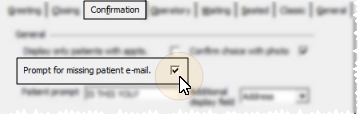
Patients view the prompt as they sign in, and can optionally update their information.
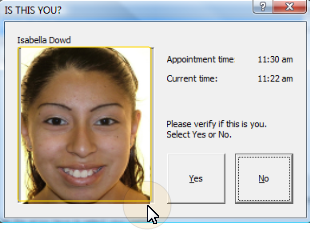
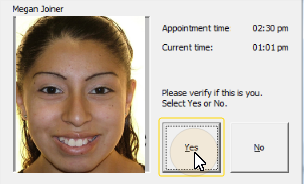
Patient confirmation prompt - Type a message that prompts your patients to confirm that the displayed information is theirs. We recommend the default prompt Is this you or something similar.
Type your patient confirmation prompt.

Patients view the prompt at the top of the confirmation window as they sign in.
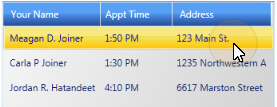
Additional confirmation display field- You can display an additional field of information in the list of matching names that appears after the patient types his or her name into the Patient Sign-In prompt. Select Address, Birthday, Phone number, or None. This setting helps avoid the confusion that could result from multiple patients with identical or similar names.
Select the additional field to display.
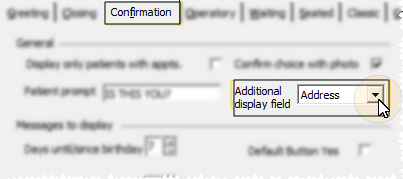
Patients see the additional information if the name they type matches multiple patients.
Confirmation button default - (Classic style only.) Check the Default Button Yes option to enable YES as the default response to
the confirmation screen. Then, if the
displayed information is correct, the patient can just press Enter to sign
in. Otherwise, NO is the default response, and the patient
is required to click the Yes button to sign in.
Enable the Default Button Yes option.
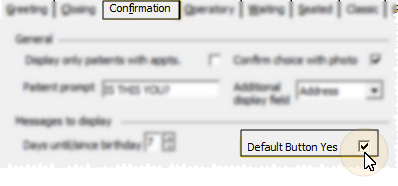
Patients can simply press Enter to sign in.
Messages to display - Use the bottom section of the window to define how special messages appear as a patient confirms the sign-in process.
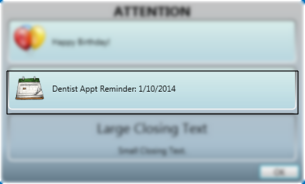
Birthday notice - Enter the number of days until / since the patient's birthday to include a special birthday message. Setting the number of days to 0 disables the message.
Set up birthday threshold.
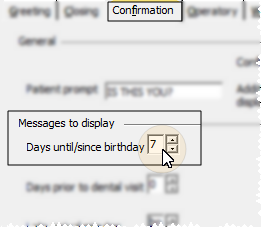
Patients view the birthday message when they sign in.

Dental visit - Specify the number of days before a dental visit is due
to display a reminder message . To disable the message, set this option to
0 (zero).
The message includes the dental visit date suggested on the Milestones
Set up dental visit reminder threshold.
Patients view the reminder when they sign in.
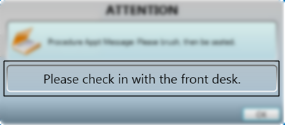
Late arrival options - Specify the number of minutes after the scheduled appointment time you consider a patient late. This field works in conjunction with the Late Arrival message, and whether you Allow late patients to sign in. To disable the late message, set the number of minutes to 0 (zero). Setting the late arrival minutes to 0 also enables late patient sign in.
Set up late arrival login option, minutes, and message.
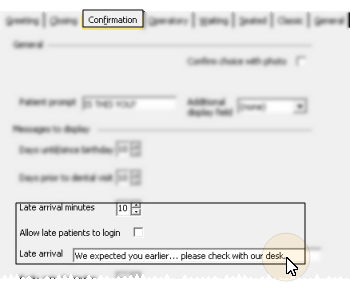
Patients view the notice when they try to sign in.
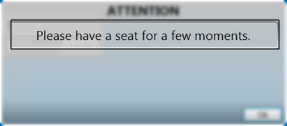
Early arrival - Specify the number of minutes before the scheduled appointment time you consider a patient early. This field works in conjunction with the Early Arrival message. To disable the message, set the number of minutes to 0 (zero).
Set up early arrival login options, minutes, and message.
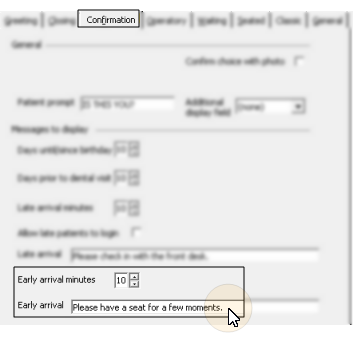
Patients view the notice when they try to sign in.
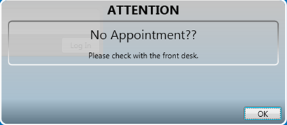
No appointment
Type your no appointment message.
Patients view the message when they attempt to sign in.
Save - Click Ok at the bottom of the properties window to save your changes.
 │
│  │
│  │
│ 
Ortho2.com │1107 Buckeye Avenue │ Ames, Iowa 50010 │ Sales: (800) 678-4644 │ Support: (800) 346-4504 │ Contact Us
Chat with Software Support │Chat with Network Engineering │ Chat with New Customer Care
Remote Support │Email Support │ Online Help Ver. 12/18/2015


