Burn Patient ID Label Onto Images
You can improve the accuracy and security of your patient images by burning an identification label directly onto the image when it is first imported into VP Imaging. Once burned, the label cannot be removed, and will appear with the image whenever you view, copy, merge, or print it. By default, the image date is the timepoint date (usually the date it was imported into the patient folder). However, you can modify the date of individual images if needed.
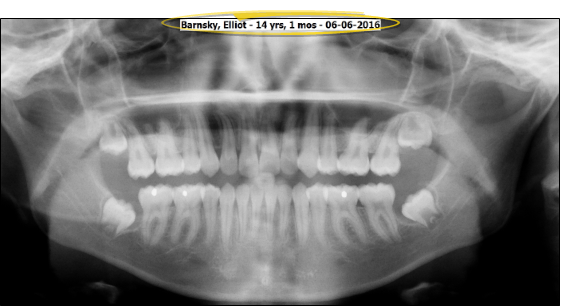
Permanent Label - Once the Patient ID Label has been burned onto an image, it becomes permanent and cannot be removed: Only the image date can be changed. The label will be included whenever you view, copy, merge or print the image
Get Started
Specify Images To Label - By default, no images are burned with the identification label. To both select the image types that should include the label, and burn existing images with the label, use the BurnImages.exe utiltiy (found where your ViewPoint files are located, i.e. C:/Program Files /ViewPoint). To only burn new images with the label, edit the [BurnInfoIntoImage] section of your advanced settings file. Please feel free to contact Ortho2 support for assistance with either of these options.
Once the label has been burned onto an image, it becomes permanent and cannot be removed, even if you later remove that image type from your settings.
Choose Date Format - You can use either the American date format (mm/dd/yy) or the standard date format (yyyy/mm/dd) on your ID labels. VP Imaging defaults to using the Standard format. To change the format, edit the [AmericanDate] section of your advanced settings file.
Use This Feature
![]() Burn Label During Import - The identification label is automatically burned onto the image as soon as you import the image, and click Save or Save & Exit from the VP Imaging Editor.
Burn Label During Import - The identification label is automatically burned onto the image as soon as you import the image, and click Save or Save & Exit from the VP Imaging Editor.

Burn Additional Images - If you decide to burn another image type with the Patient ID label, you can use the BurnImages.exe utiltiy (described above) to burn the label onto all existing patient images with that image type. Or, use the [BurnInfoIntoImage] section of the advanced settings file to choose which image types to burn with the label, then burn the existing images for individual patients by opening the patient's Image Editor for the timepoint you want to work with, and clicking Save & Exit.
![]() Change Burn In
Date - By default, the date on the image ID label is the timepoint date. If this is not the date the image was actually take, you can modify the date by right-clicking the image in the Image Editor. (See "Edit Patient Images" for details.)
Change Burn In
Date - By default, the date on the image ID label is the timepoint date. If this is not the date the image was actually take, you can modify the date by right-clicking the image in the Image Editor. (See "Edit Patient Images" for details.)
More Information
Include Orthodontist / Practice Name on Images - You can include either your practice name or the name of the orthodontist assigned to the patient on your patient images. This label can be added, changed, or removed from the image at any time. See "Include Orthodontist or Practice Name on Images" for details.
Include Panorex Orientation Label on Images - You can include an orientation label (i.e. "L" or "R") on specific images (such as your panorex images) to improve the accuracy of your patient images. This label can be added, changed, or removed from the image at any time. See "Include Panorex Orientation Label on Images" for details.