ViewPoint / Vanco Integration
Use the ViewPoint / Vanco integration to process credit card transactions, as well as automate credit card and electronic fund transfers through Auto Receipts.
Watch the movie. (Windows Media Player, an active Internet connection, and a valid Ortho2 customer login are required to run video tutorials, webinars, and training programs.)
 Confirm ViewPoint Version - The ViewPoint / Vanco integration requires ViewPoint 6 or greater (processing Vanco transaction by office, rather than by orthodontist, requires ViewPoint 6.0.4300 or greater). If you are unsure of your ViewPoint version, select Help from the ViewPoint shortcut menu and choose the About option to open your system information window. If necessary, please contact Ortho2 for update assistance.

Obtain Integration ID & Required Components - Contact Vanco to set up your account, and to obtain and install any required components. If you want Vanco to track transactions individually by office or orthodontist, be sure to get a separate ID for each.
Enter Vanco Credentials - Choose to complete the Vanco credentials fields in either your Orthodontist table or your Office table, depending upon whether you want to post Vanco transactions by orthodontist or by office.
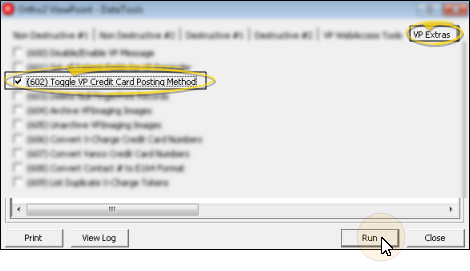
Posting Method Toggle - If the integration fields are not available in the table you want to edit, you will need to run Data Tool (602) - Toggle ViewPoint Credit Card Posting Method to toggle whether your system posts credit card payments by orthodontist or office. See "Use Data Tools" for details about running the tool.
Option 1: Set Up Vanco for Each Orthodontist - Skip this step if you will be tracking Vanco transactions by office. Complete the Vanco fields of your Orthodontist table and verify your credentials if you use the Vanco credit card processing integration, and separate your receipts by orthodontist. (See "Orthodontist Table" for details.)
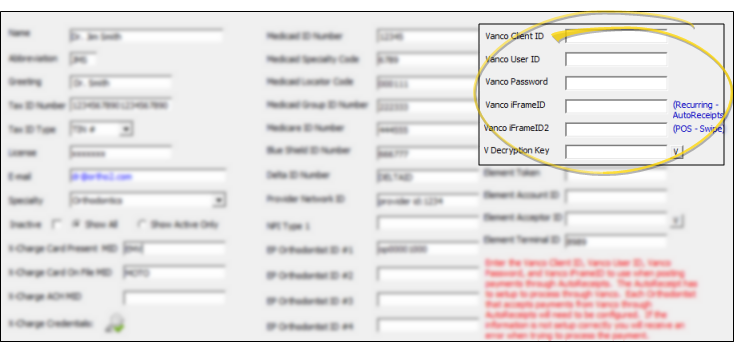
iFrame Fields - If you have obtained different merchant ID numbers from Vanco for different types of sales, enter the appropriate code in each iFrame field. If you have only one merchant ID number, enter it into all iFrame fields.
Vanco iFrame ID - Enter the number for MOTO (mail order / telephone order) transactions in this field. It will be used to process recurring credit card transactions (Auto Receipts), and transactions that are posted without the credit card being swiped (using the credit card details that have been saved in the responsible party record).
Vanco iFrame2 ID -Enter the number for POS (point of sale) transactions in this field. It will be used to process transactions when the credit card is swiped.
Verify Data - After entering the credentials, click the V button to verify that you have entered the correct data.
Repeat for Each Orthodontist - If you have multiple doctors, be sure to complete the fields for each orthodontist record. Typically, this will be the same information for each orthodontist. However, you may have requested and received unique IDs for each doctor if your practice separates bookkeeping by orthodontist.
Option 2: Set Up Vanco for Each Office - Skip this step if you will be tracking Vanco transactions by orthodontist. Complete the Vanco fields of your Office table and verify your credentials if you use the Vanco credit card processing integration, and separate your receipts by office. (See "Office Table" for details.)
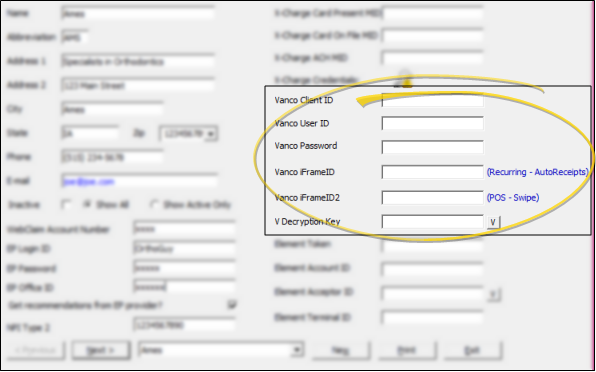
iFrame Fields - If you have obtained different merchant ID numbers from Vanco for different types of sales, enter the appropriate code in each iFrame field. If you have only one merchant ID number, enter it into all iFrame fields.
Vanco iFrame ID - Enter the number for MOTO (mail order / telephone order) transactions in this field. It will be used to process recurring credit card transactions (Auto Receipts), and transactions that are posted without the credit card being swiped (using the credit card details that have been saved in the responsible party record).
Vanco iFrame2 ID -Enter the number for POS (point of sale) transactions in this field. It will be used to process transactions when the credit card is swiped.
Verify Data - After entering the credentials, click the V button to verify that you have entered the correct data.
Repeat for Each Office - If you have multiple offices, be sure to complete the fields for each office record. Typically, this will be the same information for each office. However, you may have requested and received unique IDs for each office if your practice separates bookkeeping by location.
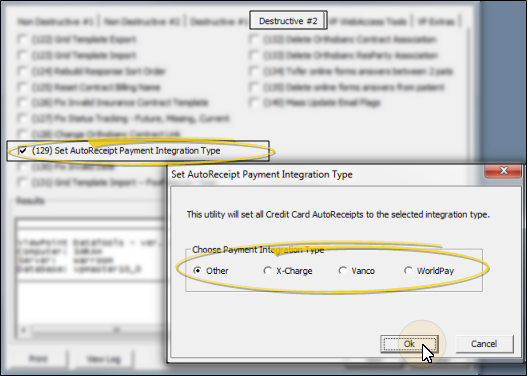
Set Auto Receipt Integration Type - (Optional.) Use Data Tool (129) - Set Auto Receipt Payment Integration Type to set all existing auto receipt credit card payments to your new integration. If you do not use this tool, you will need to confirm the appropriate payment type is selected for each account before posting auto receipts. See "Use Data Tools" for details.
Integration Support - Ortho2 can help you with questions you have about system requirements, integration setup, and using your integrations within our system. However, you will need to contact the third-party supplier for specific details about using the integrated module.