ViewPoint / OrthoBanc Integration
With the ViewPoint / OrthoBanc integration, you access OrthoBanc's state-of-the-art system which provides patient credit risk assessment in just seconds. After you create payment plans, they are submitted from ViewPoint to OrthoBanc. OrthoBanc collects payments, manages credit card expiration dates and NSF/failed payment follow-up. Deposits are downloaded from OrthoBanc and posted directly in your ViewPoint patient ledgers. The responsible party's payment method (credit card, debit card, or bank account) is handled from within OrthoBanc's processing center, assuring the most secure account protection.
Watch the movie. (Windows Media Player, an active Internet connection, and a valid Ortho2 customer login are required to run video tutorials, webinars, and training programs.)
Integration Support - Ortho2 can help you with questions you have about system requirements, integration setup, and using your integrations within our system. However, you will need to contact the third-party supplier for specific details about using the integrated module.
In general, you use this process to integrate a ViewPoint patient contract with OrthoBanc:
-
Create the ViewPoint contract in the Contract tab of the patient folder. Tell me more.
-
Get credit recommendation from OrthoBanc Optional. This is an extra service provided by OrthoBanc for an additional fee. Tell me more.
-
Submit the patient's biographical data and payment plan information to OrthoBanc. Tell me more.
-
Add the payment method the responsible party will use to pay OrthoBanc. Tell me more.
-
Submit a signed Recurring Payment Plan document to OrthoBanc. Tell me more.
-
Apply deposits responsible parties have made to OrthoBanc to their ViewPoint contract. Tell me more.
You can also link ViewPoint patients to existing OrthoBanc accounts, update or replace payment methods, and track your OrthoBanc patient progress via ViewPoint reports.
Activate OrthoBanc Integration - Select Tools & Utilities from the ViewPoint main menu. Then choose the Electronic Payment Integration option. Enable the OrthoBanc integration and click Ok.
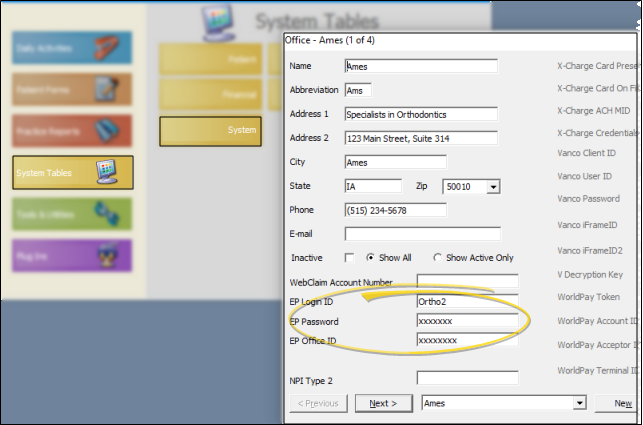
Enter Office Identification Data - Select System Tables from the ViewPoint main menu. Then from the System tab, open the Office table. Enter the identification data from OrthoBanc into the EP fields of each location's record.
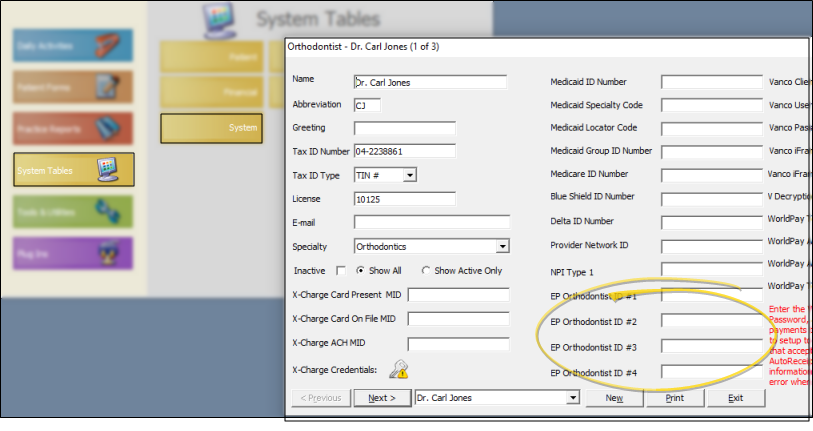
Enter Orthodontist Identification Data - Select System Tables from the ViewPoint main menu. Then from the System tab, open the Orthodontist table. Enter the identification data from OrthoBanc into the EP fields (up to 4 per doctor) of each doctor's record.
Create OrthoBanc Contract Class - (Optional.) Select System Tables from the ViewPoint main menu. Then from the Financial tab, open the Contract Class table. Create an OrthoBanc contract class, then assign that class to your OrthoBanc patient contracts so that you can easily subgroup patients that are using OrthoBanc.
 Confirm Patient Folder Data - OrthoBanc uses certain biographical data and payment structure information from the ViewPoint patient folder to create recommendations and payment plan documents. Be sure the information on the Patient, Responsible, and Contract tabs of the patient folder is information is complete before you attempt to set up a patient account for OrthoBanc payments. Specifically, OrthoBanc uses the following information from the ViewPoint patient folder:
-
Patient Tab - Patient first name, last name, and birthdate.
-
Responsible Tab - Responsible party first and last name, street address, city, state, and zip code, phone number, and social security number.
-
Contract Tab - Contract payment plan.
Additional Fee Applies - (Optional.) This is an extra service provided by OrthoBanc for an additional fee.
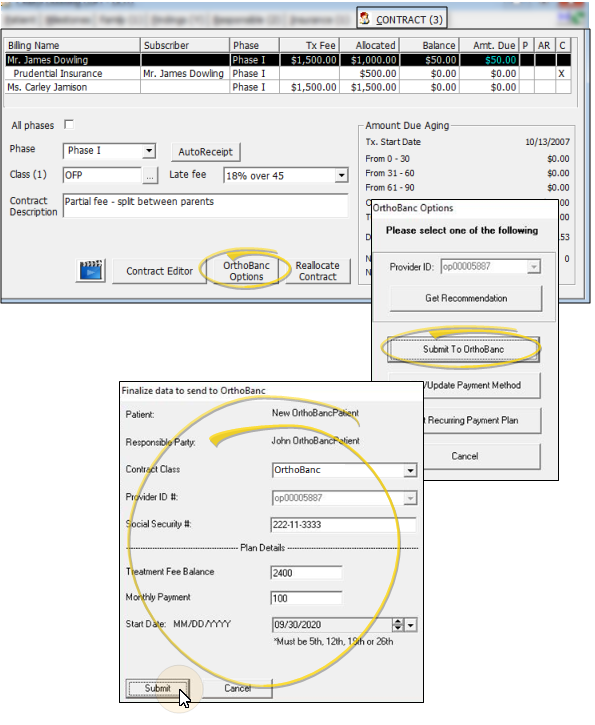
You can optionally obtain a credit recommendation from OrthoBanc before committing to a patient's contract. Open the Contract tab of the patient folder, and click the OrthoBanc Options button. Then select the Get Recommendation option. During the Get Recommendation process, your system contacts OrthoBanc with biographical and contract data from the ViewPoint patient folder. OrthoBanc performs a credit check and prepares a credit recommendation. The recommendation will be displayed on your screen,
To create a patient's OrthoBanc account, you first submit the patient data and payment plan to OrthoBanc. This information comes from the patient's ViewPoint patient folder. Open the Contract tab of the patient folder, and click the OrthoBanc Options button. Then select the Submit to OrthoBanc option. Be sure the information is correct before you click Submit.
During the submission process, ViewPoint will contact OrthoBanc and add the patient and the responsible party to the OrthoBanc database. The account will not be active until you add a payment method, and submit a signed Recurring Payment Plan document to OrthoBanc, described below.
Due Date Choices - Responsible parties must choose from specific days of the month for their OrthoBanc payment due date.
The responsible party can choose to make their recurring payments to OrthoBanc via credit card, debit card, or bank account. You use the Add / Manage Payment Method option to create the initial payment method, as well as to manage changes to the payment method, such as updating credit card expiration dates, as the contract progresses.
Open the Contract tab of the patient folder, and click the OrthoBanc Options button. Then select the Add / Manage Payment Methods option. The OrthoBanc-hosted payment account window opens in your default browser. Enter or edit the payment method details (credit card, debit card, or bank account information). This secure window has timer and is pci compliant for your responsible party's identity and financial safety.
The patient's OrthoBanc account will not be active until OrthoBanc receives and accepts the Recurring Payment Plan document. Open the Contract tab of the patient folder, and click the OrthoBanc Options button. Then select the Get Recurring Payment Plan option. You then ask the responsible party to sign it via paper, or preferably electronically. The document must be returned to OrthoBanc before the contract is finalized.
Important - Because the document itself does not contain signatures, it is not saved to the patient's correspondence history. We highly recommend that, once signed, you scan or capture the completed document to the correspondence history for future reference.
If you notice an error after the patient data has been submitted to OrthoBanc, but before the Recurring Payment Plan document is signed and returned, correct the contract in ViewPoint, but do not resubmit. Log into the OrthoBanc website, make the corrections there, and print the corrected Recurring Progress Payment Plan. If you notice an error in the plan after the document is signed and returned, log into the OrthoBanc website, and fill out a request to make a change.
You can use the Add / Manage Payment Methods option, described above, to update or change the payment method at any time.
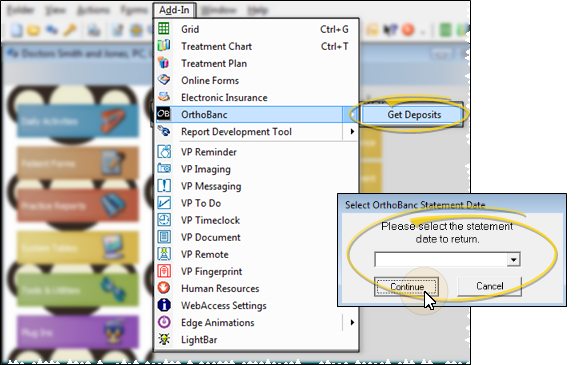
Use the Get Deposits feature to download OrthoBanc deposits into ViewPoint patient ledgers, and to link existing OrthoBanc patient accounts with ViewPoint.
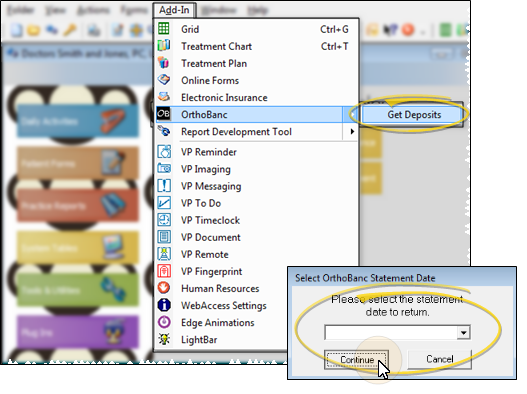
Open the Add-In section of the ViewPoint shortcut menu and select the OrthoBanc option. (You can press Alt+D on your keyboard to open the Add-In menu options.) Then choose Get Deposits.
Download Deposits - Select the OrthoBanc statement date you wish to download, and click Continue. The deposit information from OrthoBanc will be downloaded and posted to your ViewPoint patient ledgers.
Be sure to refer to the deposit schedule provided by OrthoBanc so that you download deposits only for the appropriate days.
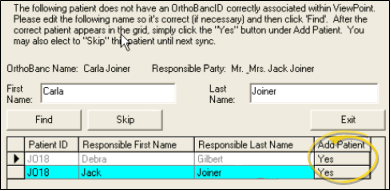
Link Patient Accounts - If OrthoBanc has received a payment from a patient who has not yet been linked to ViewPoint, you will see a Verify Patient window. If the appropriate patient / responsible party records are listed in the window, click Yes to link the accounts. You can also type the correct patient first and last names, and click Find to locate the appropriate patient, or, if the patient folder does not yet exist in ViewPoint, click Skip to wait until the next time you choose Get Deposits to link the patient and download the payment.
OrthoBanc Patient List - Run an OrthoBanc Patient List to obtain a list of patients in your ViewPoint system that you have set up with OrthoBanc accounts. The report includes the patient name, ID. NO, and responsible party name for each contract that you have set up for OrthoBanc payment collection. See "OrthoBanc Patient List" for details.
OrthoBanc Transactions - Run the OrthoBanc Transactions report to obtain a list of payments collected via OrthoBanc for any range of dates or Transaction reports. The report includes the patient name, ID. NO, responsible party name, and payment amount. See "OrthoBanc Transactions Report" for details.
OrthoBanc Subgroup - If you have created an "OrthoBanc" contract class, you can generate financial, patient, treatment, and other relevant reports exclusively for patients with OrthoBanc accounts.