Image Morphing
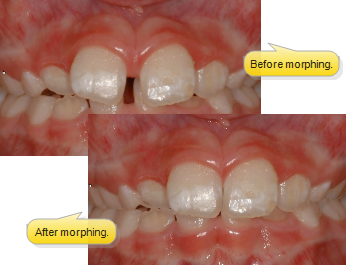
Use Image Morph tools to cosmetically manipulate images. This feature is especially useful for cleaning up patient photos, sharpening the details of x-ray images, and showing patients the potential results of orthodontic treatment.
Premier Imaging Required - .This feature is a part of the Premier Imaging add-on module to Edge Imaging. Please contact Ortho2 for further information.
Image Morph vs. Time Point Morph - This article describes the use of Image Morph tools, which give you a way to clean up and enhance an individual image. You may also want to explore using Time Point Morph tools to create an animated presentation of the changes among two or more images. See "Time Point Morph" for details.
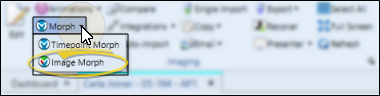
Open Image Morph Tools - Select an image > Imaging ribbon bar > Imaging section >  Morph >
  Image Morph.
 Image Morph Actions - Select a tool from the Actions section of the Morph ribbon bar to visually enhance the entire image, as well as undo and reapply changes you have made to the image.
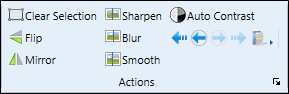
 Clear Selection - Use the Clear Selection tool, or simply click somewhere in the image window to reset your cursor's selection.
 Flip - When you "flip" an image, you turn it on its horizontal axis. (Think upside down.) You can choose to flip certain image types as they are first imported into a patient record. (See "Image Types Options" for details.)
 Mirror - When you "mirror" an image, you turn it on its vertical axis. (Think of looking in a mirror.)
 Sharpen - Use Sharpen to enhance the clarity of the image, or the currently selected area. Each time you click Sharpen, the image is affected further.
 Blur - Use Blur to soften the entire image, or the currently selected area. Each time you click Blur, the image is softened further.
 Smooth - Use
  Smooth to smooth the image, or the currently selected area. Each time you click Smooth, the image is affected further.
 Auto Contrast - Use Auto Contrast to automatically correct poor contrast by adjusting shadows and highlights for the selected image while preserving image detail and color balance.
 Undo Use the Undo Last and Undo All tools in the Actions section of the Edge Imaging ribbon bar to reverse un-saved changes you have made to the image. You can use the
  Undo Last Action icon (or press Ctrl+Z on your keyboard ) repeatedly to reverse changes one at a time, or use the
  Undo All Actions icon to reverse all changes at once. After you save changes or exit editing mode, you cannot undo your actions. You can, however,
  Restore the image to its original state if needed.
 Redo Use the Redo Last and Redo All tools in the Actions section of the Edge Imaging ribbon bar to reapply un-saved changes you have made to the image, after using the Undo actions described above. You can use the
  Redo Last Action icon (or press Ctrl+Y on your keyboard ) repeatedly to reapply changes one at a time, or use the
  Redo All Actions icon to reapply all changes at once. After you save changes or exit editing mode, you cannot redo your actions. You can, however, Restore the image to its original state if needed.
 Changes History Use the History tool in the Actions section of the Edge Imaging ribbon bar to review the un-saved changes you have made to an image. You can also click in the history list to return to a specific point in the editing trail.
Image Morph Tools - Choose an icon from the Tools section of the Morph ribbon bar to adjust a portion of the image.
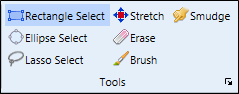
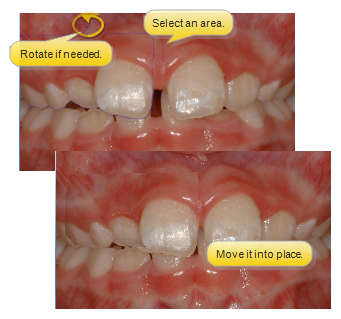
Select, Move, and Rotate an Area - Use the  Rectangle,
  Ellipse, and
  Lasso (free-hand) selection tools to outline an area of the image you want to move and/or rotate independently from the rest of the image. These tools are especially useful for showing the potential for straightening and realigning teeth.
Enable a selection tool, then draw around the area you want to work with. You can then click inside the selected area and drag it to a new location, and use the rotate handle at the top of the selection to rotate the area. (After moving and rotating an area, you will likely want to smudge or brush away rough edges, described below.)
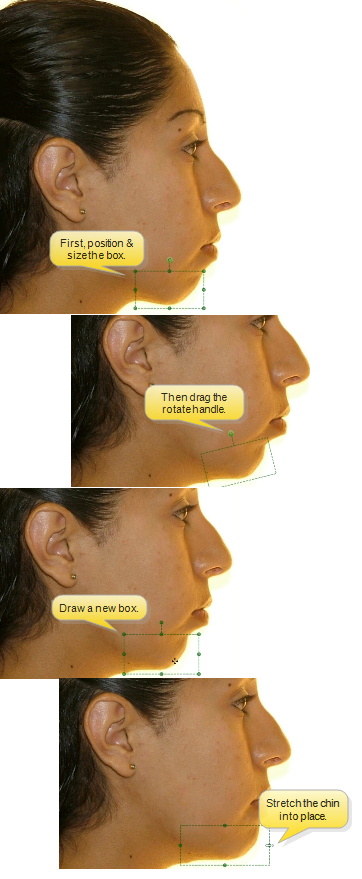
 Stretch - Use the Stretch tool to elongate a portion of the image, such as the chin.
Enable Stretch, then draw a box around the area you wish to work with. You can click inside the box and drag it to a new location, and use the corner handles to resize the box. Once the box is in the optimal position, use the side, top, and bottom handles to stretch the area.
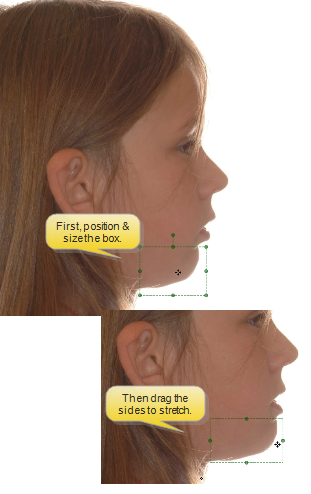
Rotate and stretch by clicking and dragging the rotation handle at the top of the Stretch box, bringing a portion of the image into a better position.
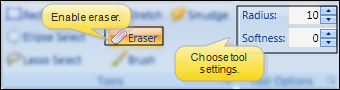
 Erase - After moving an area, you can use the Erase tool to remove parts of the area, exposing the original image underneath, providing you with a way to trim away any excess from the moved area. Enable
  Erase, and select the radius (width) and softness (transparency) of the tool. Then, click and drag to "erase" portions of an area that has been moved.
 Brush - Use the Brush tool to add free-hand "painting" to the image, for example, to touch up a photograph.
Enable Brush, and select the radius (width) and softness (transparency) of the tool. Right-click in the image to activate the current cursor location as the brush color (When in Edge Imaging, you can also click the color selector to choose a color: The color selection palette is not available in Edge Animations.) Click and drag to "paint" the image. Each time you release your mouse button, you begin another "layer" of paint.
 Smudge - Use the Smudge tool to soften harsh lines and blend different areas of the image. It is especially useful for smoothing lines around a moved section. To use this tool, enable Smudge, and select the radius (width) and pressure (movement) of the tool. Then click and drag the tool over the area you want softened.

Image Morph General Options - Choose a tool from the General section of the Morph ribbon bar to save, export, or display your morphed and original image.
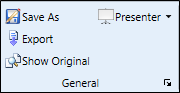
 Save As - Click Save As to save the changed image (including the Show Original silhouette, if enabled as described below) to an image type and timepoint. Any existing image will be replaced by your morphed image. Therefore, you might want to save morphed images to a special timepoint created just for presentation purposes.
 Export - Click Export, then enter the location and filename to save the morphed image as a .JPG file.
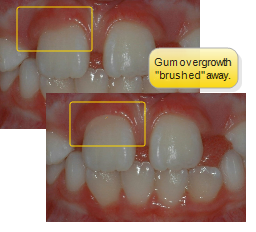
 Show Original - Use Show Original along with image morphing tools to display / hide a silhouette of the original image onto your morphed image.
If you save your changes with the Show Original option enabled, the silhouette is saved also, providing you with a "before" and "after" view in a single image.
 Presenter - Use the Presenter to duplicate whatever is currently being shown on your Edge Imaging or Edge Animations screen onto a secondary monitor. This feature is particularly useful for showing patient images to parent and professionals, as well as presenting case, compliance, and treatment progress information. See "Presenter" for details.
Print - Click Print from your File ribbon bar or Quick Access toolbar (or press Ctrl+P on your keyboard) to print a copy of the current screen contents. This provides a way to print a copy of the currently displayed morphed image, without having to save it.